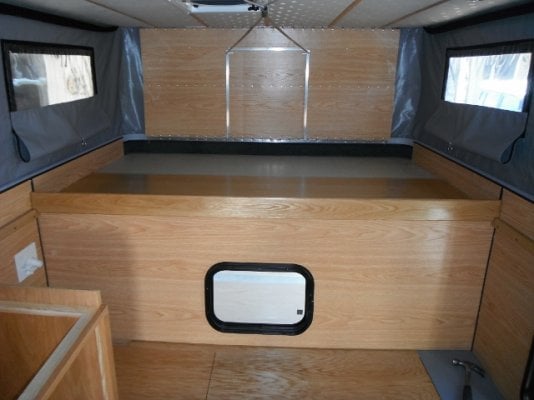
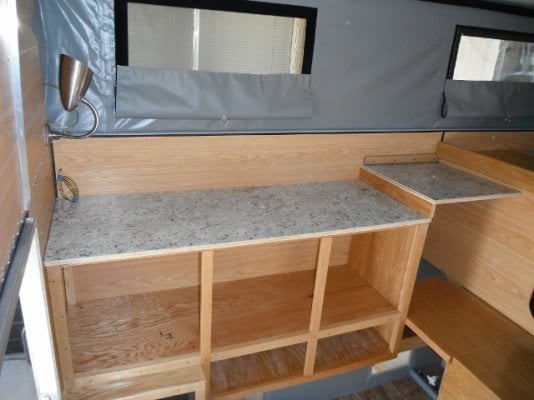
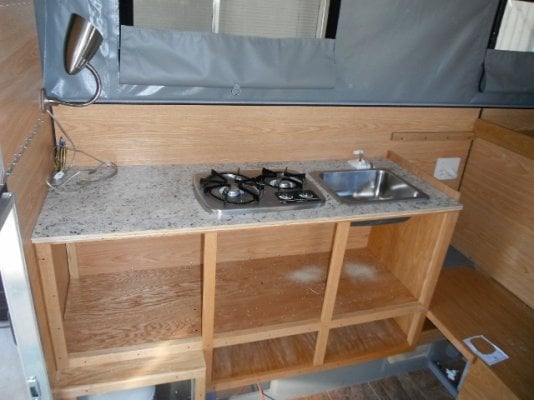
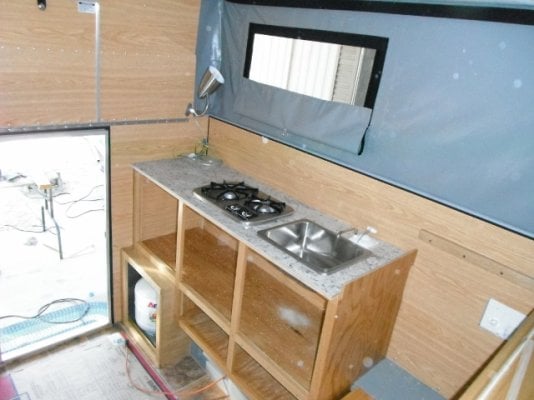
New ATC Ocelot Shell Buildout

A couple coats clear urethane bring out the grain of the oak and matches the camper paneling. Next I built a funky shelf to hold whatever, in the space below the refer.
 

Attachments

  • DSCF1367 (640x480).jpg
    DSCF1367 (640x480).jpg
    217.9 KB · Views: 509
  • DSCF1369 (640x480).jpg
    DSCF1369 (640x480).jpg
    223.6 KB · Views: 524
A refer shelf for the Engle45 that ties into and is supported by the two sides of the water tank box.
 

Attachments

  • DSCF1370 (640x480).jpg
    DSCF1370 (640x480).jpg
    204.2 KB · Views: 528
  • DSCF1371 (640x480).jpg
    DSCF1371 (640x480).jpg
    222.6 KB · Views: 542
Adding the top for the water tank box, then building the bed slide and side supports.
 

Attachments

  • DSCF1372 (640x480).jpg
    DSCF1372 (640x480).jpg
    205.5 KB · Views: 528
  • DSCF1373 (640x480).jpg
    DSCF1373 (640x480).jpg
    210.7 KB · Views: 544
How did you attach the cabinet frame to the camper? Did you screw into the aluminum frame studs or the wood wheel well or both?
 
Texan, At this stage I have two screws holding the face frame to the rear wall up by countertop level to keep it plumb. The top 1x2 framing at countertop level is just floating at this stage. The 1/2" plywood is screwed to the floor pack. If I take out the screws from the plywood and those two other screws, I can lift this section out as a unit. The vertical section of plywood is off the side wall by an 1/8".
 
Countertops are built out of quality plywood and Formica. In these pictures the plywood edges are still raw. I will finish the edges with 1/4" oak. Tops are temporarily in place.
 

Attachments

  • DSCF1374 (640x480).jpg
    DSCF1374 (640x480).jpg
    223.6 KB · Views: 565
  • DSCF1375 (640x480).jpg
    DSCF1375 (640x480).jpg
    222.7 KB · Views: 560
Made the cutouts for the stove, sink, and faucet and dropped them into place.
 

Attachments

  • DSCF1377 (640x480).jpg
    DSCF1377 (640x480).jpg
    227.5 KB · Views: 632
  • DSCF1378 (640x480).jpg
    DSCF1378 (640x480).jpg
    222.7 KB · Views: 628
Started running 12v wiring. The water tank fill and vent lines are installed. 12v receptacle in corner above fill tubing is for the Engle45. Another view of the funky shelf.
 

Attachments

  • DSCF1379 (640x480).jpg
    DSCF1379 (640x480).jpg
    243.8 KB · Views: 618
  • DSCF1382 (640x480).jpg
    DSCF1382 (640x480).jpg
    234 KB · Views: 615
View of sink drain through cabinet floor to outside of camper.
 

Attachments

  • DSCF1404 (640x480).jpg
    DSCF1404 (640x480).jpg
    228 KB · Views: 535
  • DSCF1422 (640x480).jpg
    DSCF1422 (640x480).jpg
    150.9 KB · Views: 528
Reinstalled the refer shelf and added a double USB port receptacle at tank step area. Extra hole is for a standard 12v receptacle.
 

Attachments

  • DSCF1383 (640x480).jpg
    DSCF1383 (640x480).jpg
    223.8 KB · Views: 560
  • DSCF1384 (640x480).jpg
    DSCF1384 (640x480).jpg
    220.1 KB · Views: 533
Installed the ho-made slide for the Engle45 and the corner countertop.
 

Attachments

  • DSCF1385 (640x480).jpg
    DSCF1385 (640x480).jpg
    229.4 KB · Views: 599
  • DSCF1386 (640x480).jpg
    DSCF1386 (640x480).jpg
    240.2 KB · Views: 595
Thanks Bill I "completed" the interior about a month ago but didn't have time to post. Trying to do a Readers Digest version here for I have a great need to get out of town. It's that time of year to be dry roasted down here in Tucson.
 
Installed the water tank box lid with a piano hinge.
 

Attachments

  • DSCF1388 (640x480).jpg
    DSCF1388 (640x480).jpg
    225.7 KB · Views: 606
  • DSCF1389 (640x480).jpg
    DSCF1389 (640x480).jpg
    226.4 KB · Views: 616
Installed the Engle45 on the slide and attached a barrel bolt to keep it in place while traveling.
 

Attachments

  • DSCF1394 (640x480).jpg
    DSCF1394 (640x480).jpg
    218.9 KB · Views: 807
  • DSCF1395 (640x480).jpg
    DSCF1395 (640x480).jpg
    210.8 KB · Views: 800
The slide pulls out far enough to be able to plug the 12v cord to receptacle. Custom turnbuckles( turnbuckle and threaded rod cut to length and bending end into a hook) hold the Engle to the slide. There is just enough room to slide the stove between refer and front wall. I have used this type of slide for five years in the Landcruiser and never had a problem. But this system only works if you have a surface to pull the slide unto.
 

Attachments

  • DSCF1397 (640x480).jpg
    DSCF1397 (640x480).jpg
    217.5 KB · Views: 515
  • DSCF1403 (640x480).jpg
    DSCF1403 (640x480).jpg
    214.7 KB · Views: 533
At this stage of the build I got lazy with the picture taking, so will take you to the "finished product." I do not have an electronic water tank gauge. I left the area under the refer open for easier access storage and can visually see exactly how much water is in the tank.
 

Attachments

  • DSCF1574 (480x640).jpg
    DSCF1574 (480x640).jpg
    203.9 KB · Views: 802
  • DSCF1575 (480x640).jpg
    DSCF1575 (480x640).jpg
    210.8 KB · Views: 795
At the side dinette area I decided not to build the box down to the floor. Wanted to keep the floor open for storage and I don't like stubbing my toes. Doing this makes it much easier to maneuver around.
 

Attachments

  • DSCF1576 (480x640).jpg
    DSCF1576 (480x640).jpg
    219.1 KB · Views: 838
  • DSCF1578 (480x640).jpg
    DSCF1578 (480x640).jpg
    205.4 KB · Views: 788
When I ordered the camper I deleted the overcab mattress. I wanted to try a 3" thick bed to have more room for bedding. Tried a trifold mattress from Costco that was 36" wide but it was terrible. It was made out of batting and not foam. This pictured trifold mat is foam and even though it is not well tested, I have high hopes for it. Purchased through amazom, can't find the info on it right now but search under futon. Size is 27"x 75" and came in several colors. Will definitely be my stealth mattress.
 

Attachments

  • DSCF1579 (640x480).jpg
    DSCF1579 (640x480).jpg
    211.7 KB · Views: 759
  • DSCF1580 (640x480).jpg
    DSCF1580 (640x480).jpg
    230.2 KB · Views: 762

New posts - WTW

Back
Top Bottom