Our 2014 Fleet Shell Build Out

Before heading to Alaska for the season I knocked out phase one and we were able to make a 5 day trip to Torroweep and Zion in the spring.
Now with a little time off I'll try and catch up on the build process as well as getting into phase 2.

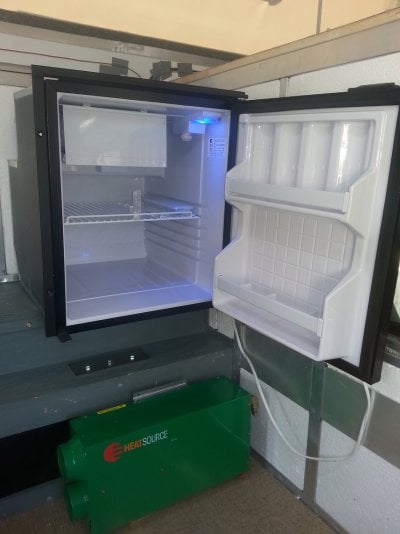
Refrigeration: I went with a TruckFridge TF 65 because of cost of the unit and the great customer service TruckFridge provides. I like the unit so much I added one to the crew quarters on the boat I run.
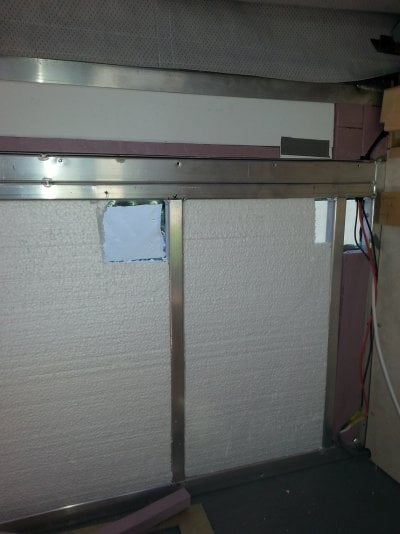
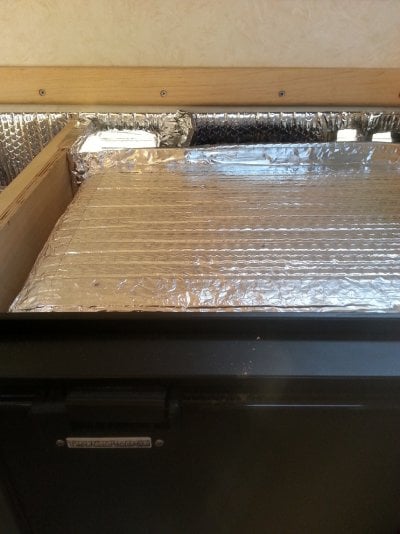
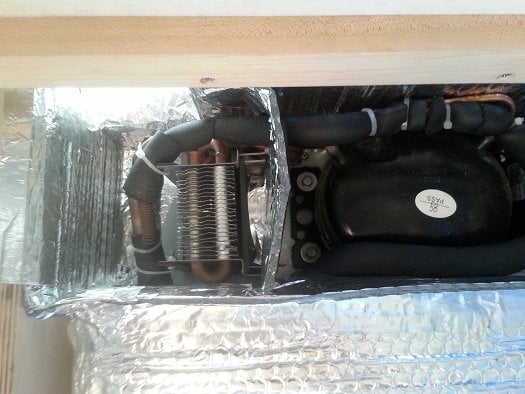
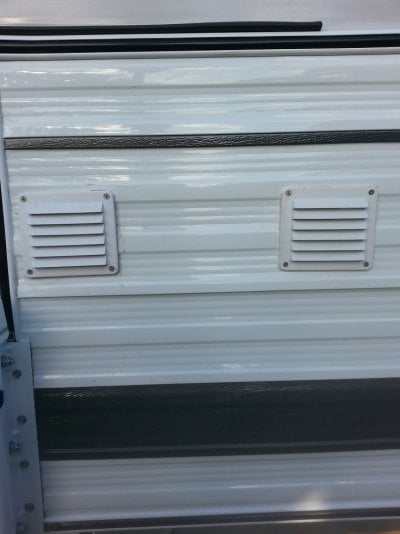
I cut out an intake and exhaust vent prior to covering the wall in Reflectix. Directing the flow of air on the compressor units as well as the 3-way units make a big difference in the efficiency of the unit.
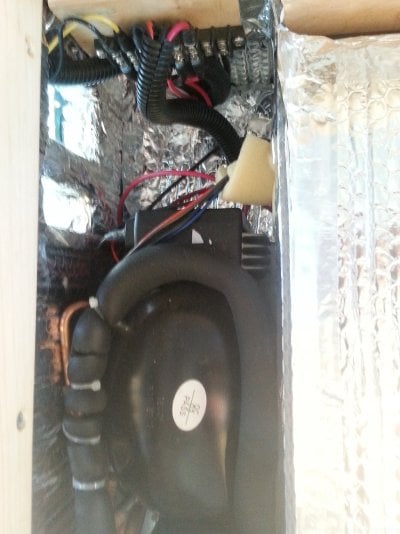
 

Attachments

  • Fridge open2.jpg
    Fridge open2.jpg
    215 KB · Views: 317
  • Cut out.jpg
    Cut out.jpg
    283.9 KB · Views: 298
I wrapped the fridge with Reflictix then left a 3/4 air gap between the sides / top of the unit and the cabinet for thermal efficiency. Air to cool the unit is drawn through the aft vent across the fins of the coil by a 12v fan mounted between the coil and condenser. I added a Reflictix wall around the fan so that air can only travel in one direction avoiding any dead spots that would be created by having the intake and exhaust vents open to each other.
 

Attachments

  • fridge 4a.jpg
    fridge 4a.jpg
    307.5 KB · Views: 206
  • Fidge 1a.jpg
    Fidge 1a.jpg
    106.1 KB · Views: 198
After being drawn across the fins and past the condenser the air is pushed out the exhaust vent. The down poor we received last week was a good test and no water came in thru the vents.
 

Attachments

  • Fridge 3a.jpg
    Fridge 3a.jpg
    297.1 KB · Views: 226
  • exterior2.jpg
    exterior2.jpg
    166.4 KB · Views: 243
Captm, this is a great thread! I am so excited to see "behind the curtain" on your build.
I saw my first FWC campers at Main Line Overland in West Chester Pa. yesterday. BTW a great company:) I had the same feeling about the wiring. I just think it is not the quality I would like. I was surprised to see the pic of the bundle going through the unprotected aluminum hole. Bad stuff. I know it is hard to keep an eye on everything but some things just should not be overlooked..... I am also not a big fan of crimped wires. If I have an option it is also solder and heat shrink:)

So I am thrilled to see your build out. I have seen so many good ones and it seems everyone does things a little differently and I learn from them all. How did your reflectix add on work out? I was thinking exactly the same thing but being more of a technical person was concerned about pulling off panels and digging into the heart of the build. Each time I read one of these mods I feel better about doing it. Thought they weren't using staples when I saw the square drive screws but alas I was wrong. I guess the need for efficiency creates some compromises.
I am looking forward to seeing what else you do:)
Congrats on the camper!
 
I'm working the Gold Coast here in Mexico and will update as soon as I get some time off, lol. The upside of having a house full of family it keeps the camper busy - between my son and brother it is getting good use.
Cheers!
 
I'm very happy with the heater and have had no issues with it. I cut two holes in the plywood (drivers side lower) to accommodate the exhaust and intake tubes. The exhaust travels down thru the bed (another hole) to exhaust under the truck between the bed and cab. The intake faces aft attached to the side of the camper in the bed. I kept the lengths of the tubes as they were supplied and installed according to the instructions. The heater is louder than a Wave 6 but quieter than the Attwood furnace we had in our pop up trailer furnace. The Attwood would wake me up, not so with the Propex. I plan on upgrading to the programmable timer - the standard works fine but I like the option to set the timing.

Cheer!
 
Captm said:
I have been wanting a FWC or ATC for quite a while now. The hold back was my concerns about the weight. I went with a Flippac because at #290 it was great for the Tacoma. We used it for 18 months, building it out as needs dictated. Fridge, furnace, fresh water system , storage, solar - you get the idea.
My only problem was climbing over the tailgate getting in and out- it sucks when your half way through life with a bum back. We tried many times to incorporate visits to FWC and ATC in our travels but it just didn't work out. A local FWC dealer is now in SoCal 40 mins from our house so my brother and I went for a drive to look at the campers. I was impressed by the roominess, warm use of interior color and fabrics. Yes I knew it was just wall paper and paperbacked veneer covering some ply but I'm looking at what's under it.
A good base of 3/4 ply, aluminum structure, I wasn't interested in the variety of options because I'm "handy" as my friends say. For those that want it turn key it's available but give me a blank canvas. My wife called me to see what I found out and I told her that if she was with us we would have bought it. The fact that it's "only 300lbs" more than our Flippac sold it for me because I'm going to put the same crap inside. I know well the debate on truck size but a Tacoma is what I have and what I love, it's my toy to build as I want/need.
We took delivery on Wednesday , January 15th from American RV Company in Azusa. I could not resist the temptation to take the rest of the day off and go over the camper with a fine tooth comb.
attachicon.gif
P1030282.JPG
attachicon.gif
P1030291.JPG

To be continued...
I will also be picking mine up from American RV in Azusa. I have spoken to Steve and Shana there multiple times.
 
Captm,

Great build! Any more details about where you sourced your propane locker? Any finished shots of the interior and propex install?

Thank you!

f.
 
Hola Frosty_1,
I built the propane locker out of ply and bought the liner and door from FWC. The liner is a non-permeable and it is sealed to the edge of the door frame to prevent any fumes from entering the cabin. A vent is in the top of the door for air ingress and I drilled a vent hole through the liner and the ply in the bottom, again sealing the edges, so any propane fumes will escape outboard of the truck bed. Sorry no new photos at this time.
Cheers
 
Any updates or photos of your interior? I'm especially interested in how much your camper ended up weighing since you were being careful with that.
 
Hey Captm, saw you got a composting toilet:) How do you like it and how long before needing to empty. Did you install yourself and if so (I'm thinking you did) how did you vent it. Thanks! Love the kitchen pic :)
 
Stereo - when we decided to full time it I changed direction from weight conscious to wife happy mode. I have not weighed the rig but it is definitely lighter than when we started after pairing down on what we really didn't need.

Happyjax - We really like our AirHead Composting Toilet, having decided on this over other brands after talking to friends who have them in their boats. Initially I vented it strait down although the fragrance lingered under the overhang of the camper. I then connected pvc to
the vent and routed it up. When we get to free wifi I'll post some pics.

Cheers
 
Sorry to bring this back from the dead. I was going to PM Captm but thought someone else might be interested.

You mentioned putting Reflectix between your wall panels and the frame/styrofoam. I have all my wall panels off and want to do something to insulate, but Reflectix looks to be .3125" thick, and I'm envisioning problems fitting it all back together with that in there. I wondered if the 1/8" thick type would be better. It wouldn't give much R-value, but I think keeping the aluminum and wood from touching would do some good.

I couldn't see in your thread what the final result was. Could you elaborate on what you ended up using and doing and if you ran into problems, if you even still remember? :p

Thanks!
 
for my walls, I used 1" rigid foam, and stuffed smaller cracks with pink fiberglass. Then used aluminum duct tape to make a tight air seal everywhere.

For the ceiling, much the same, but with 1/8" reflectix between the foam and the cloth ceiling liner.

Regardless, you will have alum to wood contact in most places, and at minimum, the screws/staples you use will be going into metal.
 
There are a lot of areas in my walls that are just air space. I do want to fill as much as I can with loose fiberglass. I think I can fit 1/8" bubble insulation behind the wall panels to break the thermal path and get somewhat of an air seal.

I had an idea for the ceiling. Without taking apart my perfect ceiling, I thought of using the white double bubble stuff across the whole ceiling, and attaching it over the wood strips with another layer of strips. This would give a radiant barrier and a bit of R value from the bubble layer and also a small air gap between ceiling and bubble layer. I think it would look ok and not much different than what is there now.
 
Back
Top Bottom