Palomino B500 Rebuild

SurfinRik

Member
Joined
Mar 31, 2022
Messages
15
I recently bought a Palomino B500 (for very cheap) that needs quite a bit of work. The rainy PNW has not been good for the OSB Palomino seems to love so much.

gallery_12109_1533_2696376.jpg
gallery_12109_1533_3886956.jpg


As you can see the torsion bars in the Heco lift system have started to rip the brackets out of the rotten roof boards so that'll need to be addressed.

Interior is pretty dated, basically completely original with some paint.
gallery_12109_1533_1799580.jpg
gallery_12109_1533_2793939.jpg
gallery_12109_1533_1719957.jpg
gallery_12109_1533_1388915.jpg
gallery_12109_1533_123596.jpg
gallery_12109_1533_1371407.jpg
The front of the over cab area is rotten/eaten by a rodent so that will be replaced. Floor pack has more rotten OSB both on the center section and on the sides. Interior will be gutted and replaced, as well as all the appliances. I've done some of this already so i'll post that next.
 
First up was the center floor pack section that way I didn't fall through will working on it. I started by removing all the staples holding the siding to the bottom, then removing all the screws. After some light prying and removing the screws I had forgotten, it came right off.

gallery_12109_1533_572334.jpg

gallery_12109_1533_867202.jpg


Two layers of Linoleum! Funny how the first layer it extends to the edges, under the walls. I guess it saves some time to apply it before the floor is attached to the camper.

New floor is 3/4" CDX primed with some kilz in case I paint it. I used some coated exterior construction screws and titebond 3 to attach to the walls.
gallery_12109_1533_1666953.jpg

gallery_12109_1533_2641109.jpg

gallery_12109_1533_263932.jpg


You can also see at this stage most of the cabinets have been removed and all the appliances.
 
I've since removed the rest of the cabinets and begun removing the staples attaching the siding to the underside of the floor pack sections on the sides. Those will most likely get replaced next. After that I'm thinking the roof rebuild which I will detach from the camper to make things easier. One major thing I need to figure out roof lifting system. I'm thinking of ditching the Heco system so I can have a wider bed using a panel that slides out like in Four Wheel campers. If I got rid of the Heco I think I'd go with something similar to the Four Wheel Camper lift system as well with gas struts and some type of supports, probably like the metal tubing that's already there and like was done here:

https://www.wanderthewest.com/forum/topic/10761-this-old-granby-build/page-3

I can't seem to find anyone else that has removed a Heco lift and put in another system. Has anyone done this?
 
Next up was replacing the upper portion of the floor pack since that had some water damage.

Driver side:
gallery_12109_1533_2669921.jpg


gallery_12109_1533_1306415.jpg

gallery_12109_1533_322608.jpg


Passenger Side:
gallery_12109_1533_84069.jpg


gallery_12109_1533_126324.jpg


gallery_12109_1533_1591752.jpg


I used 5/8" CDX attached with liquid nails and exterior structural screws. The new plywood was way lighter than the old OSB which had absorbed quite a bit of water over the years. Should be a much sturdier mounting surface for the jacks and tie downs. Surprisingly the 1x2s on the wall where the floor pack mounted was in pretty good condition.


I'm now prepping to rebuild the roof which should be interesting....

gallery_12109_1533_600575.jpg


The passenger side is missing the lower trim piece on the roof which I've been having trouble finding at the local RV supply stores. I may need to get creative. The old wood is so rotten its hard to figure out how it was made but it appears it's two pieces of wood, a curved 1x2 to match the top and a straight piece on the bottom portion. There's a slight gap with some spray foam to fill the gap. I think I'll just go with one solid piece. Dreading the roof rebuild....
 
Thought over the roof rebuild for a while and realized it would be easier and best to just rebuild the roof from scratch. I took couple measurements and started removing the old roof. There's quite a few posts here on how to remove a heco lift system such as this one: https://www.wanderthewest.com/forum/topic/21489-heco-manual-lift-rebuild-complete-with-torsion-bars-summary/

After a friend and I got the roof off i just cut it up with a reciprocating saw and took it to the dump. The roof is just 3/4" styrofoam with 1x3s around the perimeter 2 1x3s running left to right and aluminum skins on the top and bottom.

gallery_12109_1533_2970839.jpg


For the new roof the frame around the perimeter will be 3/4" plywood spliced together to make it 11' long with 2-3 1" aluminum square tube cross members and 1" XPS 25psi compression strength foam between. Then I'll glass both sides, the top will be 2 layers of 6oz glass, inside will be 1 layer of 6oz glass all laminated with marine epoxy. I make surfboards for fun so I figured this should be the easiest and best construction. Maybe not the cheapest though...

Once I had the roof off I decided it would be the right time to rebuild the bed overhang since the heco gears would need to be removed to do so. The OSB they used was so rotten and so well adhered to the aluminum skin that it was impossible to get off. After a few hours of scraping with a heat gun solvents I decided it would be easier to also glass this too and toss out the old aluminum skin.

More to come on the roof and the bed.
 
good luck with this build. i wonder if u thought of just building a pop up from scratch ?? you seem to have some skills !
 
goinoregon said:
good luck with this build. i wonder if u thought of just building a pop up from scratch ?? you seem to have some skills !
It probably would have been easier at this point! Not many skills but I'm learning and having fun.
 
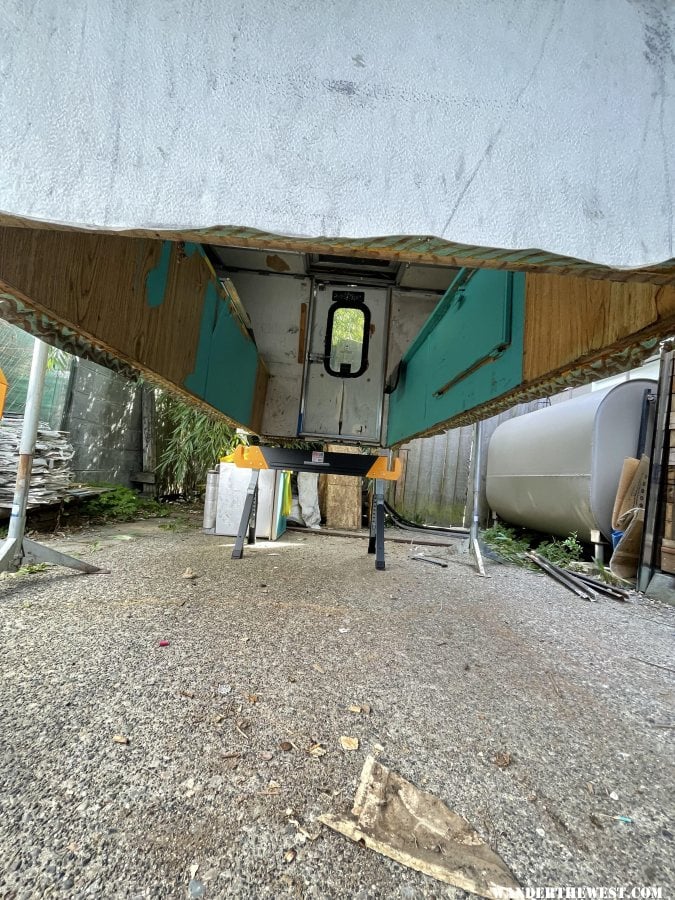
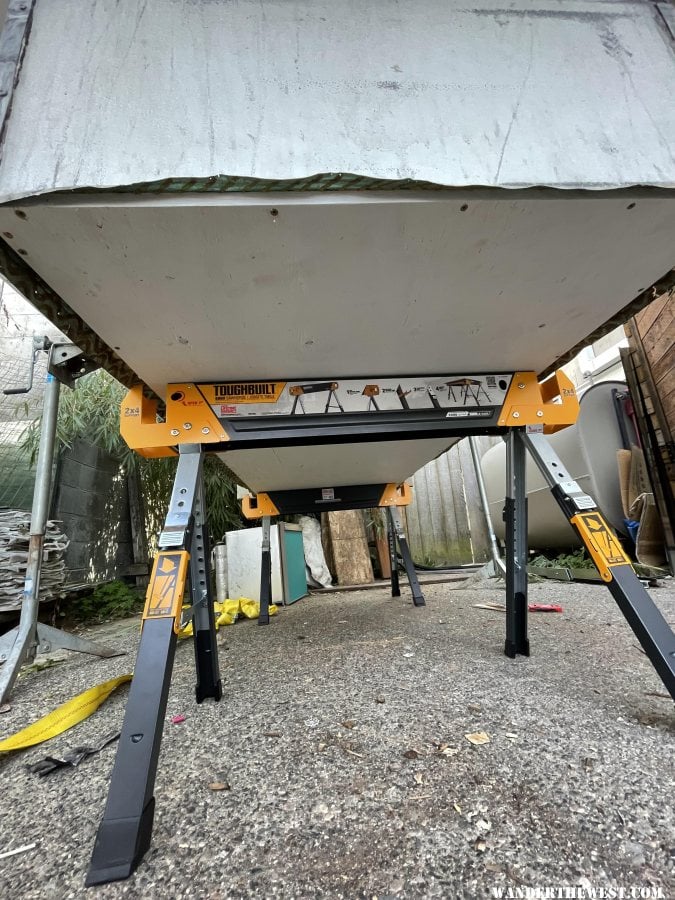
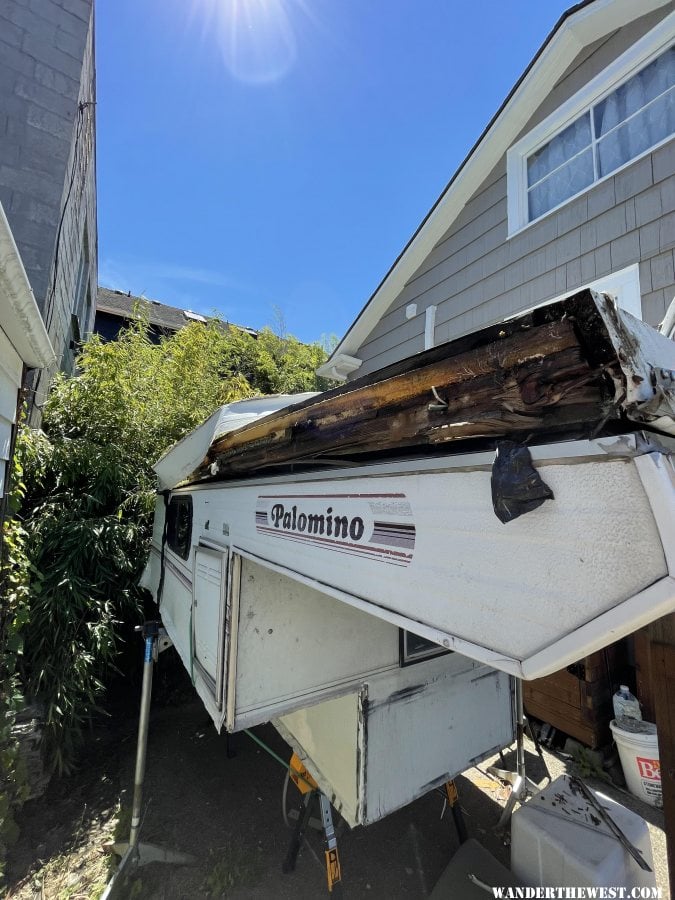
Here's some pictures of the attempt to salvage the overcab/bed
gallery_12109_1533_2871132.jpg

gallery_12109_1533_1778767.jpg


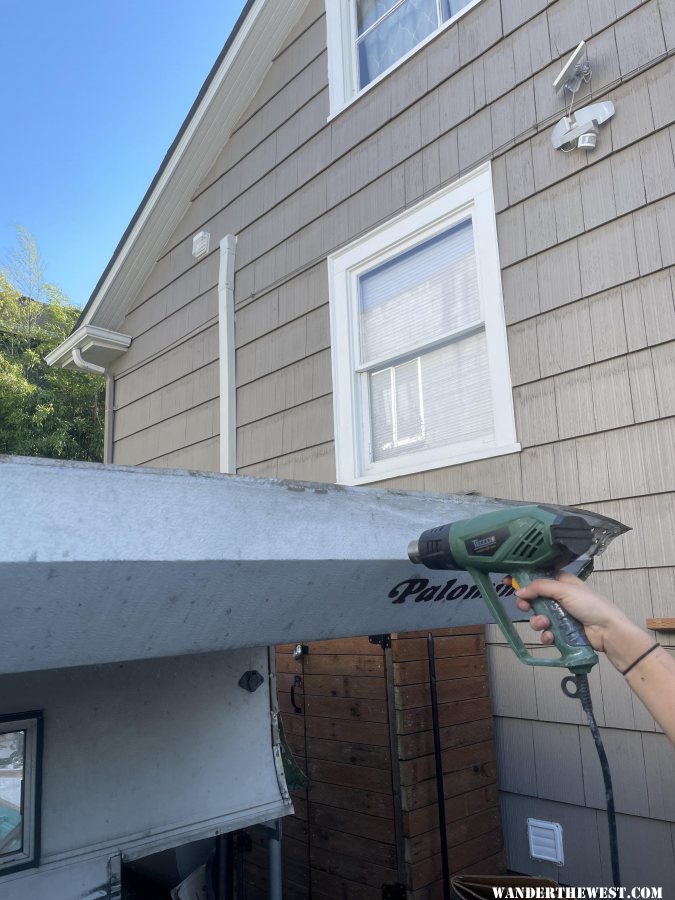
Tried a heat gun which helped but still wasn't great. Also tried mineral spirits which also wasn't very effective.
gallery_12109_1533_1133954.jpg


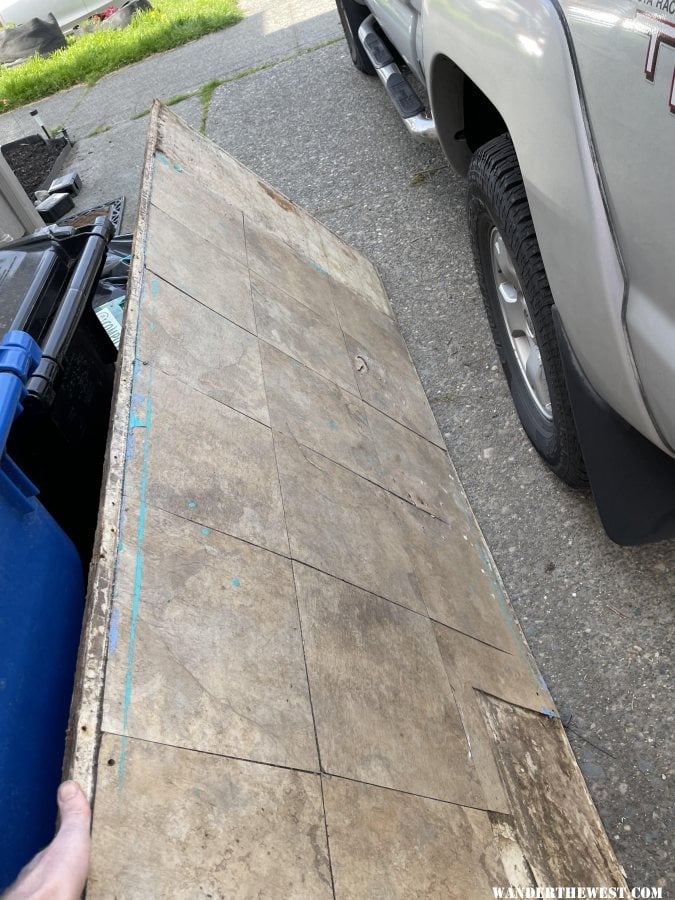
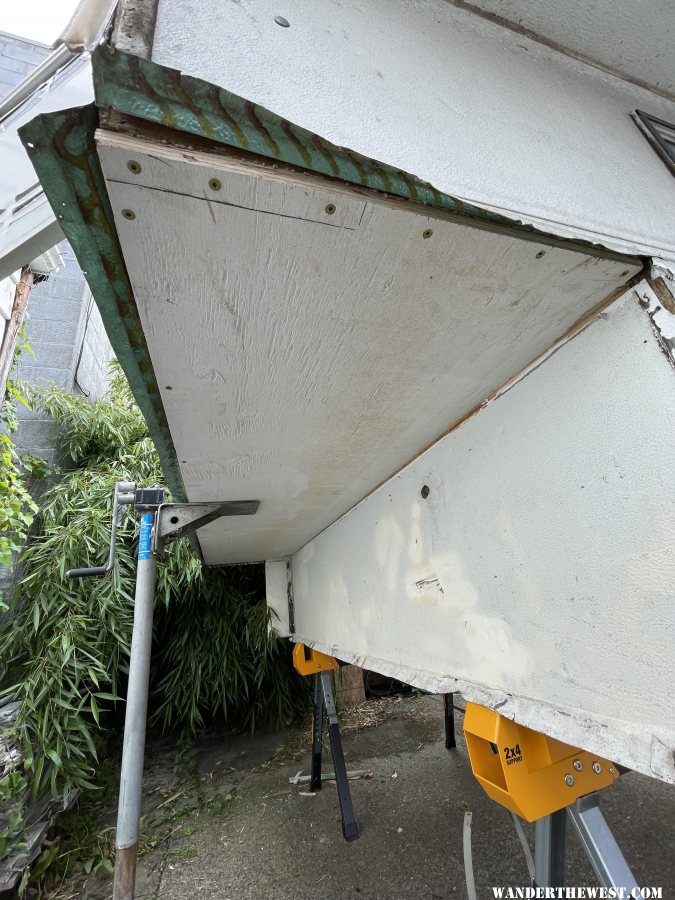
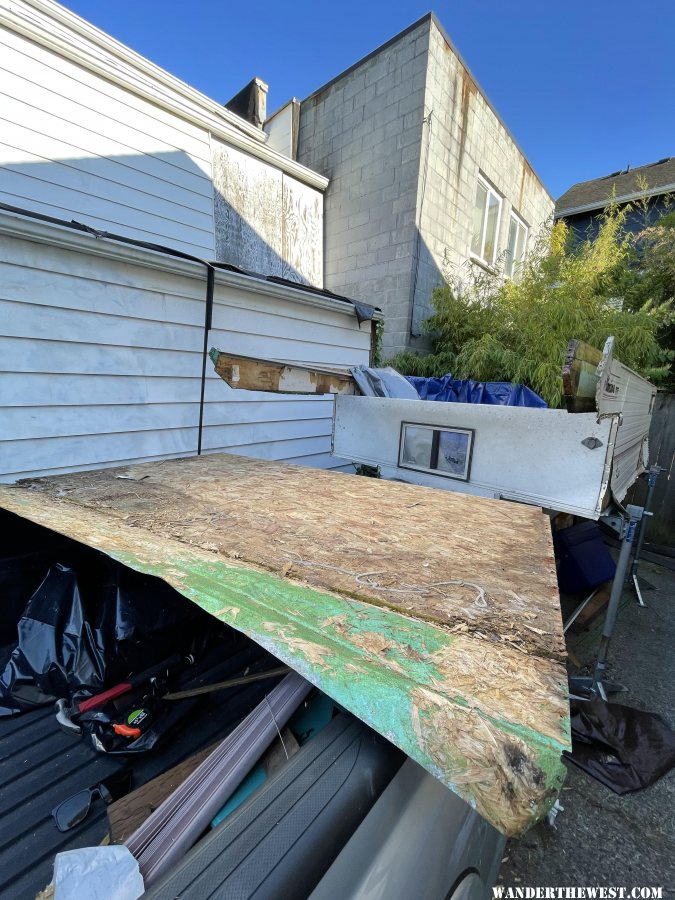
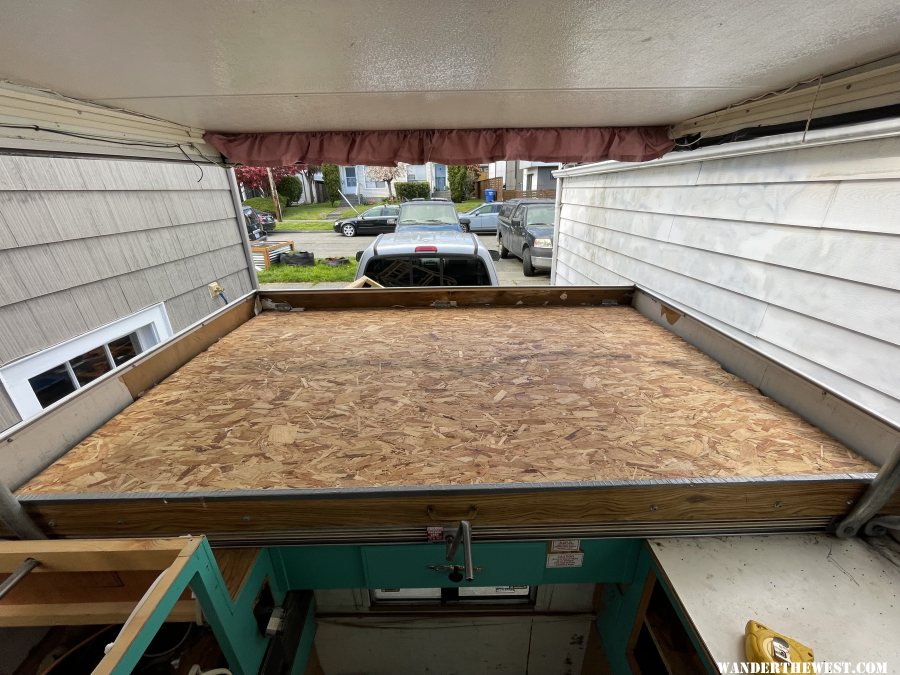
Took out the remaining screws, a little prying, and it came right out.
gallery_12109_1533_1371500.jpg


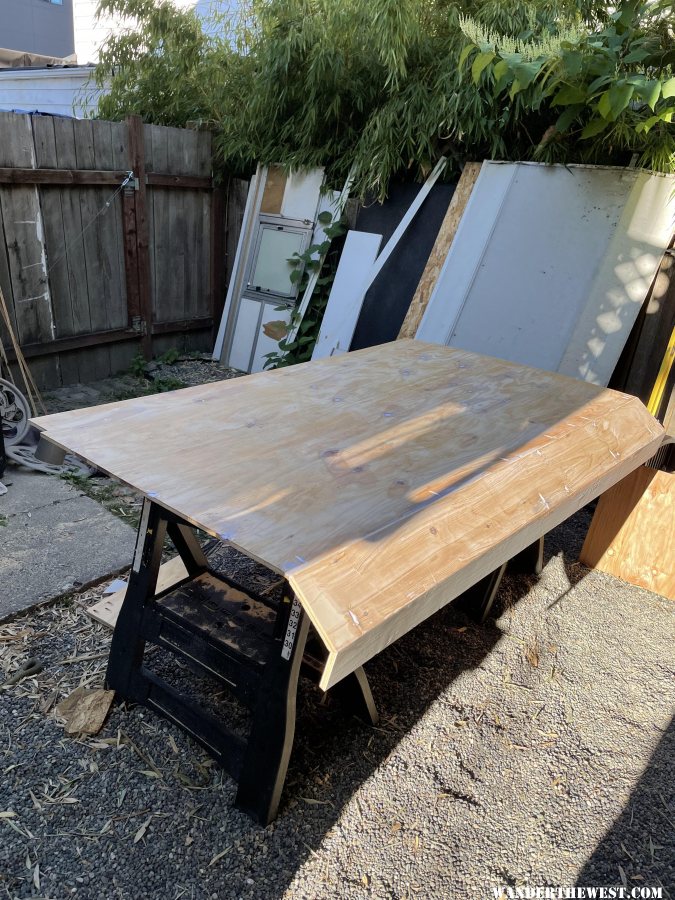
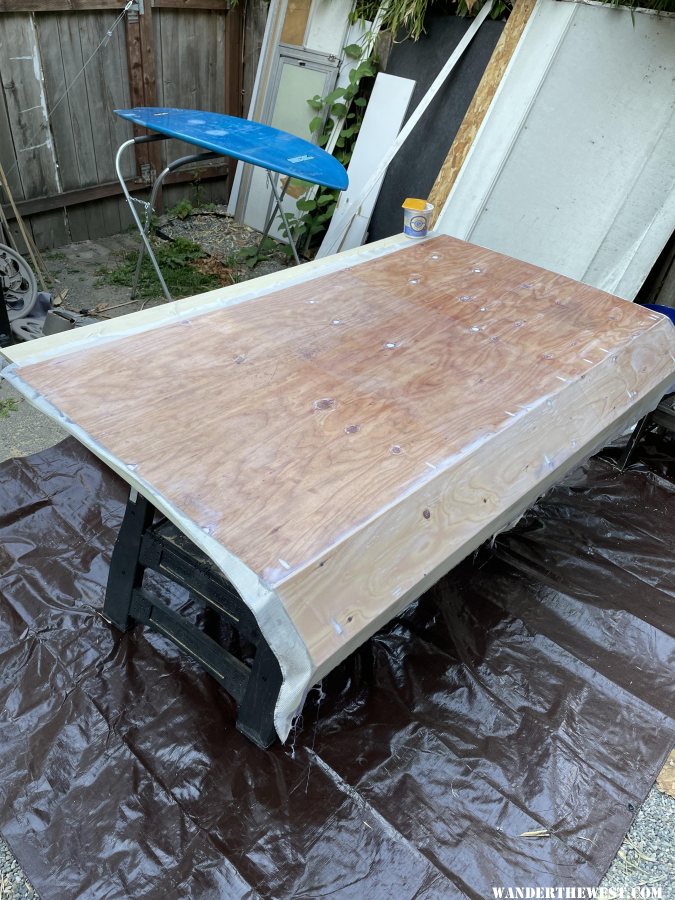
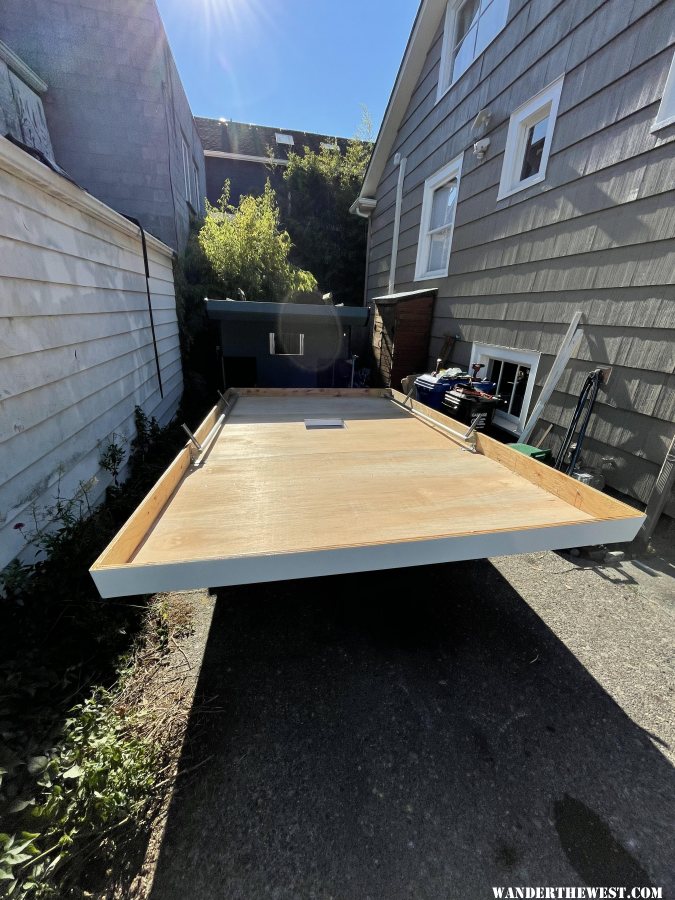
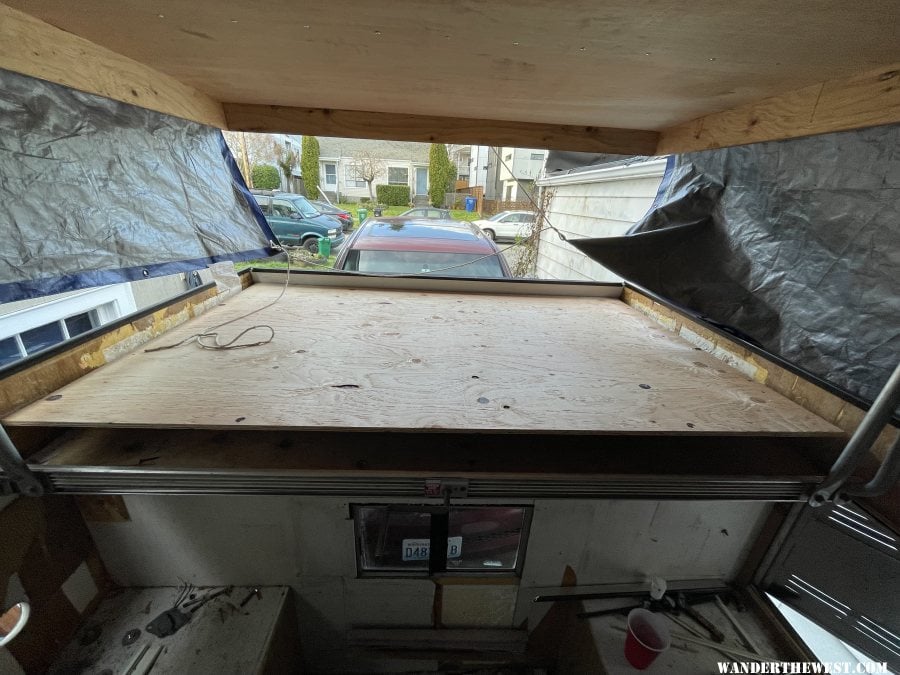
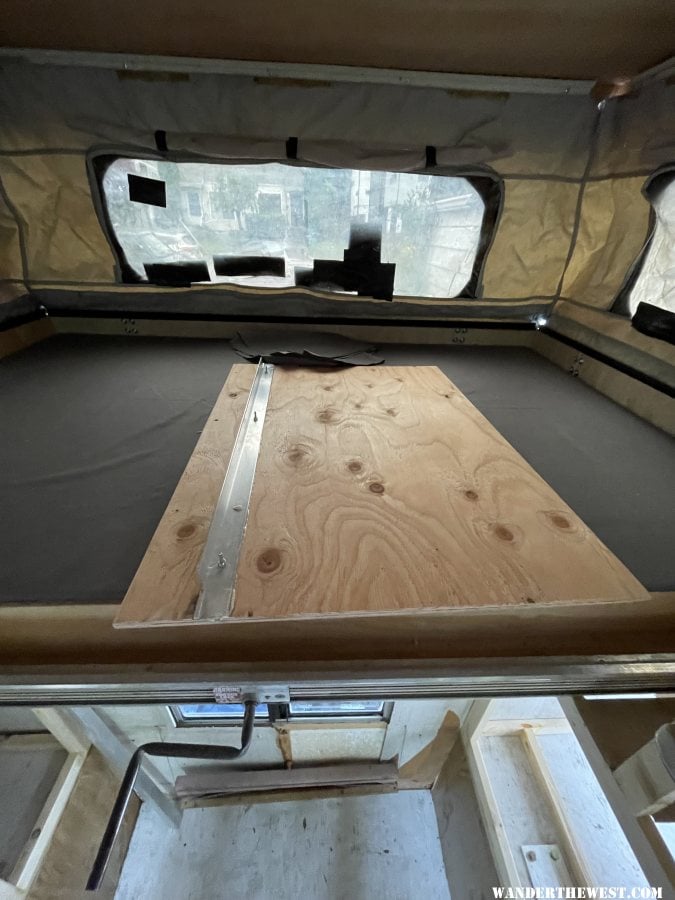
Got started with the rebuild, I matched the thickness and size of the old OSB that came out. The bed portion was 1/2", the first next piece 3/4" and the top piece 5/8" with a piece of luan so the trim piece would fit. I matched the angled cuts from the old pieces as well and also made templates of the sides of the camper where the overcab attaches. The templates allowed me to clamp the new pieces while the glue dried. In addition to titebond 3 i used some pocket hole screws to hold everything together. Since I was going to glass the bottom, I wanted to fill all the knots, gaps, and pocket holes with epoxy that I thickened with micro balloons and cabosil. I also added some of this paste to where bed attaches to the first angled piece since they didn't mate up very well.

gallery_12109_1533_1279720.jpg


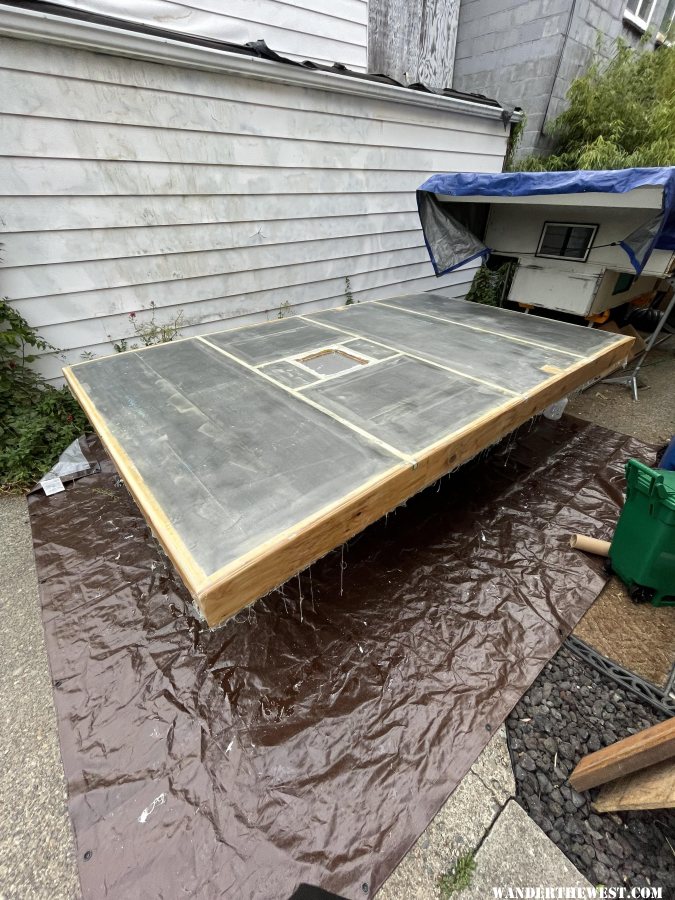
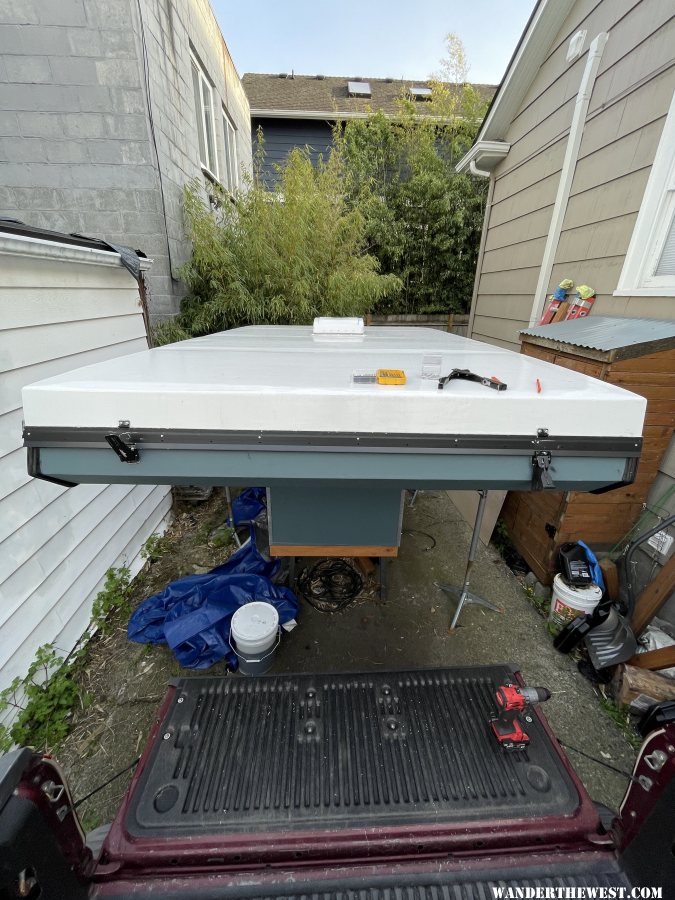
After some sanding I glassed it with 6oz glass with a pretty big overlap in the center. I just used some old surfboard epoxy resin which is basically the same as marine resin.
gallery_12109_1533_2139067.jpg

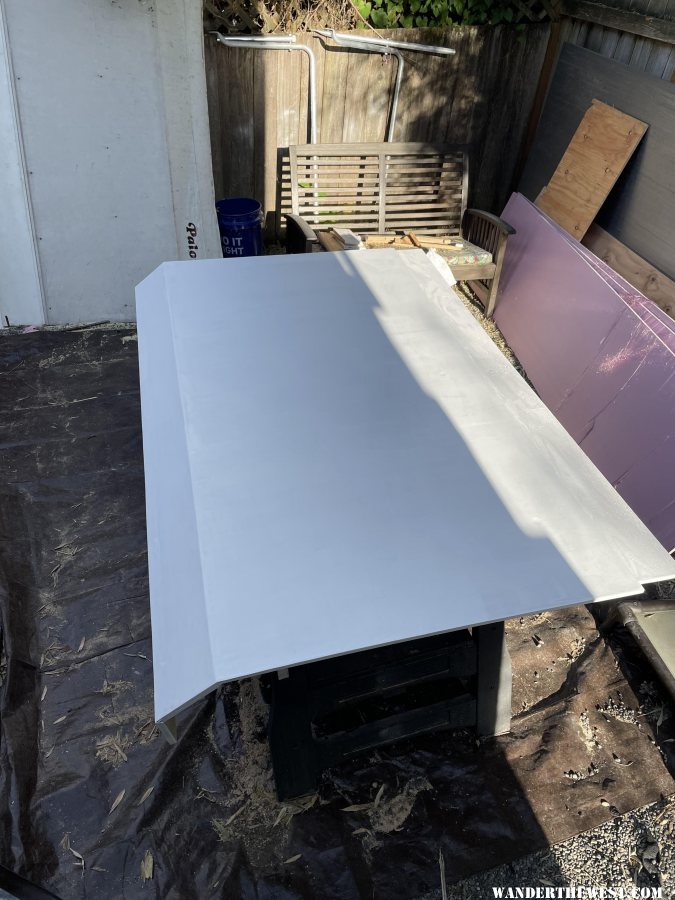
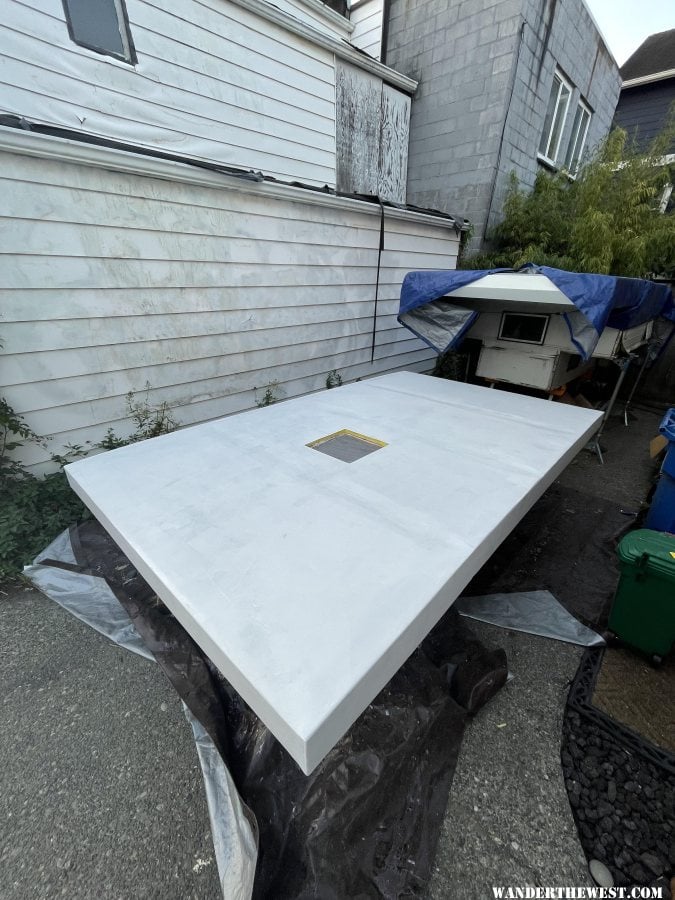
I then sanded the edge of the overlap and any other high spots. Hot coat was next to fill in the weave which once it cured I sanded with 120 grit. I also painted on some epoxy on the exposed plywood edges to seal them. Next up was epoxy primer which I went with a two part marine primer by interlux https://www.fisheriessupply.com/interlux-epoxy-barrier-kote-404-414-primer-kits

gallery_12109_1533_1586694.jpg


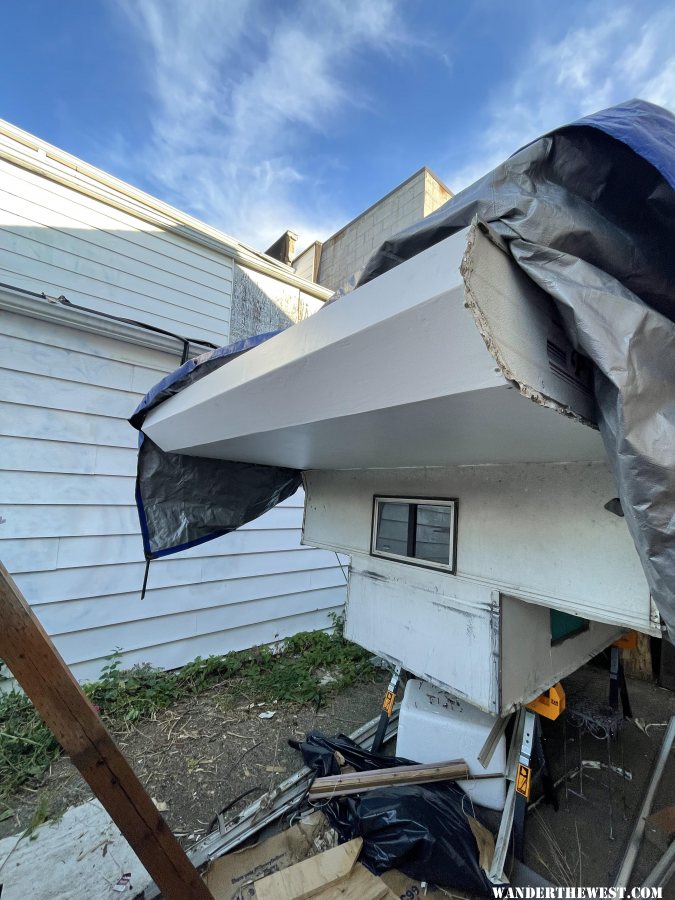
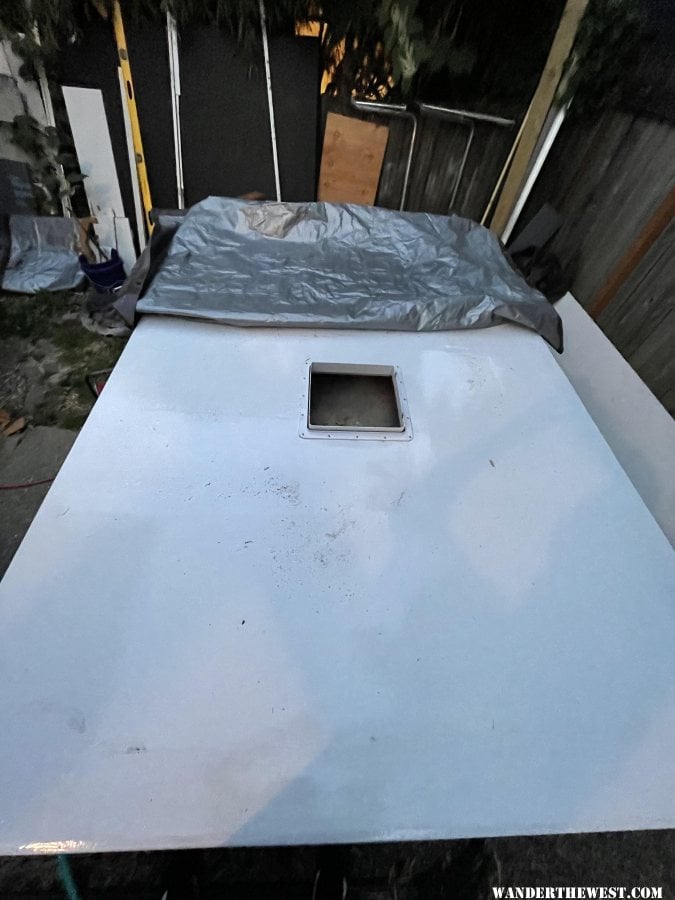
I'll probably paint it later once I'm ready to paint the rest of the camper. Not sure if I want to go with bedliner, marine paint, or just some exterior paint like rustoleum.

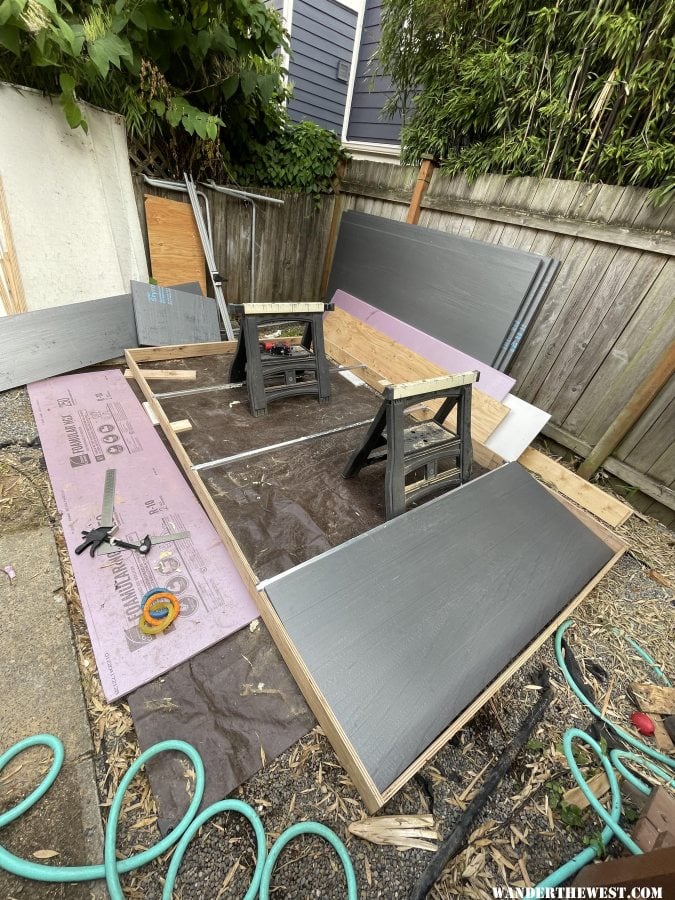
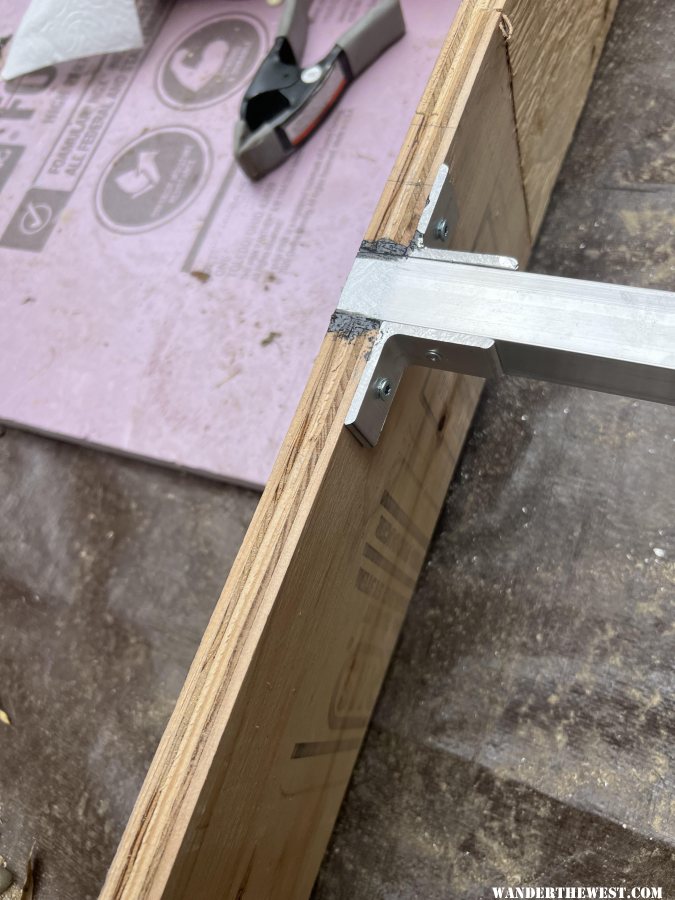
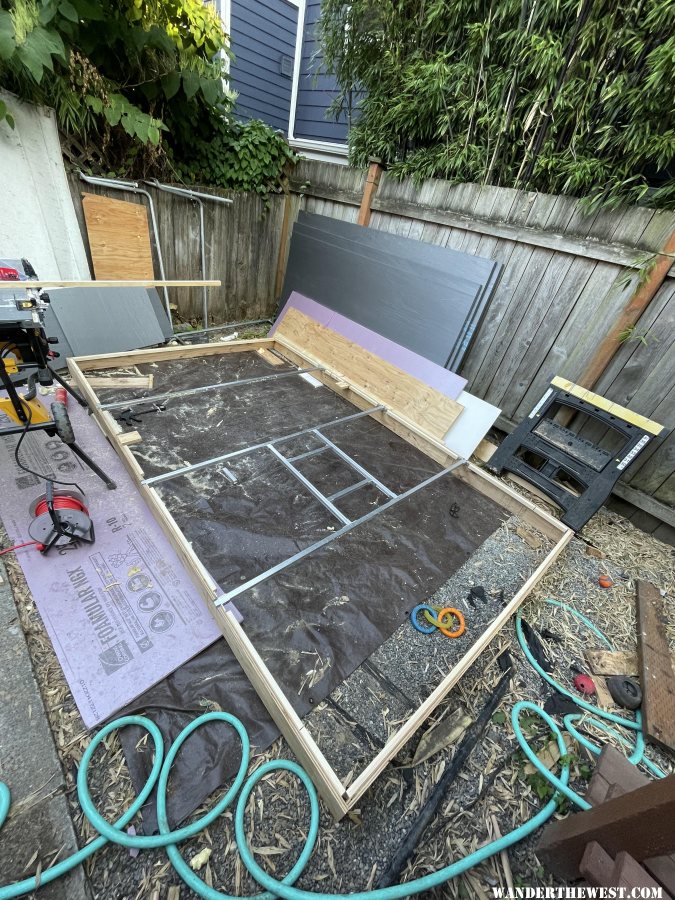
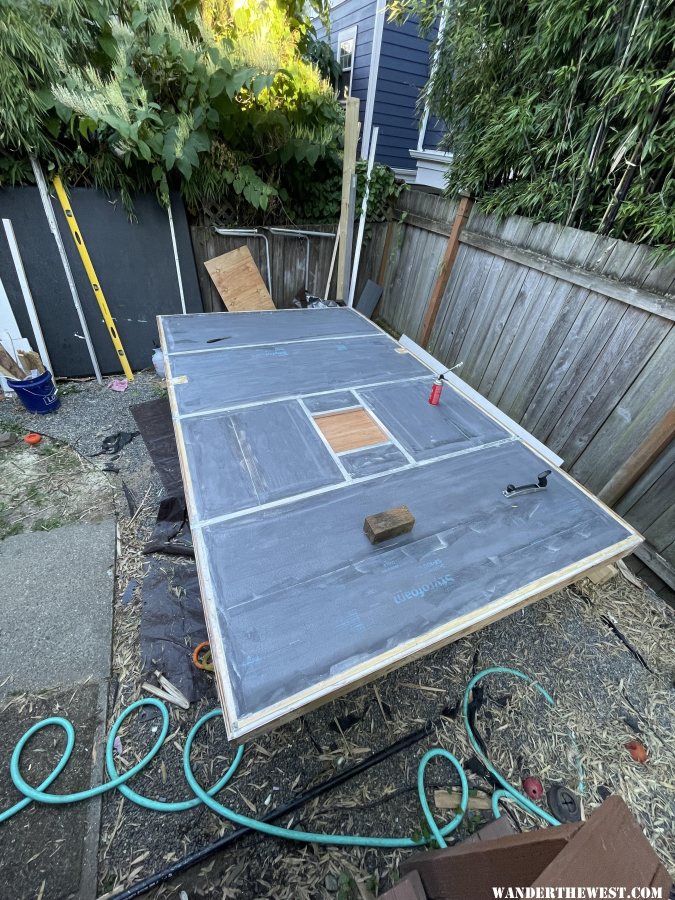
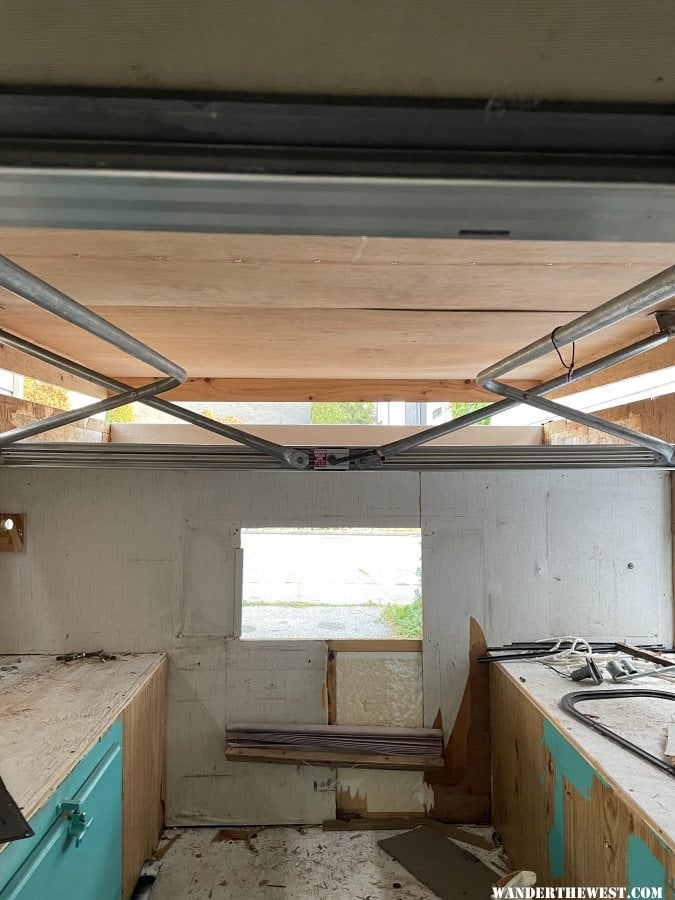
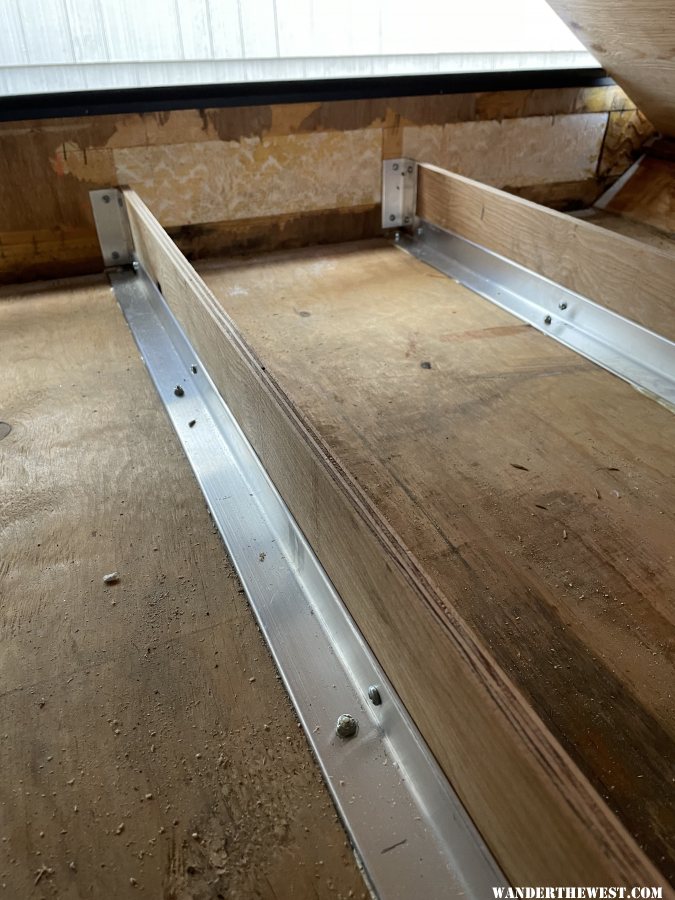
Roof prep has started, I spliced the 3/4" plywood together for the long side pieces and got the foam. I'll pick up the aluminum square tube next week and start building.
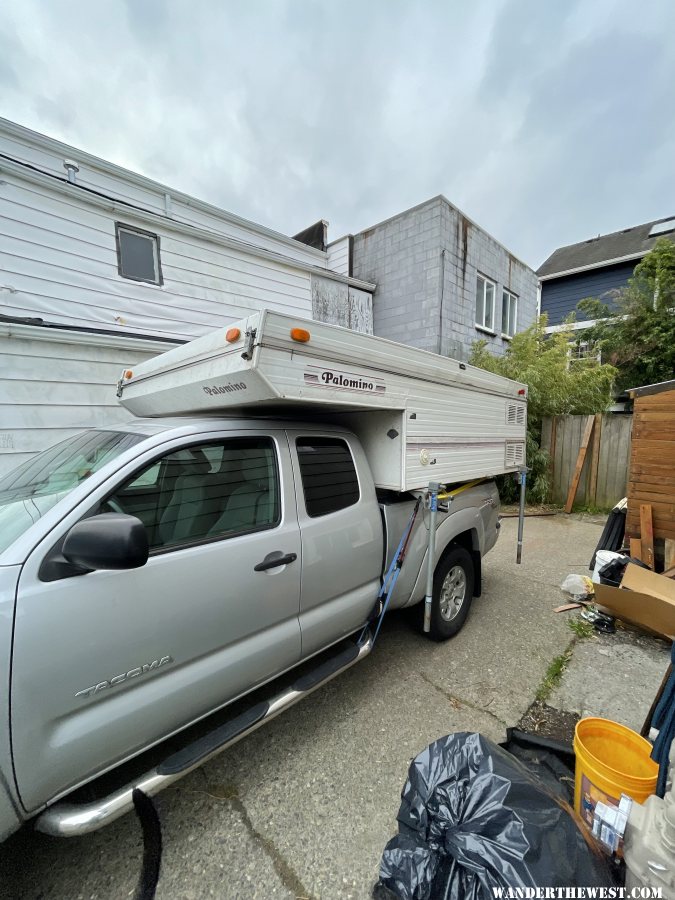
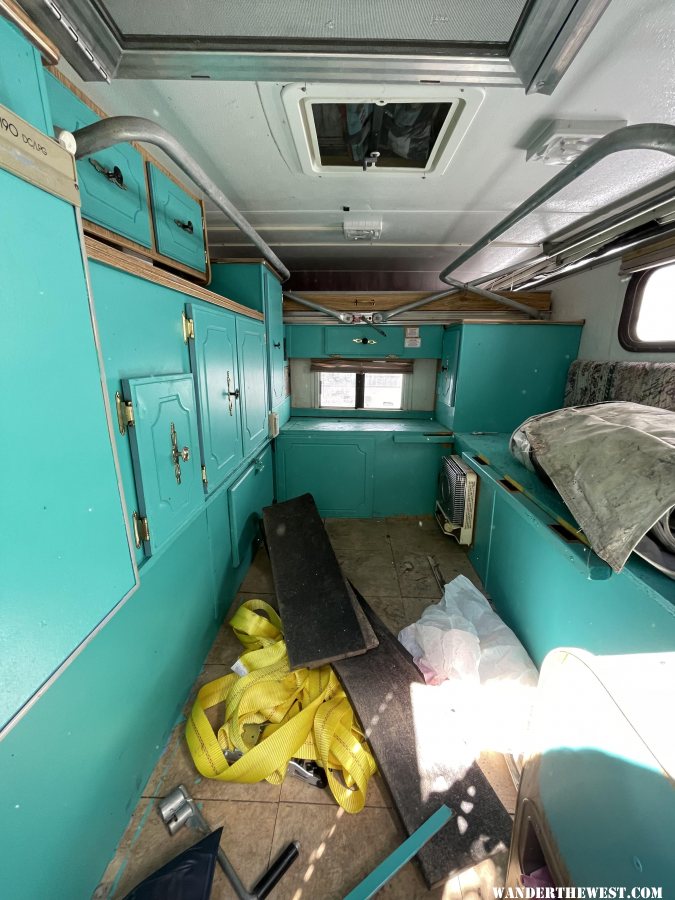
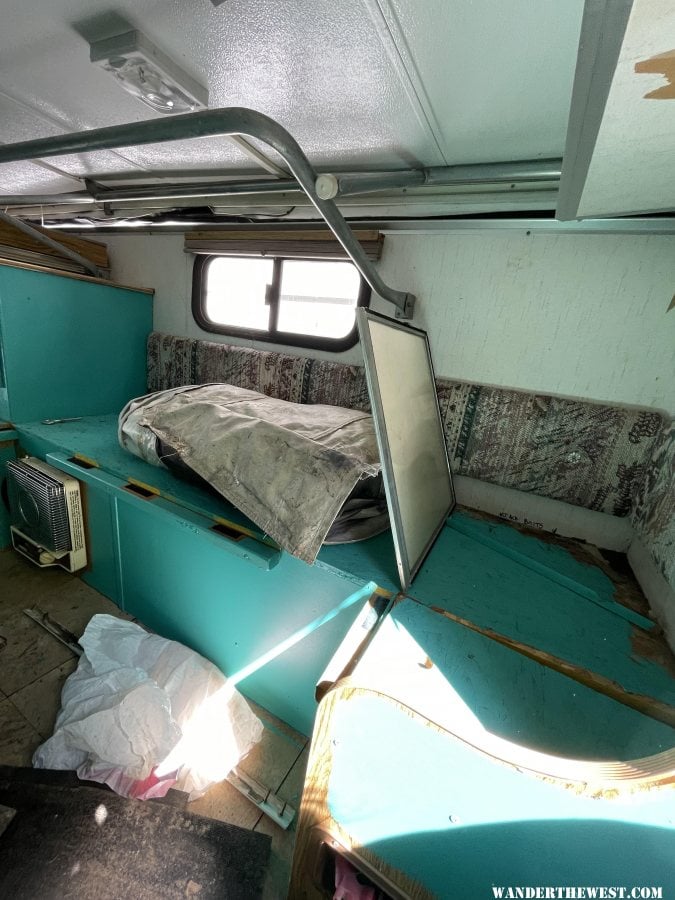
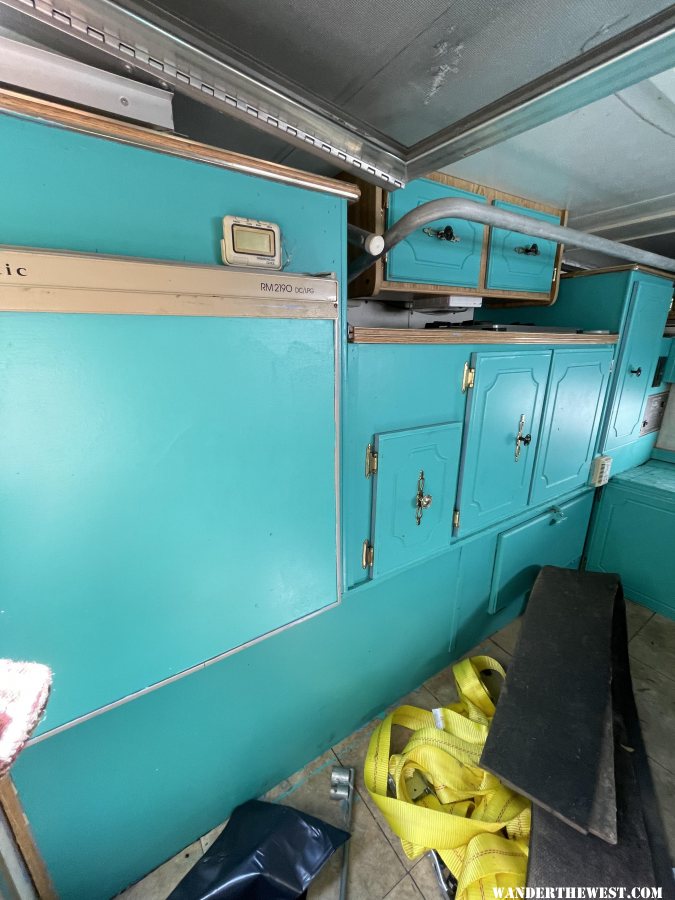
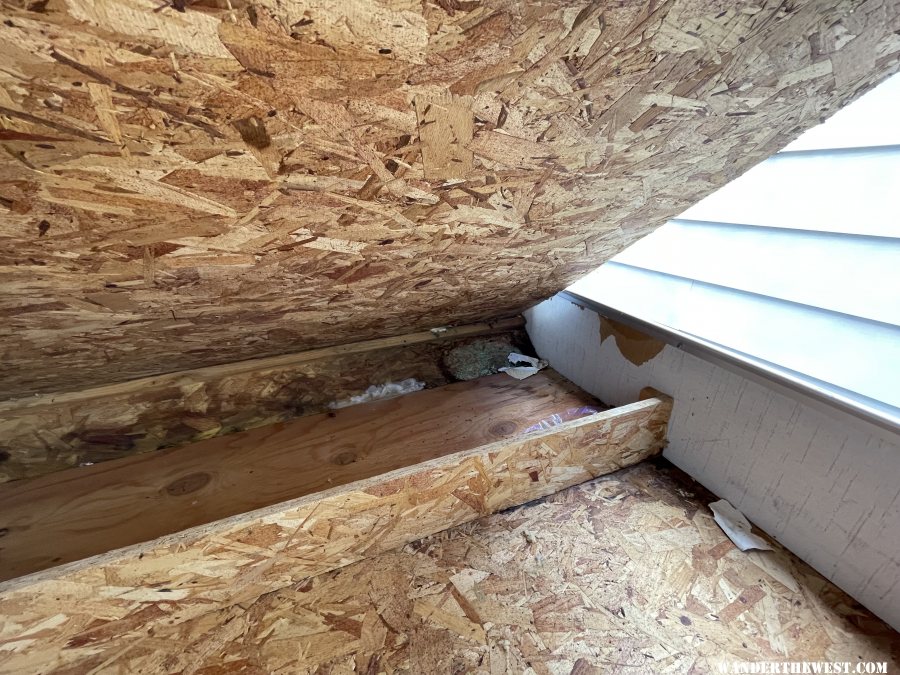
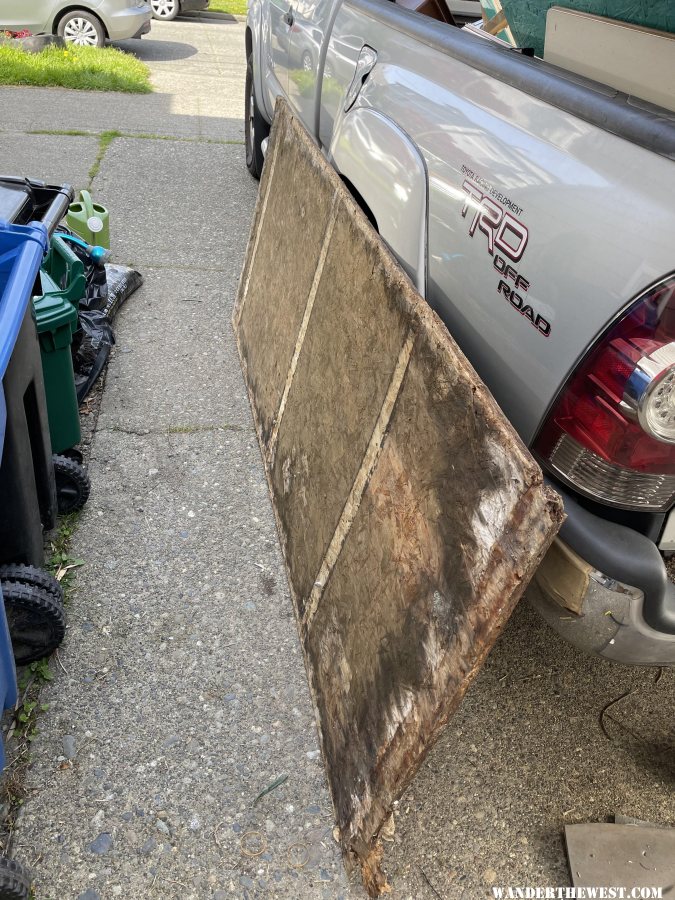
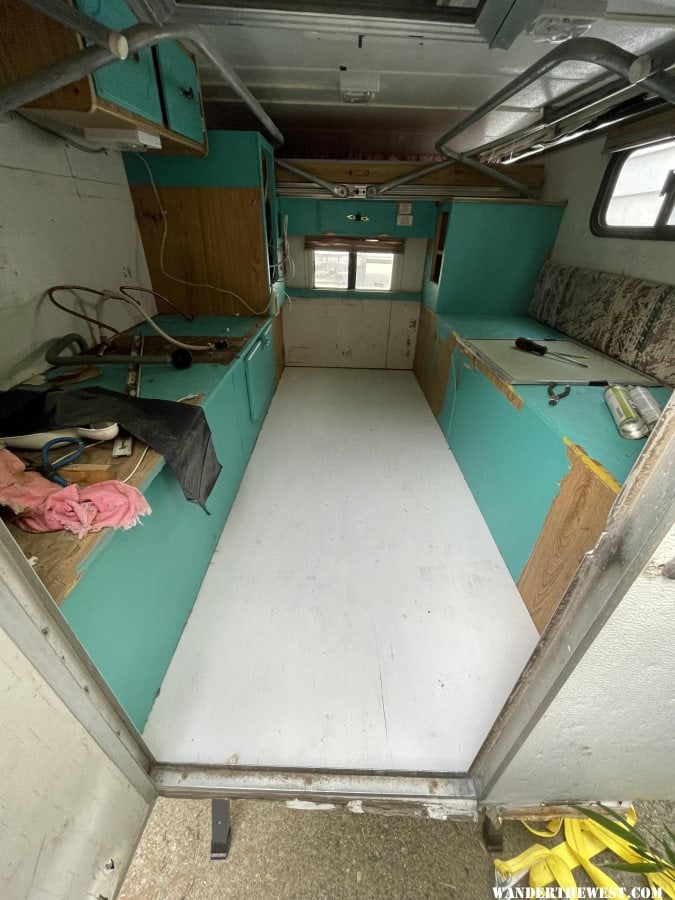
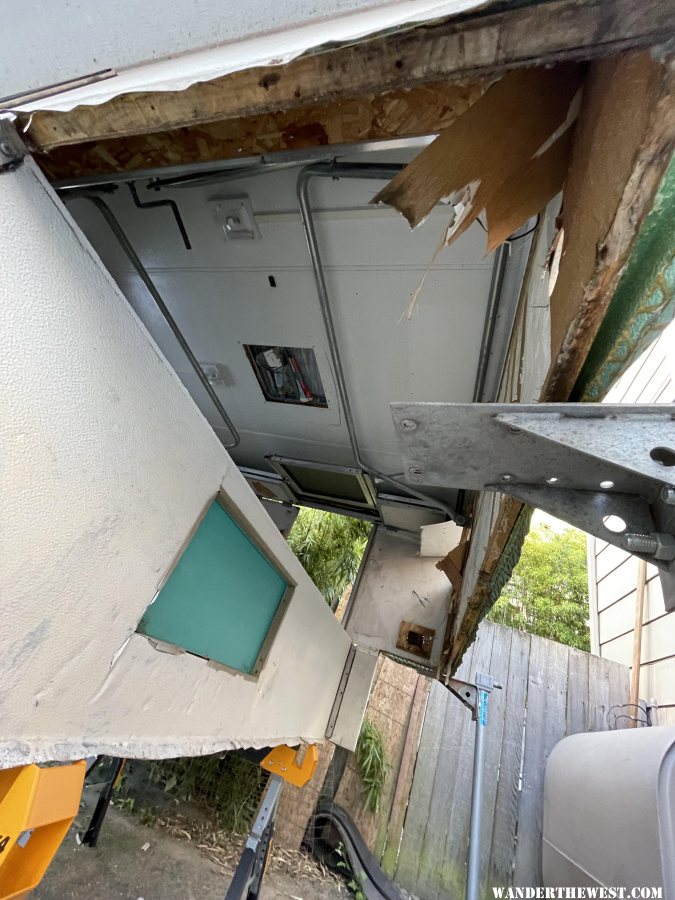
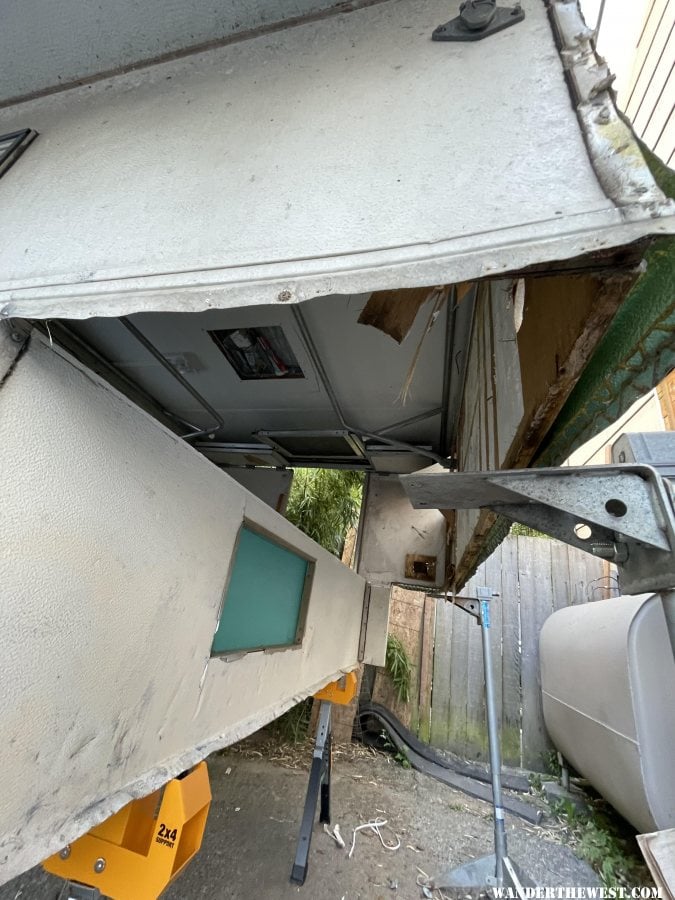
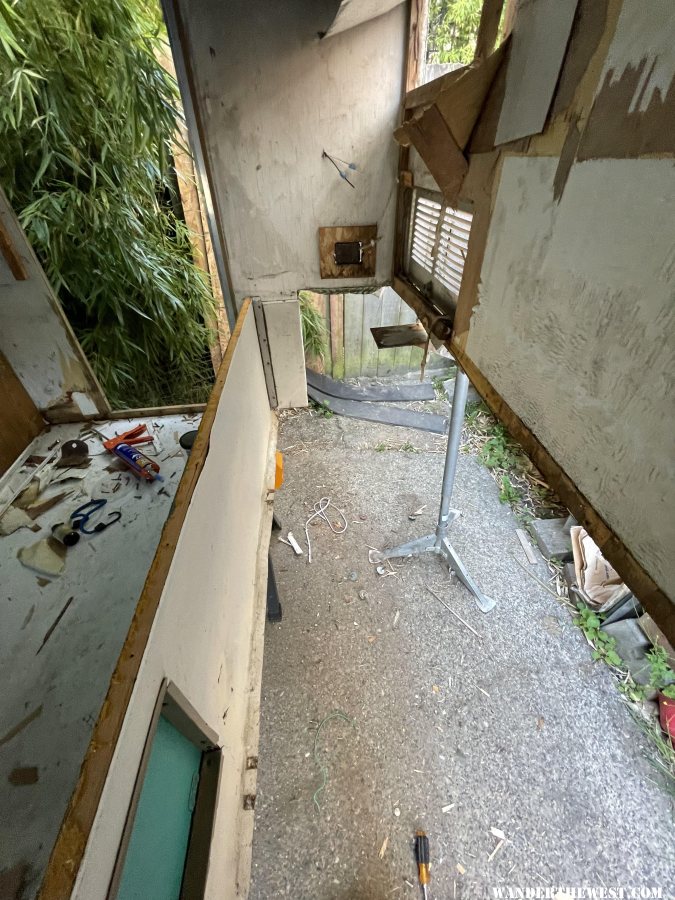
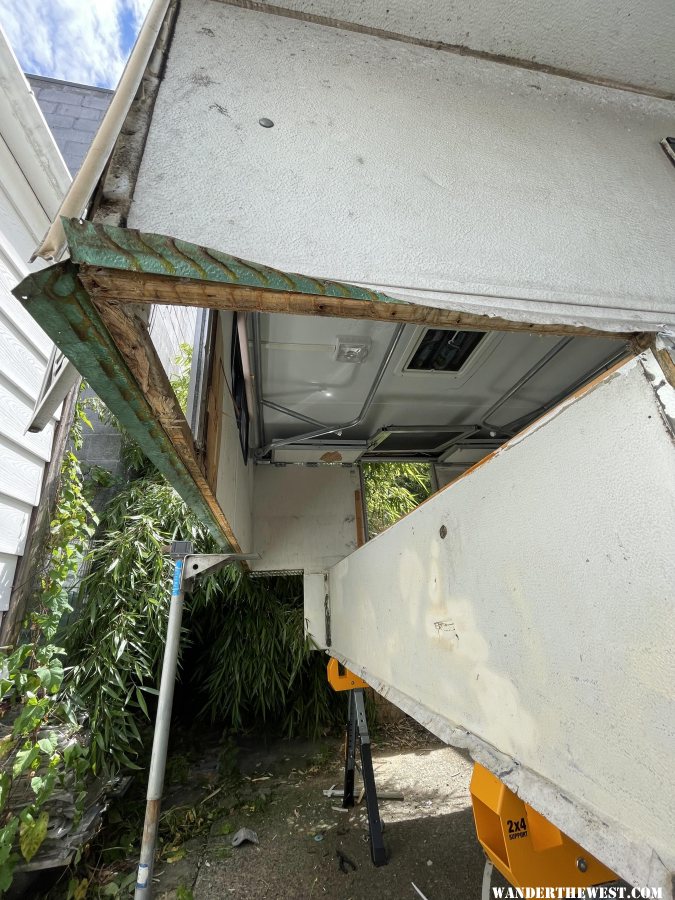
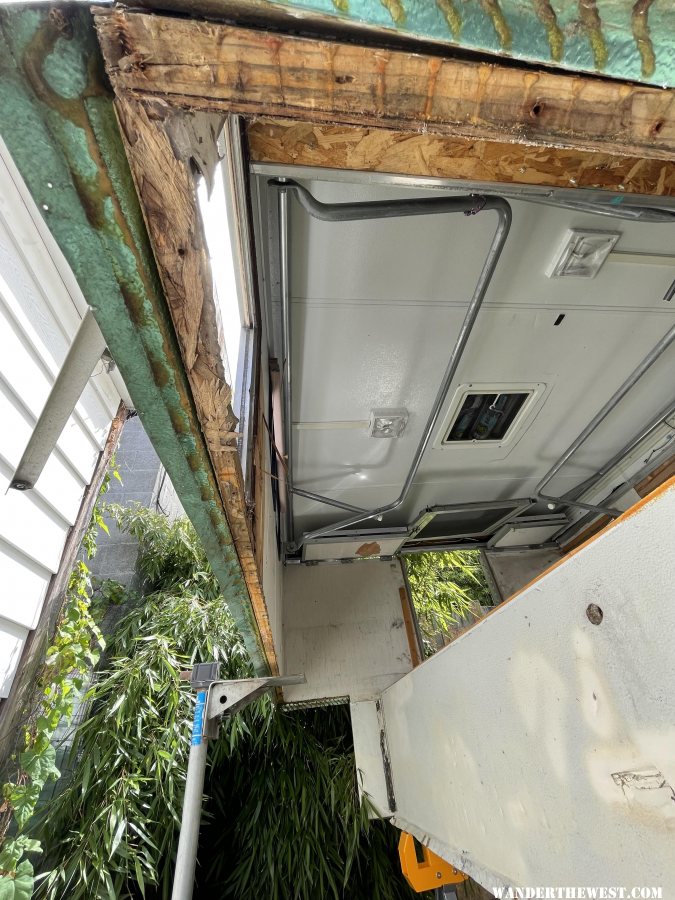
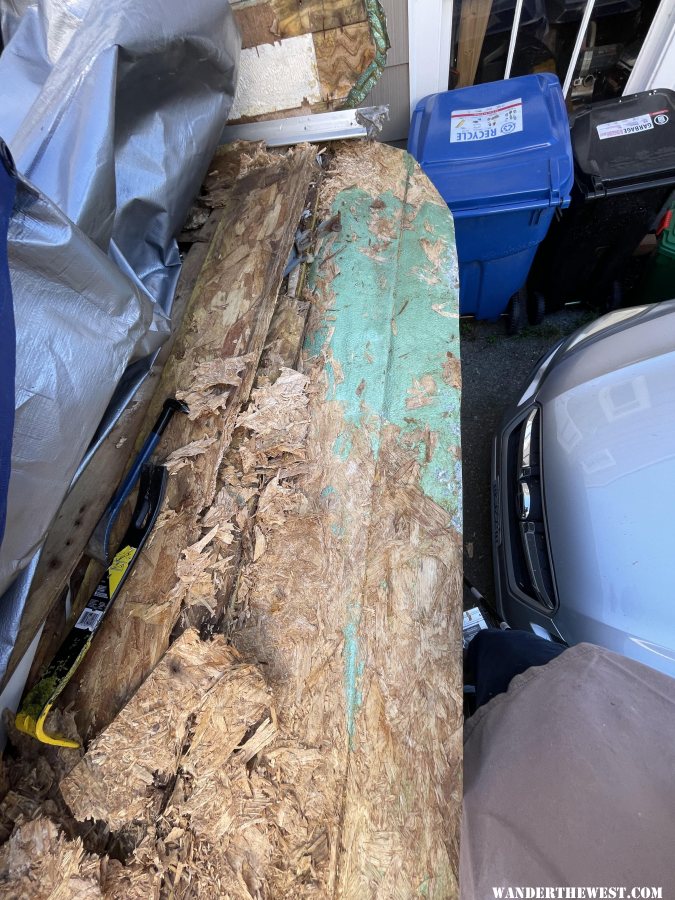
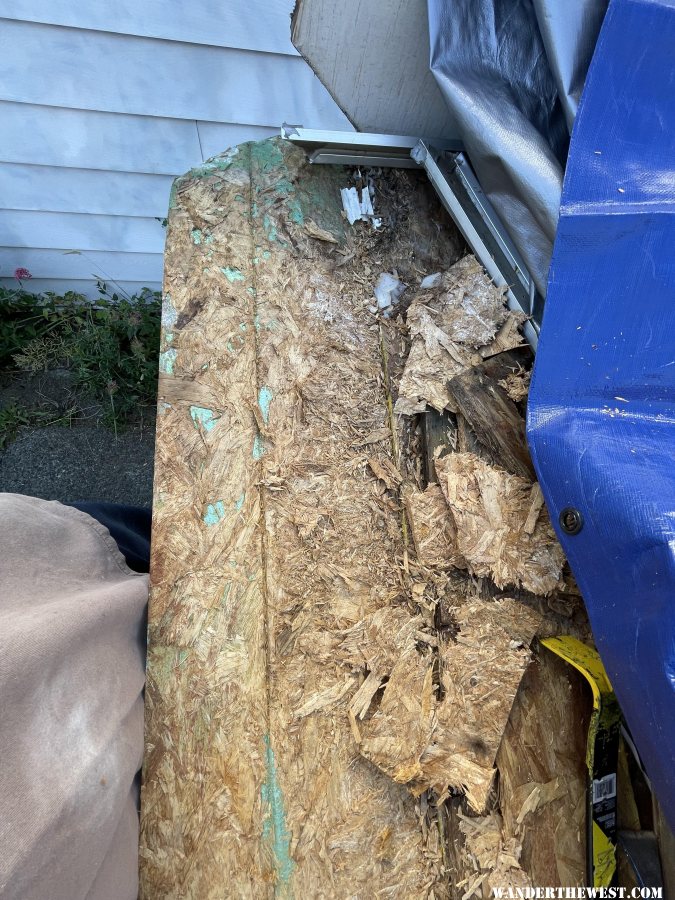
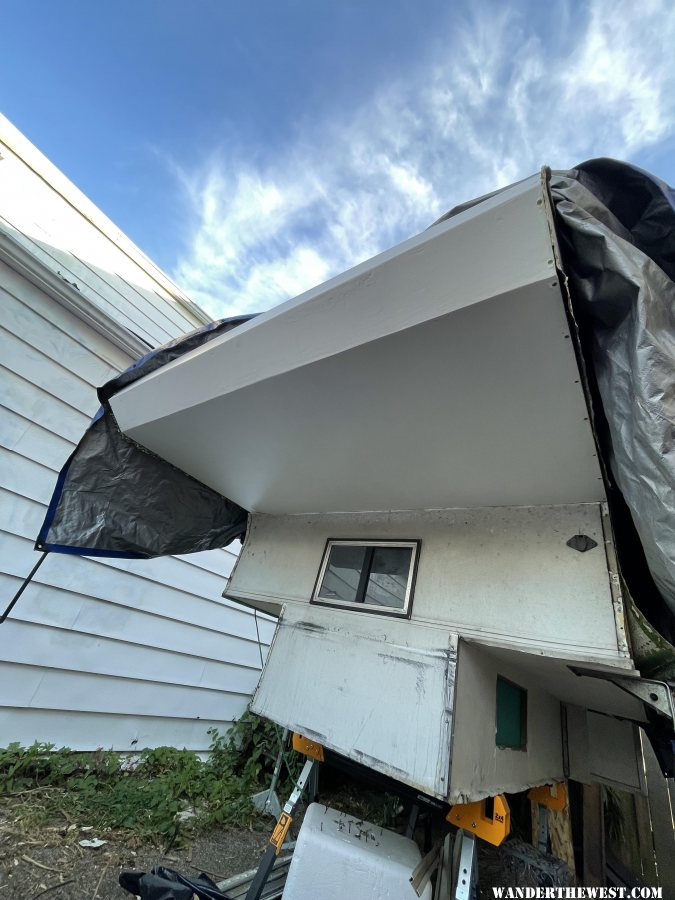
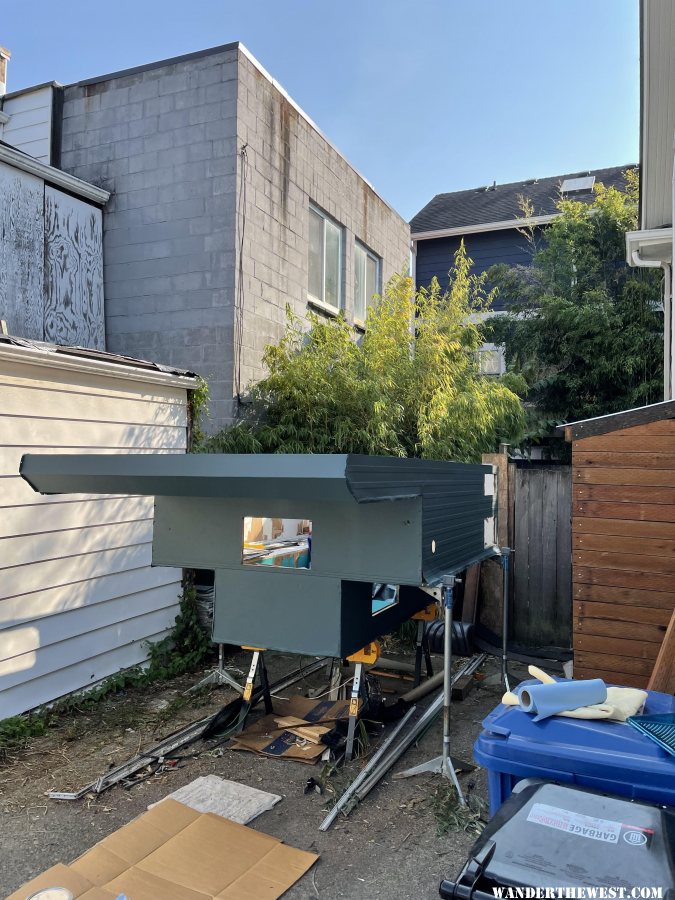
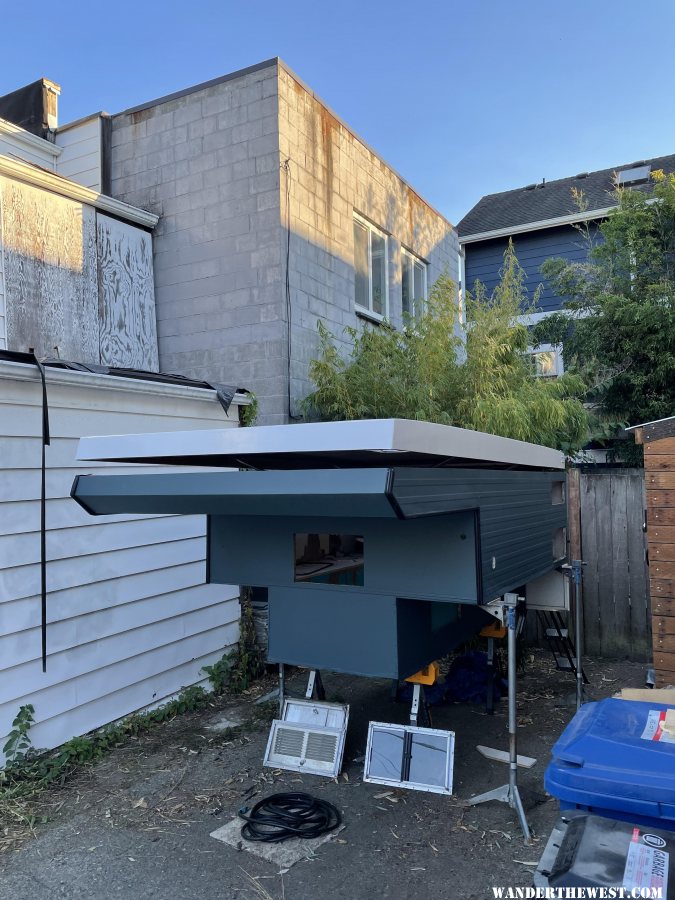
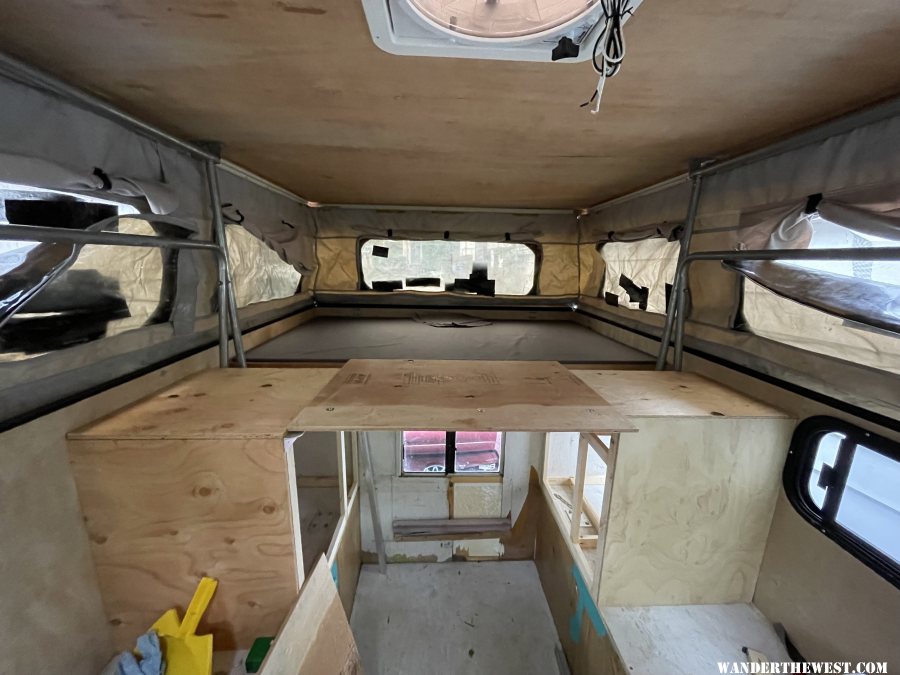
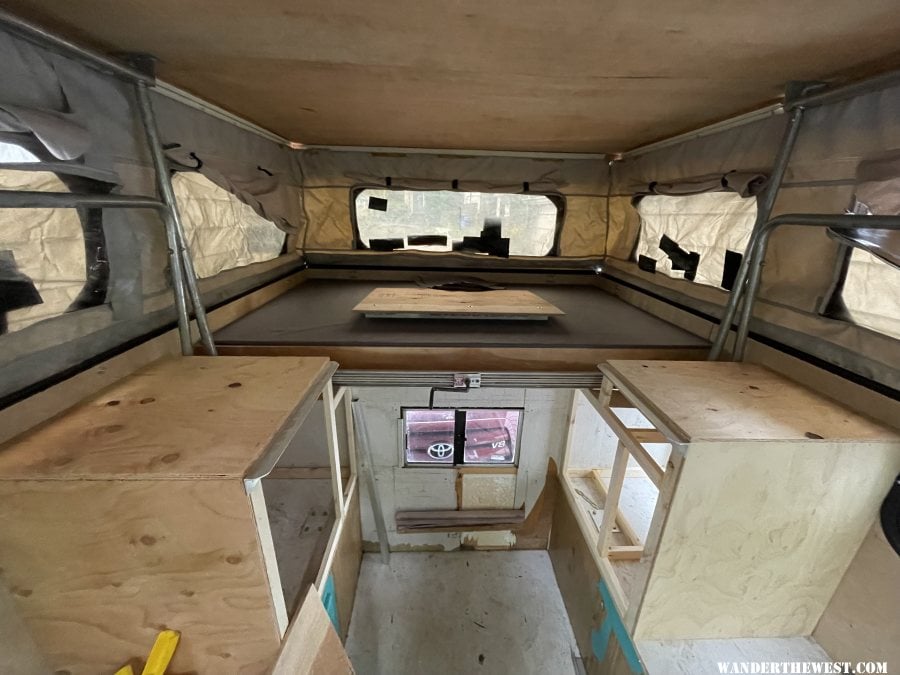
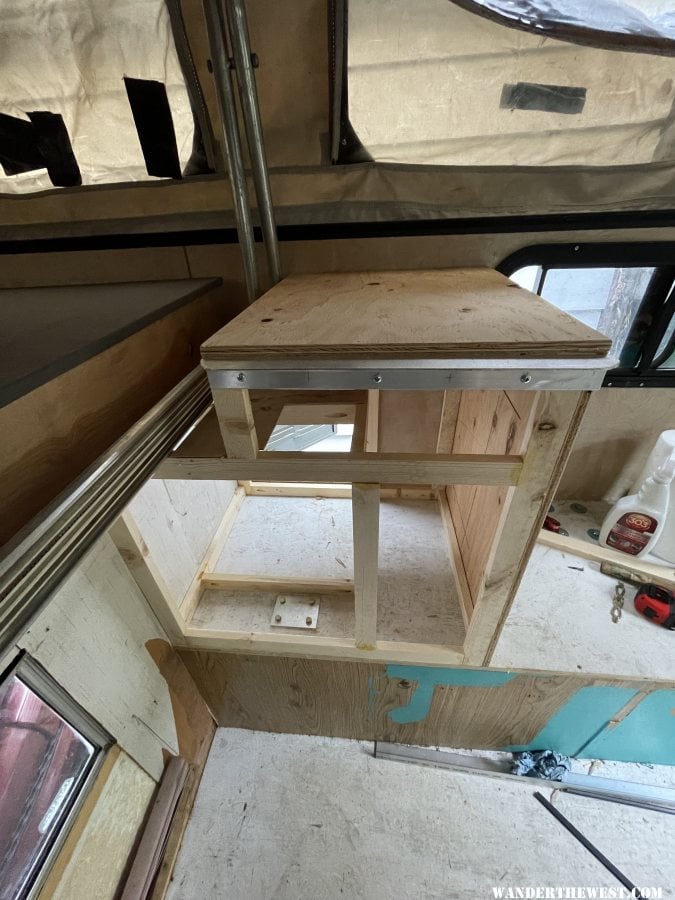
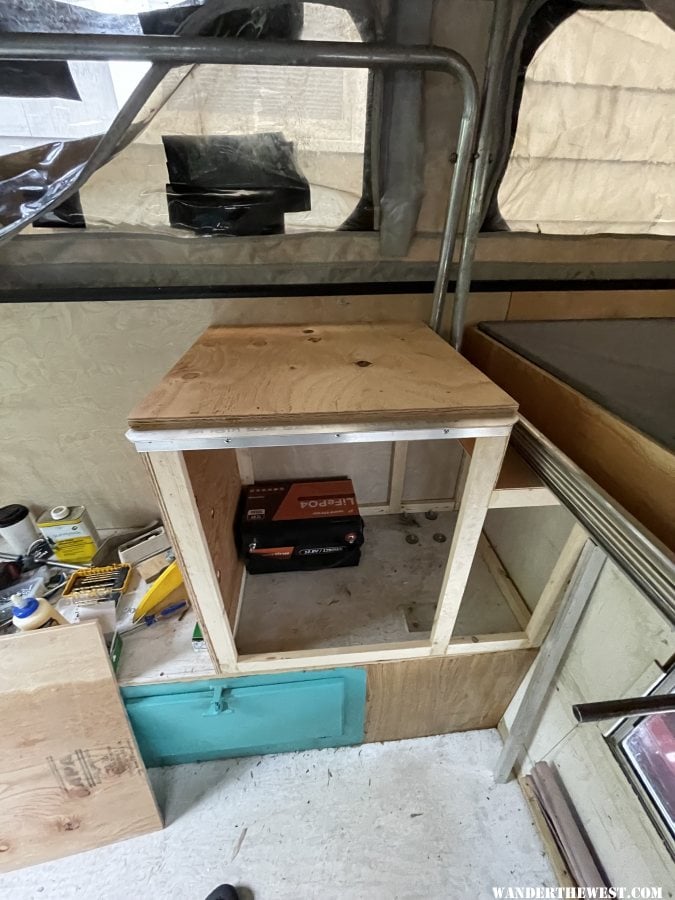
 
Thanks Vic!

Finished priming the cab over and got it installed. I predrilled some countersunk holes and used some exterior liquid nails where the cab over meets the frame. The fitment wasn't perfect leaving some small gaps and I had sealed some of the frame with epoxy so I figured wood glue wouldn't be best for this. I also put some polyurethane sealant in the holes before I put the exterior screws in. I noticed there was a little flex when pushing down from above so I looked back at some previous photos and saw the two horizontal wood support pieces. I decided I would use .125" thick 1.5" aluminum angle in place of the 1x2" wood and fasten the 1/2" plywood to the angle. You can sorta see this in the last photo of my first post. More to come on this later.

gallery_12109_1533_1890444.jpg


gallery_12109_1533_729098.jpg


I started the roof by cutting the curve on the side pieces of the wooden frame along with the notches for the 1" aluminum square tube cross beams. I also had to cut an angle on the front of the side pieces to match the angle of the front of the cabover. To connect the frame I just used titebond 3 and pocket holes for simplicity. To attach the crossbeams I used some JB weld in the notches and cut some aluminum angle to make some brackets that I attached with rivets to the aluminum and screws to the frame. I also filled the crossbeams with spray foam to prevent condensation. I had to drill two holes along the length to fill it all the way. Feels quite sturdy and also light at this point.

gallery_12109_1533_3521000.jpg


gallery_12109_1533_2234114.jpg


Next up will be running the wiring for solar and the roof fan as well as adding more framing for the fan. Then will be cutting the foam panels and attaching them between the cross members. I haven't decided how i'll hold them in place until they're glassed. I'm thinking about putting thin plywood on the interior of the roof fastened to the crossmembers and some blocking. That will also help determine what my ceiling will be and add some strength. Another option would be to use some temporary blocking and glass the inside. This would be stronger but more difficult and wouldn't make for the best ceiling.
 
I put a layer of reflectix on the inside of my ceiling when I redid it. Without it, the different colours of the rigid insulation and the alum structure was too visible. Also taped it all with Duct tape for an airtight seal. Covered it with the same cloth as factory by buying it from ATC. Looks great.
 
Vic Harder said:
I put a layer of reflectix on the inside of my ceiling when I redid it. Without it, the different colours of the rigid insulation and the alum structure was too visible. Also taped it all with Duct tape for an airtight seal. Covered it with the same cloth as factory by buying it from ATC. Looks great.
That's a good idea. I put up the thin plywood but i think i may run my wires along the plywood and cover them with reflectix and headliner. A little extra insulation can never hurt.
 
I decided to go the thin plywood on the inside of the roof route so i cut some 1" thick strips (same as the foam) of wood and glued and nailed them to the perimeter.

gallery_12109_1533_625620.jpg


I then flipped the roof, installed the 1/8" plywood using TB3 and brad nails to the nailers on the perimeter and construction adhesive and screws to the aluminum. Then I cut and sanded the foam panels with 60 grit and rolled with a carpet seam roller to help with bond strength. I flipped the roof back to right side up and installed the foam with super 77 and spray foam around the perimeter.

gallery_12109_1533_3941417.jpg


Once the foam was in there was lots of filling to be done. I used mostly thickened epoxy and some spray foam. There was LOTS of filling to do as everything must be relatively flat and smooth. It took multiple coats and a lot of sanding to get it ready for glassing. For the glassing I did 2 layers of 6oz glass and marine grade epoxy which I used ~140oz of. It was a pretty difficult glass job but it went pretty well overall.

gallery_12109_1533_517521.jpg


Next was some sanding and patching air bubbles here and there. I did the fill coat today and will start the sanding tomorrow. I'm hoping to get it primed this week. I'll be using the same primer as the cab over, interlux epoxycoat, and then i'll use rustoleum marine paint. Hope to get that done soon.
 
The roof has been primed and painted with two coats of the Rustoleum marine topside paint. This paint was super easy to use and looks pretty good. I wish it wasn't gloss though, you can see every imperfection and with my glass job there are a lot. Luckily it's just a roof and it will be water tight. Here's a picture post priming, forgot to get one after it was painted.

gallery_12109_1533_177240.jpg


After paint I started the fan install, first using my router I cut the ceiling plywood back to the aluminum framing. Then using some butyl tape and screws I fastened the Maxxfan flange to the roof. I still need to seal it up with some lap sealant. I also sealed exposed lower edge of the plywood frame with some epoxy.

gallery_12109_1533_362955.jpg


I wanted to take advantage of the good weather so I prepped the exterior for paint, removing all trim and windows. I removed all the residual butyl tape with some adhesive remover and a wire cup on a drill. I also removed all the decals/pin stripes with a decal remover wheel. Then I primed with some kilz and painted with Sherwin Williams Emerald exterior latex paint. Looks pretty good but will look even better when I finish painting the trim black and get that installed.
gallery_12109_1533_66706.jpg

gallery_12109_1533_264829.jpg


Roof install will be next, getting everything prepped so it doesn't end up on the ground in the process. I'll be happy when I can start working on the interior and don't need a tarp to keep this thing water tight.
 
Well the roof is on with no major issues. I started by mounting the lifting arms with the roof upside down. I used 8 1/4" bolts to secure each rear corner brace and 6 1/4" lag screws for the fronts. I did make a quite large mistake installing the driver side on the passenger and vice e versa. I labeled them but somehow missed it and didn't realize it until I had already attached the lower brackets on the camper.

gallery_12109_1533_988573.jpg


With the arms swapped, this made the torsion bars under a lot more preload which was incredible difficult to attach and impossible to lower. So, I put the sawhorse back on the cab over, took off some of the preload with ratchet straps and disconnected the front half of the arms. Once they were swapped things went together quite a bit easier and the roof lowered easily but with another issue, It doesn't close all the way in the front.

gallery_12109_1533_637160.jpg


When I crank down I start to feel resistance at the very last few rotations. I can force it those last few turns but if I let go of the crank it'll slowly unwind.

gallery_12109_1533_658990.jpg


It was suggested that I remove the set screws that set the length of the lift poles and lower the roof. When I did this the roof closed more and the front poles got shorter but bottomed out and the roof still didn't close. So maybe I cut them shorter? It seems to make sense but I'd hate to ruin them. I guess I'll start with a small amount and see if it makes a difference. Anyone have anyone have any experience with this? I've triple checked measurements from the old roof for where the brackets were mounted in relation to the lower edge and distance from the floor in the up position and they all match up with the new. Perhaps the sides bow in a bit and the old bowed out. Also the new roof is probably lighter than the old one so that may not be helping.

I also got the maxxfan fully installed and sealed so the roof should be almost fully waterproof, besides it not being fully closed. I'll need to get the window and all the trim back on next.
 
Looks like some ding repair happening in the back ground while you had the resin out.
 
Beach said:
Looks like some ding repair happening in the back ground while you had the resin out.
That's right! I always mix up too much resin and always have dings to repair so I just plan ahead. Still haven't finished that ding repair....
 
Finally getting back to posting about camper progress. We took some time off from working on the camper to remodel out kitchen but have been at it strong the past couple months. Getting really close to being able to finally use this thing.

I did a pretty bad job of taking pictures over the last few months so I'll try and fill in the gaps.

We got the bed overhang supported with some 1/2" plywood and aluminum angle. After I rebuilt the overhang I noticed there was some flex to it. The previous overhang had some OSB pieces running left to right which I thought were just spacers for the bed to add more storage but those were structural. I decided to mimic those but use aluminum angle for some added stiffness but with less weight. The aluminum was glued with gorilla glue and bolted through the bottom.
gallery_12109_1533_1245533.jpg

gallery_12109_1533_3572489.jpg


I then added the bed surface which is just 1/2" plywood that we later covered with some canvas. The bed is way sturdier now, cant feel any flexing with two people.
gallery_12109_1533_3480752.jpg

We've also been trying to figure out how to get a North South queen sized bed. We think we've come up with a solution that we like but I didn't take pictures. I'll add more on that later.

When I bought my camper it was missing the roof trim on the passenger side. The rest of the trim has a T slot for a bulb seal to go so I needed a replacement. After trying every RV supply store in my area and contacting Palomino and not having any luck, I decided to wing it. I decided on some garage door seal trim I found online but the issue was it didn't have a drip edge that overhung the lower half of the camper. After looking at some flooring transition trim in my house I realized that was the perfect shape and is pretty cheap. I bought a couple of these and painted them and screwed them in place. I then decided it would be a good idea to add that same trim all the way around to extend the overhang since there's still a bit of a gap. On the sides with the existing trim I just riveted it in place.
gallery_12109_1533_1021312.jpg

gallery_12109_1533_1691763.jpg


More to come...
 
good work, and thx for the pics, and reporting..
now i want to see what u did with the kitchen !!!
go
 
Made some progress on the bed extension setup. I originally had one piece of 1/2" plywood that ran the full span sitting on 1.5" aluminum angle but that was way to flimsy. I added aluminum angle on the underside of the plywood which felt pretty good. I decided I would just build a cabinet on the driver side that would be the same height as the bed so then the extension would just go to the front edge of the cabinet and sit on aluminum angle. That felt ok but I decided to just do the same on the passenger side as well. Here's what we came up with.

gallery_12109_1533_841736.jpg


gallery_12109_1533_2016671.jpg


gallery_12109_1533_603128.jpg


gallery_12109_1533_1648664.jpg


gallery_12109_1533_994723.jpg


Close-up of the extension. It's 1/2" 5 ply with a piece of 1/8" 1.5" aluminum angle. I glued with gorilla glue and bolted the angle to the plywood. Cabinets are framed with 1x2s I ripped from some 2x4s and put 1/2 plywood on the outer sides and tops. Lightweight but strong. Gotta add some shelves in the cabinets and figure out how I'm going to do the doors. Not in a big rush to do that though.

Getting close to using this thing! We got the mattress cut and will start making the covers for that.
 
Back
Top Bottom