Photos of Struts to Lift Roof

menoco

Advanced Member
Joined
Aug 19, 2011
Messages
41
Location
Wyoming
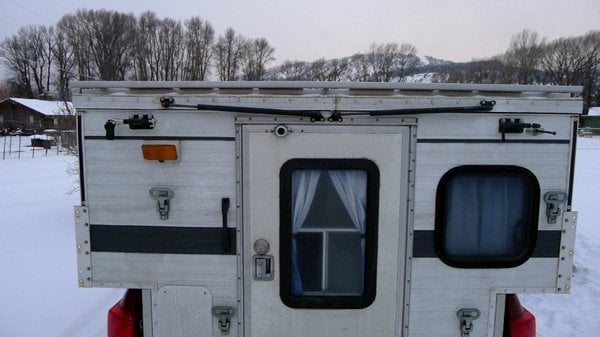
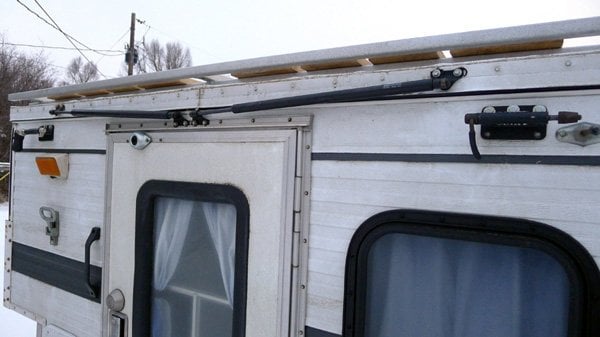
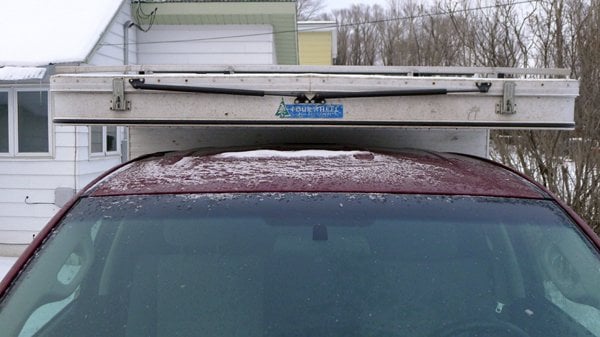
Does anyone who has installed struts to lift a roof have photos of the struts in place and in operation?
I have just put a 2002 FWC Hawk on my 2010 Tundra. With roof rack and bikes it's a challenge to lift. Certainly discourages lifting for short stops. There are a couple of good discussions on struts:
http://www.wanderthewest.com/forum/index.php?/topic/4825/page__st__20
http://www.wanderthewest.com/forum/index.php?/topic/4899/
But I have a hard time picturing how these struts work and are installed. I'm both a newby and not mechanically-minded. So, looking for help on how to do this job - or how to get it done.
Thanks,
Armando
 
If you decide to do side struts (can't be done if you have a awning) see this link. I put pictures of positions on my Hawk.

http://www.wanderthewest.com/forum/index.php?/topic/4825/

Keith
 
Even more prior discussions. Thanks. The Suspa C16-15952 are available for $30. Now see that FWC has them for sale, placed inside, on the front lifting panel.
Keith, the side struts look like the way to go, and thanks for the photos, even of the installation. Will have to consider. I had pictured us sitting in the desert under an awning.
Armando


My ATC camper has the struts on the ends. They work quite well. You can see pictures in my blog: My link
 
Lots of valuable info, and I even got thru the 24 pages on the Shocks Thingys post. Thanks again to all.
Based on lessons of others, I think I’ll go with the Suspa C16-15952, which is 40 lbs, extended length 35.43” and compressed length 19.29”. And I like the idea of putting sets in front or back, overcab or overdoor, instead of inside. The posts/photos of Weatherman and esimmers look best for me.
May I ask a couple of specifics.
1. Much discussion of 2 v. 4 struts and 40 v 60 lbs. How about going with 4 struts @ 40 lbs, 2 on front and 2 on back? Could do it incrementally, and place 2 in back first and see how that lifts a loaded roof.
2. What brand and size of brackets? Come with Suspas?
3. What size on screws? Don’t want to damage roof.
As I said initially, I am mechanically-challenged. So this is a BIG JOB for me. Feel free to specify size of tap and drill bit and put an "X" on where I place bit.
Armando
 
1. Much discussion of 2 v. 4 struts and 40 v 60 lbs. How about going with 4 struts @ 40 lbs, 2 on front and 2 on back? Could do it incrementally, and place 2 in back first and see how that lifts a loaded roof.

Yes, two x 40lb in the front and in the back is the most-common way people have done it here.
At first I only had them in front -- as a test -- since my extra weight, two solar panels, is all up front. But I noticed that even though I hardly needed lifting help in back it wouldn't hurt, so I went ahead and added two in back...as most people do.

3. What size on screws?
I used #8 x 3/4" (...or #10...) self-tapping (aka "self-starting") No need to pre-drill or tap anything. They could be stainless steel...wouldn't hurt.

As I said initially, I am mechanically-challenged. So this is a BIG JOB for me.
Armando

Me too!...or if not mechanically challenged, then experience-impaired. So, measure-twice -- or 3 or 4 times -- drill once. (and I still drilled a couple/few extra "mistake holes").
Use Proflex RV to seal around the screws -- goop some of that on the threads of the screws before you set the screws into the roof/body of the camper (and to seal any "mistake holes").
 
Mark,
Used your post to order my stuff. Found the struts and brackets on eBay. $138. I can picture myself up on ladder, in one hand the drill and in the other iPad with your photos. Will give you and others who helped me with advice a report in couple of weeks.
Armando
 
...in one hand the drill and in the other iPad with your photos....

OK...but I'd suggest an Android tablet might work better -- more flexible and less limited by one man's vision...
But it may work out, nevertheless.
wink.gif
 
Armando sounds like you have it all together.Definitely use the stainless screws.If you figure it right you only have to drill one hole per bracket,as you use the original hole on the roof for one hole.You have to drill two holes for the lower bracket.When I did mine I measured to the center of the lower part of the camper and placed the lower brackets each side of center,than raised the roof to find the other mounting point.
Good luck.If you need help fire up a post and someone will help.
Frank
 
I did it. Installed pair of struts front and back. Afterwards, my wife, all 5'2" of her was able to lift and lower by herself. Thanks to all for your help.
I was able to use an existing hole on top for each strut. Do notice that the last couple of inches of lifting in back is still a hard upwards push. Wondering if either, should have placed top brackets closer so that getting upwards push all the way, or if strut has reached full extension just short of top and it's actually resisting the last bit? Might be tricky to move top brackets in an inch or two, since would be right over existing hole.
We are off today on a several week shakedown trip to SW desert. Thanks again,
Armando

The lift in the back is harder even with the lifts.Don't know why except may be that you lifting closer the the lift panel,just a thought.You don't have many choices where to attach the brackets.
Enjoy the easy lifting.
Frank
 
Note that in extreme wind situations the struts may make the roof impossible to lower. If you find yourself in that situation, I would recommend removing the struts before attempting to lower the roof. I made the mistake of wrestling with mine until I had tweaked the end panels a bit.
 
Friends,

Just completed our initial trip in the 4Wheel Camper, a 2 week loop across SW desert parks and then up Pacific coast. Time for a follow-up report on struts.

I had put off installing them because of the cold, snowy Wyoming weather in November. Day before we were to leave, I had no choice. Time to put on the struts.

All your advice was right on. Wasn’t too hard, less than two hours. Starting in the back I placed the bottom strut brackets side-by-side, and the top brackets lined up right over existing screws. Beginners luck? So only had to drill two new ones. On front, placed top brackets first, again using existing holes. Last and hardest part was to drill-screw lower brackets. Had to lay across hood and windshield with my wife pushing the soles of my boots to keep me in place. Wish I had that photo!

The result isn’t pretty, but works perfectly. My wife can raise and lower the roof by herself. I make the short circle releasing hold-down clips, give the OK command, and my wife has roof up before I pull out and place entry steps. A quick pop-up of roof is not a big deal.

Shake down trip was just what needed. Discovered how much room there really is for traveling, cooking, and living in camper. Shopped en route fitting out camper, such as at Ikea and bought several sizes of soft sided storage boxes that work great to separate and organize gear.

Also discovered a couple of problems, and shortly will post Qs about fuses that keep burning out and freezing water drains.

Thanks again to all for your help,

Armando
 

Attachments

  • 1-2012_12_12_LX5_0470-Rear 72x600.jpg
    1-2012_12_12_LX5_0470-Rear 72x600.jpg
    100.8 KB · Views: 191
  • 2-2012_12_12_LX5_0475-Rear-Close 72x600.jpg
    2-2012_12_12_LX5_0475-Rear-Close 72x600.jpg
    97 KB · Views: 187
  • 3-2012_12_12_LX5_0479-front 72x600.jpg
    3-2012_12_12_LX5_0479-front 72x600.jpg
    207 KB · Views: 172
Do you think you can reverse both the front and rear driver's side struts, so that the metal shaft part is always pointing down? In other words, have the metal exposed part of the struts towards the center of the camper, like the passenger side struts are. That might keep the seals inside the plastic part in good condition, i.e., crud and water will not be held in contact with the seals by the larger plastic part. Just a thought.
 
....so that the metal shaft part is always pointing down...That might keep the seals inside the plastic part in good condition, i.e., crud and water will not be held in contact with the seals by the larger plastic part...

I agree with Allen's suggestion -- I think that's the way most people install theirs (based on the photos posted): Shaft down.
But who knows if it really matters. There are a lot of things where "the better way" isn't much different in practice from the less-preferred way, and this may be one of those.
 
What I have found about weathering of the struts is some blisters on the bodies.I removed the struts sanded them clean of the "rust",primed them,than using "electrical" tape covered the bodies to keep the moisture off.Since I live on the coast I think the salt air in the fog we get here has caused rust blisters.
I think what I did will solve the problem,keeping the bodies from contact with the salt air.
IMO the "piston" should face up,seems that how they get placed,even on the FWC inside installs.
Frank
 
Good job. It looks like he did it both ways. First pic is not the same as the second pic. Now to the big question. Did he really read all twenty eight pages (is it more now?).
 
... the metal shaft part is always pointing down... That might keep the seals inside the plastic part in good condition...


That is exactly how the manufacturers of these struts recommend they be mounted. Shaft down so that the seals stay lubricated.
 
Back
Top Bottom