POD: Homebuilt foam core fiberglass skin pop-up camper build thread

Being 150 hours in, how is the project feeling?


Entertaining but a fair amount of work. I enjoy this type of things though, just wish I had some more time to dedicate to make timely progress. (Also wish I started earlier in the winter but we're having a crappy summer weather wise anyways). If there were quality & affordable premade panels on the market to use as a jumping off point it sure would be nice though.

If weight savings wasn't an ultimate goal I think going the traditional aluminum framed route and applying a skin over that would probably save time as well.
 
It is kinda fun though isn't it. Time isn't all that important when the end result will be so cool and fun. Keep it up.

Home Skillet
 
Update 10 (185hrs) I finished off almost all the panel laminating, I've just got the exterior of the rear portion of the passenger all to do. However that doesn't really affect assembling the rest of the panels back together so I went ahead on that this weekend and will knock out that last panel lamination after work one day this week.

First off I got the floor all leveled out up on some concrete blocks, this will allow me enough access to the under edges to do the taping work. Then I reassembled all the panels with screws to make sure things were fitting up right (they did!) and then undid various joints to apply thickened epoxy and then screwed the joint back together. After wards I ran a thickened epoxy fillet along the inside of the joint. I finished off epoxying all the joints except for the rear wall and the rear portion of the passenger wall which I need to finish off still. From here I'll need to do a "tape" lamination on the inside of the joints and also on the outside (before doing the outside I'll do some more structural filling/sanding/fairing work, best to get it as good as possible at this stage to save hassle later).

Once this is all done I'll move onto building and fitting the roof cores around the lower camper to make sure it all fits. Also I can do parallel path work on portions of the interior and the lower door.

All the tape is on top of peel ply so I didn't bother to peel it all off since it will come off with the peel ply. I'll remove portions of the peel ply as I need to for the taping work and anything else that comes up. The rest stays on until I start the fairing work of the whole thing, makes it nice because I don't need to worry about getting stray epoxy on the surface (which is happening while doing the fillet work) of it since it gets peeled off.

2011-08-07_19-31-28_327.jpg


2011-08-07_21-11-03_629.jpg
 
Hey Pods

I like your design.

:)

It has been interesting watching your build thread.


How are you supporting your cabover bed ?

No catalever ?

It looks like there is a wood frame member where the cabover bed meets the body of the camper ?

Are you going to have external bracing ?

Or will the fiberglass sides be hellping to support that cabover weight ?

Just curious.

On most cabover campers, they will somehow catalever the cabover bed frame so the cabover is also tied in to the side frame structures.


.


.
 

Attachments

  • old frame.JPG
    old frame.JPG
    73.1 KB · Views: 1,216
  • cabover.jpg
    cabover.jpg
    127.9 KB · Views: 1,035
It's a cantilever. The whole thing was looked at like a composite beam (which it is) and I just took the loading of it just before it meets the walls which should be the highest load concentration. The top of the rails have much more material on them which is needed based on the beam calc. to carry the load. I used some fiberglass plutrusions along the top portion of the rail cores to be cost/time effective it getting the build up of material needed there rather than doing it all by hand layup. There is some weight/strength trade off in using the pultrusions but it's small in the overall scope of the build. The blue tape is in the way otherwise you'd see a grey strip along the top of the rails (you can see it on the interior picture).

The wood isn't considered "framing" in the sense it's not intended to carry loading in the way you are thinking. Its there to make shaping/assembly of the cores easier and helps make sure the skins stay tied together since it has much higher shear strength than the foam.

Once I get all these seems laminated up I'll actually put a load on the cabover and see how well theory aligns with reality... :p
 
Pods8,

I see where you are going with the composite beam as the cantalever. It should work and you have certainly done your calcs. However, just a word of warning. My camper cabover (with the aluminum cantalever) has about 0.75 inches of flex at the front when all of my weight is hanging on it. Only about 0.5 inches with me lying in the front of the cabover. This was unexpected and it goes to show how much composite will flex. I can't remember how many layers of glass you were planning on using, but with 2 layers of CF (fibers running in opposite directions) I still get a little flex ( and this is with the aluminum cantalever.

Is there a way for you to test this as you go? Might be worth it.

On another note. Man those photos bring back memories. I really like your design and think you are on to something here!

Home skillet
 
I can't remember how many layers of glass you were planning on using, but with 2 layers of CF (fibers running in opposite directions) I still get a little flex ( and this is with the aluminum cantalever.

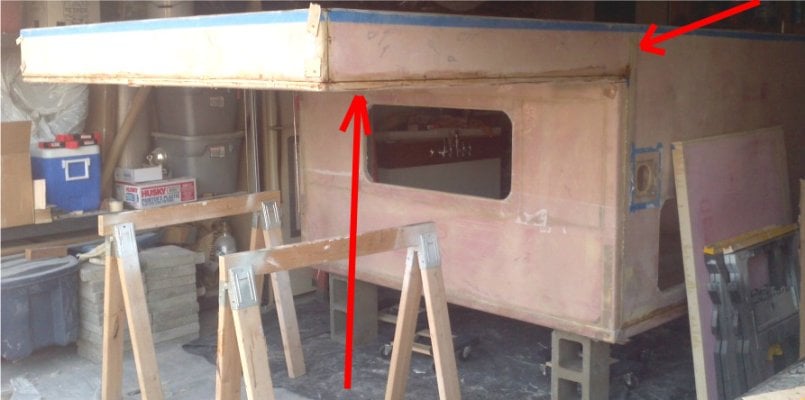
The glass skins (or CF skins in your case) on the sides of the rail really don't do much for the load bearing, its the parts that are on top of the rails (and the aluminum under it in your case) that take the loads. Due to the way I wrapped the sides over the rails I've got ~6 plys of skin glass at different orientations along the top of those rails (3 plys from each side wrapped over) however the real load bearing capacity is the fiberglass pultrusions which is the layer right underneath those skin plys. There is ~1/4" of fiberglass there across a 2" wide rail (equivalent build up of about 27plys of the skin glass I'm using if I would have laid something that thick by hand).

Is there a way for you to test this as you go? Might be worth it.


Yup, as I mentioned previously once I get the seems all glassed up so it's all truly held together I plan to load test it to see how it handles the weight and what kid of deflection I get (both from a comfort standpoint and also so I don't hit the top of my truck!). I plan to suspend a platform off the front of the cabover a couple inches above the ground. I'll record the height off the ground and start loading up the weight. I'll be able to see how much the cabover deflects doing this and also if something does happen to fail things would only drop a couple inches which is far safer than weight dropping 3-4'!

Currently due to curiosity I've breifly done a pull up on the front edge of my camper even though the seams aren't all glassed up. Held so far. I noticed the passenger wall that has the short piece flexed inwards a tad though, however as mentioned the seams aren't tapped yet which will counter act that motion and also the eventual internal cabinetry will brace the wall as well. I'll know more after load testing it.

On another note. Man those photos bring back memories. I really like your design and think you are on to something here!

Home skillet


All kinds of sticky/dusty fun! :p Yeah I hope I like it when it's all said and done otherwise I'll go mad, haha.

Still digging your actuators? I'll need to order up some units sooner or later here as I shift over to building the upper half.
 
Still digging your actuators? I'll need to order up some units sooner or later here as I shift over to building the upper half.


I probably should post an update, but ya, the actuators are performing well. Rate of extension and retraction seems to be unchanged over time or with the position of the truck (sidehill, etc.). The front two run about 3 inches slower then the back two and so I give just a little upward push on the front while raising them to even it out. They reach full extension at about the same time with just a little effort. My concerns surrounding the inability to control each ram individually turned out to be unfounded. It is pretty nice to push one button and just step back.

Another thing that I have noticed: I was a little worried about the top only being held onto the bottom by the rams. I felt sure that there would be some lifting when at highway speeds or when a big truck went by. I was wrong. On my recent trip to Montana I was cruising at 70mph into a 35 knot headwind with one big rig after another coming right at me. The whole truck would rock, but not even a wiggle between the top and bottom of the camper. I attribute this to the super tight fit and the aerodynamic (unplanned really) shape of the top. With that slight downward slope of the top, most of the air seems to actually push it down, not up. I don't know, but it would be nice to see it in a wind tunnel :) Whatever the case, I am growing extremely comfortable without clamps and such.

The on-demand hot water heater is the ticket. That thing is awesome. I do loose about 1/4 of a litter of wate waiting for the hot water to come up, but it is hot and shuts off when I am done. Why arn't more campers using something like this?

Home Skillet
 
Why arn't more campers using something like this?


If a manufacturer was to install one they'd have to externally vent it for liability reasons I suspect.
 
How are you supporting your cabover bed ?


It's the new WTW birth control method. Cuz there's no knockin boots in that thing :D
 
It's the new WTW birth control method. Cuz there's no knockin boots in that thing :D


Just ride the wave! :LOL: Well my second son is due in 2months and that's the intended end of our family expansion so no need for the BC too much farther on here.

Honestly though I'll know more once I get to test things out here shortly but I don't think there should be too much concern. Deflection will be a bigger issue that failure.
 
If a manufacturer was to install one they'd have to externally vent it for liability reasons I suspect.


Heck, I externally vented mine. Took about 2 hours and the parts are everywhere?!
 
Heck, I externally vented mine. Took about 2 hours and the parts are everywhere?!


I didn't notice that the last time I was looking at your build, do you just have a vent on the side of your rig then? (Can't view your page at the office).
 
Ya, I used some flexible furnace vent pipe and tried t minimize the bend, then vented it out the side. I initially put a "box" type cover over it because I didn't know how much heat would be put out and didn't want to have a "heat back up problem" into the unit.
After having used it some now I have decided that a louvered cover would be fine and more low-profile. You can see the exterior vent in one of my last videos.

Home Skillet
 
Update (234hrs): Lower shell is all taped together. I did some carbon reinforcement work around the door frame but still getting a bit more flex than I want so I'll need to ponder how I want to handle that, whether its just more carbon or some other route (just tested it tonight so I haven't composed my thoughts).

2011-10-07_18-20-07_440.jpg


2011-10-07_18-20-16_912.jpg


Here's a shot with 320lb loaded at the front end of the cantilever. The tip of the cantilever dips down 1/4" which is fine with me however I'm displeased with the flexing I'm getting in the door gap. The door opening width at the top spreads about 5/16" with that load on it and may can door fit/seal issues.

2011-10-07_19-00-41_26.jpg
 
Great job Pods. it looks really good and terrific workmanship. I think you've nailed why ATC and others don't have a U shaped door opening. I had the question asked by a customer the other day and the answer is IMO what you found. Without a door "header" you lack structural integrity.
 
Coming together! Woot for another flatbed camper.


Slowly but yeah getting there, I think (hope) the top will come along a little faster as I've gotten better/faster at doing certain aspects of the construction. However the next few weeks will be chopping since little man #2 can show at any point now and I'm still trying to squeeze some hunting in. :LOL:

I am digging the flatbed aspect though!

Great job Pods. it looks really good and terrific workmanship. I think you've nailed why ATC and others don't have a U shaped door opening. I had the question asked by a customer the other day and the answer is IMO what you found. Without a door "header" you lack structural integrity.


Framing it in completely is always a fall back/fast fix if needed. Doing a rear door like this would be far less of a problem because I wouldn't be fighting the cantilever loads and I know I could have that stiffened perfectly fine. A framed in door isn't the immediate solution for me though because of the overlapping hard walls and the upper half would block too much of the lower door (thus I'd need a U door up there are no point in doing a door up there for only getting in when the top is down). The ship isn't sunk, it just takes more reinforcement/thought if I want to keep a U door opening. Still collecting my thoughts... Once of the nice things on the fiberglass is you can always add layers on fairly easy. ;)
 
pods,

Just a quick thought on the door flex issue. Looking at your photos I'm guessing the flex you are seeing is coming from the floor at the door area. You might try weighting the door area and the cantilever equally and see how much deflection you get. If it is less then reinforcing the floor/door frame and attaching to the flatbed in the door area of the floor might solve the problem.
 
Back
Top Bottom