Question on replacing Battery Separator

Kokopelli

Senior Member
Joined
Jan 1, 2008
Messages
134
Location
Durango, Colorado
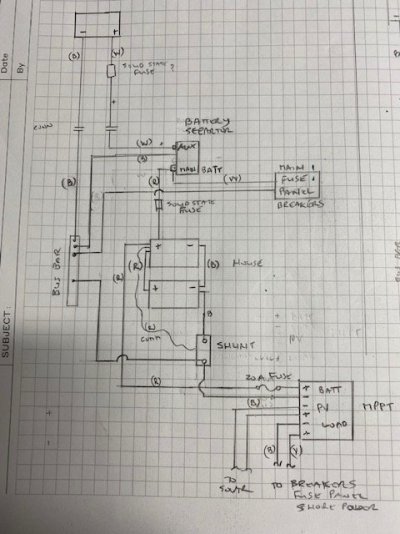
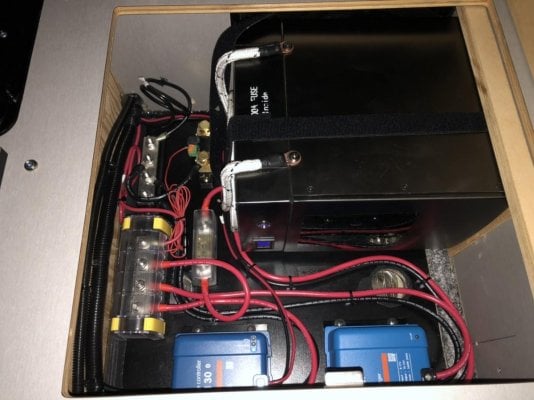
I have been upgrading the battery system in my Eagle. I got a Renogy smart 100ah Lithium battery and a Vitron MPPT 100/20 charge controller. The other evening I was checking things out and noticed a 2 amp draw on the system when I had nothing running. Didn't have time to trouble shoot then, so looked at it the next morning. The draw was .8 amps by then, and the battery had dropped to 88% overnight. I isolated it to my Sure Power 1314 Battery Separator which was warm. Took off the negative wire to it and the draw dropped to .1amps (the draw from the charge controller) and the separator cooled off. Plugged it back in and the draw stayed at .1. Started the truck, then turned it off and the draw was back to .8. Unplugged the connector from the truck to camper and it dropped back to .1. Overnight the battery only dropped to 99%. So I need a new battery separator.

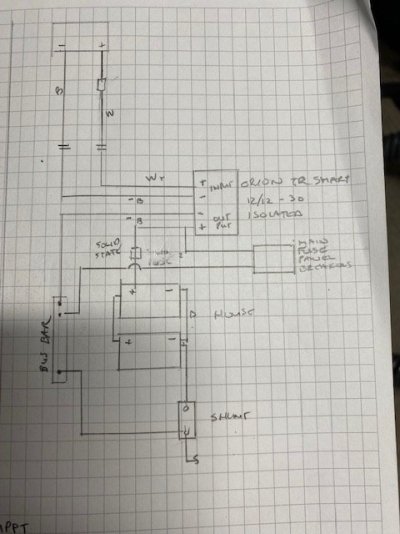
I searched through posts here on battery separators and read on line and am a bit confused on what I should replace it with. Sounds like the Sure Power 1314 has a draw to it even when new. Folks here recommend the Blue Sea 7622ML and the Blue Sea 7619 (if you don't need to fancier controls). Then I read that using an ACR between a lithium house battery and the truck batter causes problems as they are not the same. The Blue Sea 7622 has minimal draw - does the Blue Sea7619 also or does it draw more like the Sure Power 1314? Can I use those with a Lithium house battery and a regular battery in the truck? Do I have to do anything special?

I don't have a lot of power draw in my truck so may not need to charge from Solar/house to vehicle, but if it doesn't hurt anything, I'm fine with it. I just want something simple I don't have to worry about, that won't take a lot of power, that will enable the truck to charge the house battery when driving, and that works well with the Renogy Lithium battery and Vitron controller. Or I could just forget all the and only use the solar.

Thoughts?
Thanks!!
-Rick
 
I think you have figured out what is going on. The Sure Power isolator uses a lot of power when on (0.8A) which is why it gets hot. The resting voltage (~13.3V) of the lithium battery is high enough that once the Sure Power turns on it won't turn back off, even after the truck has started, so it will drain your lithium battery over time.

You have 3 options to deal with this:
1. If you don't need charging from the truck (which you probably won't get much of anyway) then just disconnect the camper from the truck and let solar do its thing to keep the camper charged.
2. Switch out the Sure Power for a Lithium specific battery separator. This will work much like the Sure Power did but will correctly isolate the batteries when neither is charging. You still will likely only get a few amps of charge from the truck, but it will allow the camper solar to keep the truck battery charged if you park outside.
3. Switch to a DC-DC charger . This will give you a consistent charge from the truck, but is expensive and may require you to replace the wiring between the truck and camper. It also only goes one way, the truck will only charge the camper battery, the truck solar won't charge the truck battery.
 
+1 to what has been said already. You could also just put in a battery combiner/separator switch and manually connect the two systems when you want to, or as you already indicated, the BlueSea series of ACR include some with manual/remote switching. There have been a few of those for sale here as people switch over to DCDC charging.

The good thing is that you have located the source of the drain... it is both the inefficient 1314 as well as the voltage differential between your Lithium house battery and the lead acid truck battery.
 
I believe that all of the solutions offered so far, other than the dc to dc converter or permanent disconnection, fail to address the issue of high alternator load or fuse opening if you drive the truck with a deeply discharged lithium camper battery. The lithium battery in that state will take a lot of current, limited only by wire resistance, alternator output, or circuit protection. You want the current limiting that a dc to dc converter provides unless you disconnect from the truck charging system altogether.
 
I have a Renogy 20 amp dc-dc charger and use a jumper wire system with the dc-dc charger off to charge my truck battery from solar when parked.
 
With the stock 10AWG wiring, this is unlikely to happen. The wiring provides plenty of resistance to limit the current. Even with 'upgraded' wiring it is unlikely to be an issue due to the length of the wire. As an example, I installed 6AWG wiring from the alternator to camper, and even when under 50% SOC, the most current I see to the battery is ~10A and usually less than that.

The key thing here is the length of the wire - even with 4AWG to the camper (30' round trip) you would be hard pressed to get more than 40A into the battery, unless your alternator voltage is much higher than normal.

Jon R said:
I believe that all of the solutions offered so far, other than the dc to dc converter or permanent disconnection, fail to address the issue of high alternator load or fuse opening if you drive the truck with a deeply discharged lithium camper battery. The lithium battery in that state will take a lot of current, limited only by wire resistance, alternator output, or circuit protection. You want the current limiting that a dc to dc converter provides unless you disconnect from the truck charging system altogether.
 
rando said:
With the stock 10AWG wiring, this is unlikely to happen. The wiring provides plenty of resistance to limit the current. Even with 'upgraded' wiring it is unlikely to be an issue due to the length of the wire. As an example, I installed 6AWG wiring from the alternator to camper, and even when under 50% SOC, the most current I see to the battery is ~10A and usually less than that.

The key thing here is the length of the wire - even with 4AWG to the camper (30' round trip) you would be hard pressed to get more than 40A into the battery, unless your alternator voltage is much higher than normal.
I have noted much the same, with 2AWG I was afraid of overheating my alternator, but have only seen 33A (battery was not discharged much though) from the truck to the camper. I'm confused by that though, since I was sure the 200AH BBorn battery bank would suck down a LOT more...
 
When I built that system in our truck years ago I chose 6ga. conductors and chose 80A breakers. The alt is capable of 120A according to the mfg. I deliberately left some alt capacity to run the truck.

Batteries have an internal resistance, they limit their charge rate automagically. Just because you can supply 100A to the battery doesn't mean that it will charge at 100A. Now if you are using a super-capacitor instead of a battery, well, we're going to need a different approach......

Seems to me that it would be possible to tune the opening/closing voltage of a Blue Sea ACR with a resistor or two in the ground reference wire. I have not worked out if this would drive it up or down, but it would change it.
 
Vic Harder said:
I have noted much the same, with 2AWG I was afraid of overheating my alternator, but have only seen 33A (battery was not discharged much though) from the truck to the camper. I'm confused by that though, since I was sure the 200AH BBorn battery bank would suck down a LOT more...
Vic - do you have your BB batteries directly connected via a battery separator or are you using a dc to dc converter (I thought you had an Orion 12/12-30)? If so, the converter is limiting its output to 30 amps, which means it would be drawing 33 to 35 amps typically from the truck.
 
I tried both ways. With AGM's, I would sometimes see 90A for 30-45 minutes before the internal resistance and charge level would level off at 45-30A over the next few hours (275AH Rolls Batteries). I was expecting over 100A with the 200AH BattleBorn setup. Nope, just 35A or so.

I did NOT do extensive testing on this arrangement, deciding that the intelligence of the Orion was preferable to me keeping an eye on some gauges while driving if the charge levels were going to be that similar.

I may test again when I have a LOT more time on my hands...
 
I have also replaced my batteries in my 2012 eagle, installed a Victron shunt and Victron 100/12 MPPT, and will install a Li and I am now replacing the Sure Power 1314 Battery Separator as it is clicking and not charging the batteries at all. I purchased the Orion-Tr Smart DC-DC charge, but the isolated model.

Is the Isolated model going to be an issue, or can it be used?

I am not great with electrical vehicle wiring or diagrams but have sketched what I think is my current system and proposed connection to the Orion smart. I will have to confirm the wire gauge, (I think it is 10 gauge). The connection from the vehicle battery to the camper quick connect was installed by FWC Trigard. I also I labeled the thermal breakers as solid state fuses. Oops!

I will follow Jacks post for the installation as close as possible. EDIT: I have labeled Aux. and main battery backwards on the sketches and the existing thermal breakers are 30 amp.

I will also install a cooling fan as suggested by Vic


Wiring the DC-DC From the Truck:

Most recent campers should have similar wiring. I strongly recommend a circuit breaker for you battery such as https://www.amazon.c...e?ie=UTF8&psc=1 . This also acts as a convenient disconnect switch.

  1. For the Victron, download the VictronConnect App for your phone.
  2. Replace the 30 A thermal breaker near your truck battery and depending on the wiring to the camper, with a 40 A (10 gauge wire) or 50 A (8 gauge).
  3. Check the voltage on the “Main Bat” terminal of your battery separator – it should be the truck battery voltage. If not, stop here and troubleshoot or get help. Label the wires connected to the battery separator with tape (“Aux” and “Main”). in case you have to troubleshoot.
  4. Unplug the camper from the truck or disconnect the positive wire to the camper from the truck battery (or from the auto-reset fuse). Open the circuit breaker or disconnect the wire from positive terminal of the camper battery and tape the end. If you have solar, disconnect the panels. You may be able to unplug the panel(s) on the roof, or disconnect the positive wire from the charge controller and tape the end so it can’t short out accidentally.
  5. Find a location to mount you DC-DC Charger. Unless the DC-DC has remote voltage sense or adjustable charge voltages, the closer to the battery or the thicker the wire gauge, the better. If you can do the math to adjust the voltages, you can use 10 or even 12 gauge wire with the Victron. NOTE: The Victron can get hot, so make sure it has air flow.

  6. (needed to modify this panel)


  7. Disconnect the wire from the “Main Bat” terminal of the battery separator. Connect this wire (or an extension to it) to the input on your DC-DC charger.
  8. If there are two wires connected to “Aux Bat” post on the battery separator, disconnect them from the battery separator and connect them together. One should go to a 30 A auto-reset fuse – you can leave the fuse in the circuit or remove it. Be sure to tape the connection. If there is only one wire, disconnect and tape it. The Eaton 1341A battery separator has a black wire connected to a spade post. Disconnect it and tape the end.

  9. Sorry, forgot to take before pictures.
  10. Connect the output of the DC-DC Charger to your battery. If the DC-DC is not isolated(most likely), connect the single common ground terminal to the battery. If there are two ground terminals on the DC-DC, connect them together and then to the battery.
  11. Reconnect the camper to the truck (or connect the camper wire to the truck battery). Verify that you see the truck battery voltage on the input to the DC-DC controller. If not, check your wiring – trace the voltages from the truck to find the problem.
  12. For the Victron, with the engine running, open the App and set your parameters for battery type and engine running levels. The default Bluetooth pin is 000000. (The Victron website has detailed instructions on setting up and using the App.) You can change the Pin now or later. For a new Pin, choose something easy to remember – like your birth date in 6 digits. Write the Pin on a label and stick it on the controller. Also write the PUK number on the DC-DC Charger on the label as well. The PUK resets the Pin code to 000000.
  13. If you don’t already have a circuit breaker now is the time to add it. Close the circuit or connect the wire back to the positive terminal of the battery.
  14. Measure the battery voltage. Start your truck again, and verify that the voltage at the battery is greater. With the Victron, just check your App to verify the DC-DC Charger is charging the battery.
Any suggestions or comments would be appreciated.
 

Attachments

  • exist.jpg
    exist.jpg
    70.5 KB · Views: 48
  • proposed.jpg
    proposed.jpg
    60.7 KB · Views: 45
looks ok, both wiring diagrams have the ground from the fuse panel going to the bus bar. All grounds have to go to the shunt.
 
Thanks for the help Jon and Vic.

Just to confirm, the negative from the MPPT, shore power from my Iota (which is connected to my breakers?), and from the Orion TR smart should be connected to the shunt. My 3 charging sources.

Do I also disconnect the existing negative from the bus bar to the shunt?
 
I didn’t look at your diagram, but the shunt should be between the battery negative terminal and a negative bus bar. All negative connections for chargers and loads then connect to that negative bus bar. The idea is for ALL current in and out of the battery negative to flow through the shunt so the battery monitor can integrate the current draw over time and track battery charge state.

Here is a picture of my installation. The shunt is the brass device in the upper right above the battery, and the negative bus bar is the unguarded bus bar immediately above it.
 

Attachments

  • AB210F72-4807-408C-9EF8-14759343A0F8.jpeg
    AB210F72-4807-408C-9EF8-14759343A0F8.jpeg
    117.3 KB · Views: 47
Back
Top Bottom