You are using an out of date browser. It may not display this or other websites correctly.
You should upgrade or use an alternative browser.
You should upgrade or use an alternative browser.
Quick removal camper jacks?
- Thread starter UglyScout
- Start date
kmacafee
Senior Member
This seems to be a solution looking for a problem. Bolting and unbolting the jacks takes 2 minutes per corner at most. I do like the knob replacement idea instead of nuts.
Now, if all this creative and significant brain power could figure out a mounting system to replace turnbuckles, you'd really be on to something. ;-)
Now, if all this creative and significant brain power could figure out a mounting system to replace turnbuckles, you'd really be on to something. ;-)
ETAV8R
Senior Member
2mins vs. 2sec.kmacafee said:This seems to be a solution looking for a problem. Bolting and unbolting the jacks takes 2 minutes per corner at most. I do like the knob replacement idea instead of nuts.
Now, if all this creative and significant brain power could figure out a mounting system to replace turnbuckles, you'd really be on to something. ;-)
Then there's the stripped bolt once in a while and oh does it slow down the process.
2trout
Senior Member
KMACAFEE Said
My wife has suggested that I am guilty of this.....This seems to be a solution looking for a problem.
Well, maybe, but I think there's also the satisfaction of exercising your creativity and then using using your metal-working skills to fab the design. The kicker is when it works well!kmacafee said:This seems to be a solution looking for a problem.
I actually timed it just for the heck of it, and it's more like one minute vs. 25 minutes to put the four jacks on. The FWC brackets use 3 bolts each. That's 12 bolts, 24 washers, 12 nuts. Taking them off is a little faster, about 15 minutes. I am no stranger to the wrench, and I used a cordless socket driver..... and you can't tell me that you didn't drop at least one or two of those nuts and/or washers while you were at it and had to go crawling around looking for it. Now I can put my wrenches away, and it's one less thing to deal with when I'm trying to get packed or unpacked. It took me an hour to design and draw the thing up in Solidworks, and about two hours to machine the parts. It's also hard on your hands and wrists dealing with all of those nuts and bolts and wrenches. I would think that it would be an especially good thing for folks with arthritis.
Of course, in the grand scheme of things it's not a BIG problem, but what else are you doing?
Of course, in the grand scheme of things it's not a BIG problem, but what else are you doing?
ETAV8R
Senior Member
When are you going to start producing and selling them?cvant said:I actually timed it just for the heck of it, and it's more like one minute vs. 25 minutes to put the four jacks on. The FWC brackets use 3 bolts each. That's 12 bolts, 24 washers, 12 nuts. Taking them off is a little faster, about 15 minutes. I am no stranger to the wrench, and I used a cordless socket driver..... and you can't tell me that you didn't drop at least one or two of those nuts and/or washers while you were at it and had to go crawling around looking for it. Now I can put my wrenches away, and it's one less thing to deal with when I'm trying to get packed or unpacked. It took me an hour to design and draw the thing up in Solidworks, and about two hours to machine the parts. It's also hard on your hands and wrists dealing with all of those nuts and bolts and wrenches. I would think that it would be an especially good thing for folks with arthritis.
Of course, in the grand scheme of things it's not a BIG problem, but what else are you doing?
I have been on the hunt for washers and nuts several times after dropping them.
Hold tight for a couple of weeks. I am going on a trip next week, and when I get back I'm going to try to make a set of these that need no modification to the shoulder bolts, and that can be built without a milling machine. If it works out I'll try to document the fabrication process with lots of photos.ETAV8R said:When are you going to start producing and selling them?
I have been on the hunt for washers and nuts several times after dropping them.
Scott81621
Advanced Member
I'll buy a set!!!
Atlin
Senior Member
Has anyone just welded the nuts onto the jack or jack brackets? Would eliminate dropped nuts and the need for a second wrench. Might have to repaint the brackets.
Rafter C
Advanced Member
Aftermarket hydraulic bottle jack........ Can't imagine ever traveling without one. You get way more lifting ability, and they can be in a smaller package than OEM. Keep the OEM too.knobbytracks said:Off the subject a bit, but after removing the jacks, how do you lift the truck in the event you need to change a tire on the road? Thankfully I have not had to do this but if I do, I would use the camper jacks along with the OEM bottle jack to change a tire. I have not tried the OEM bottle jack for my Tundra but am assuming it won't have the "oomph" needed to lift the back end with the camper loaded. Thoughts?
Rafter C
Advanced Member
I think that goes on here a lot....2trout said:KMACAFEE Said
My wife has suggested that I am guilty of this.....
I have been kicking around the idea of making my jacks "quick release" and this is a great example of what I was also thinking, and very well executed.cvant said:After bolting and unbolting the 12 bolts on my jacks every weekend for the past few months, I built this set of plates and shoulder screws to make life easier. The plates are made from 3/8" x 2-1/2" 6061 aluminum from Mcmaster Carr. You'll need a six foot long section to make four plates, with enough left over for one extra in case you need it. The s/s shoulder screws are part number 90298A705. The shoulder screws will need modification on the lathe. (see attached drawing). The s/s nylon locknuts used to retain the shoulder screws are Mcmaster part 90101A243. I can't verify that this design will exactly fit all other applications, so I suggest that you make and fit a paper template first to see if you need to modify any part of the design.
Disclaimer : My camper is 4WC Fleet shell, so it is fairly lightweight compared to many others out there. This system may not work for everyone, and it is important that you determine the suitability of this design for your own specific purpose before proceeding.
When I went to post this and did a search, I noticed that someone else had a very similar idea. At least for me, this system feels pretty solid and definitely saves a lot of time and knuckles. I realize that not everyone out there has a mill and a lathe in their garage, but you might find a local shop to help you out on this..
I was thinking about using more of a hitch and receiver type interlocking set up.
or as posted above making the 2 half's like a giant hinge, to drop a pin down through
ETAV8R
Senior Member
I have stripped several of the bolts so not sure welding would be a good idea until you absolutely know you're not gonna run into something like that.Atlin said:Has anyone just welded the nuts onto the jack or jack brackets? Would eliminate dropped nuts and the need for a second wrench. Might have to repaint the brackets.
ntsqd
Custom User Title
Welding on hardware is generally frowned upon. Yea, I know it's done all of the time, but that doesn't make it right. When I want fixed female threads in something I drill and tap.
ETAV8R
Senior Member
Gonna resurrect this thread. Have you used these yet? Do they clear the side of the camper and/or jacks? I went with a smaller size.Mark W. Ingalls said:

ETAV8R
Senior Member
I picked up some grade 8 hardware and tried two different types/sizes of those knobs. 2nd type works great. I've had only two bolts on any corner at various times due to other bolts breaking because the threads get damaged. Never felt uncomfortable about it. Last night put on the new hardware and knobs. Helps having a McMaster Carr on the way to work.
The parts I used are:
These don't work: https://www.mcmaster.com/#5993k85/=1bjidgp

This worked great: https://www.mcmaster.com/#57715k76/=1bjido8

The parts I used are:
These don't work: https://www.mcmaster.com/#5993k85/=1bjidgp
This worked great: https://www.mcmaster.com/#57715k76/=1bjido8
billharr
Senior Member
Ok I ordered
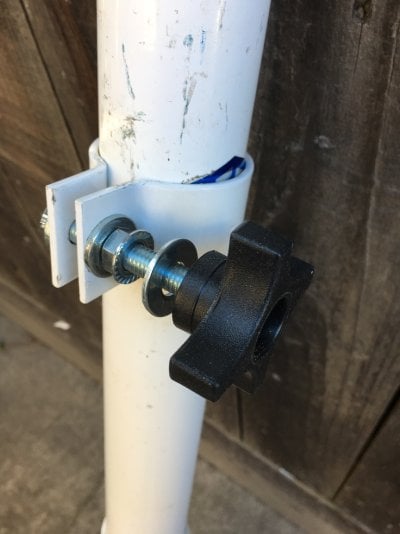
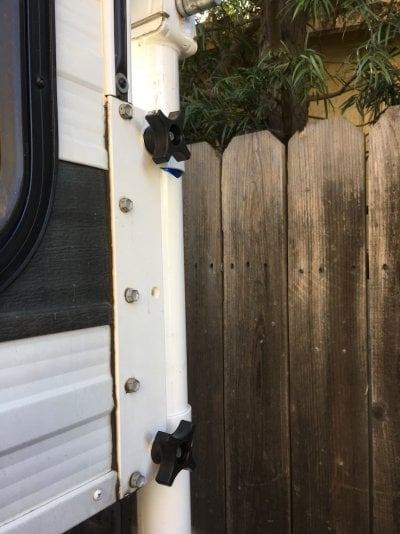
Davies Thermoplastic Four Arm knob, Flute Rim, Threaded Through Hole, 3/8"-16 Thread Size X 1/2" Thread Length, 2-1/4" Diameter (Pack of 10)
from Amazon $14.90. Got some flange nuts and 2 1/2" bolts at Ace Hardware. Tighten the jack clamps using the flange nuts upside down. See picures for details. Saves a ton of time taking the jacks on and off.
Attachments
Similar threads - WTW
- tex85
- Four Wheel Camper Discussions
- Replies: 4
- Views: 356
- TahoeT
- Gear Exchange
- Replies: 1
- Views: 487
- GPAY
- Four Wheel Camper Discussions
- Replies: 10
- Views: 1K
- kmehr
- Trucks, Truck Accessories & Mods
- Replies: 1
- Views: 361
- patrickkidd
- Truck Campers
- Replies: 6
- Views: 596