Recieved my solar panel today

craig333

Riley's Human
Joined
Jan 12, 2007
Messages
8,154
Location
Sacramento
My 100watt panel from solar blvd came in today. Its bigger and heavier than I'd pictured. I'm not in any hurry to install it. Don't even have a controller yet. Not prewired either so I'm not even sure how to do the wiring.

I'm considering using these for the install http://brightsolar-power.com/upload/ABS%20Plastic%20Solar%20Mounting%20Systems(2010).pdf
and wondering what you think of those?
 
My 100watt panel from solar blvd came in today. Its bigger and heavier than I'd pictured.

What's the width x height and weight of your panel, Craig?
 
wondering what you think of those?


Those mounts would work great if you were mounting the panel to the top of a standard plywood roof because you could drill them and put the screws where ever you wanted.

It's a bit different though mounting the solar panel to your FWC roofs. The only place we can drill is into those 1 1/2" roof frame slats. If you use those mounts...you'd still only be able to put one screw per mount into the roof frame per mounting point.

I would just use some "L" or "Z" brackets which would accomplish the same thing and look much more tiddy in the process. Or, use a full length front and rear "Z" mounting like FWC uses.
 
Pics? Mine doesn't get here till tuesday.


Sorry pods8, I don't have a picture of the FWC mount. It is simply a piece of sheet metal the full length of the panel (front and back) shaped like a "Z" with screws mounting it to each available roof stut. I guess one advantage of this over just "Z" legs...is that it will not get any lift due to high winds. I think the little "Z" legs look much better.
 
Sorry pods8, I don't have a picture of the FWC mount. It is simply a piece of sheet metal the full length of the panel (front and back) shaped like a "Z" with screws mounting it to each available roof stut. I guess one advantage of this over just "Z" legs...is that it will not get any lift due to high winds. I think the little "Z" legs look much better.


I meant craigs new panel, I ordered the same one but it doesn't get here till Tuesday, I'm wondering what it looks like. Sounds like it's got a junction box instead of leads which I like for my needs, means I can add my own style pigtail w/o voiding the warranty (which I've heard chopping their pigtail will do if it comes with one).
 
My 100watt panel from solar blvd came in today. Its bigger and heavier than I'd pictured. I'm not in any hurry to install it. Don't even have a controller yet. Not prewired either so I'm not even sure how to do the wiring.

I'm considering using these for the install http://brightsolar-power.com/upload/ABS%20Plastic%20Solar%20Mounting%20Systems(2010).pdf
and wondering what you think of those?


"Not prewired" is what I would deal with first.
Make sure you get a suitable controller.
Do you want to place the panel on your roof or store it somewhere and only use it when you get to camp? If the second you can easily drill through the side of your camper and have a plug for attaching a cable. The panel can be out in the sun while you are in the shade.
If you need to be on the roof, think first of how you are going to get the wires up there and what kind of pass through the roof skin you are going to have. You don't want to mount the panel and find the wires coming up in the wrong place.

Are you going to use the system in summer, winter or both. Up North, in winter, panels need to be angled toward the sun to get enough volts for a full charge. I find I can do that with a roof panel by facing south and dropping the front lift panel on the pop up. But that may not be what you had in mind. A flat roof mount will work well in summer or in southern Mexico but may not cut it in December. But in summer you may not want to park in the sun to charge your batteries.

I am using both options. I have an easy to take off roof mount system. The roof pass through goes to a plug that is under the panel (there is barely enough room for the plug and I am praying it does not scratch the sensitive backside of the panel). I also have a plug mounted on the side of the camper and a 20 foot cable so I can place the panel on the ground (propped up).

Finally if you go with the roof mount look into the On-Stage loud speaker stand (hand cranked extension pole) described elsewhere for roof lifting. It is very easy to use and will take away all your concerns about the weight of the panel (I have 120 watts)
 
Panel measures 44.5x24.5 inches. Was packaged very nice. Tossed it on the roof for fun and the roof lifter shock thingys were plenty, lifted very nice.

panel.jpg


panel.jpg


The abs mounts dont seem to be able to be sourced locally. Only retailers were one in au and one in the uk and priced as much as the panel itself so that route is eliminated. I think I'll go with my original plan of using the forward rack bar and and adding another rearward for mounting. As to cabling, I'm still not sure on how to go about that.
panel2.jpg
 
You said no wiring before, looks like there are some MC4 pigtails on there. If you want to use those you just buy an MC4 cable which will have a male connector on one end and female on the other and cut it in half to wire into whatever you need. They come in 6', 15', 30', 50', and 100'. Here is a 15' for instance: http://www.solarblvd.com/Cables-&-Wires-Solar-Panel-Wiring/c5_19/p486/15%27-MC4-Solarline-2-Connector-%2310-AWG-Male/Female/product_info.html There are also some supplier for just the loose connectors to install on your own wiring if desired.
 
Camper is not prewired, not the panel. And I did order a cable to do just what you said.
 
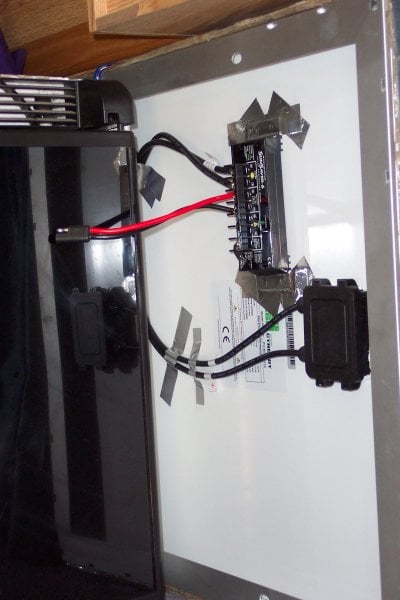
Here is what I did with my 80 watt solar panel.I use it as a portable setup.The aluminum tape was used as a temporary setup but it worked so well that I think it might be temporary forever.I made a 12' cable with battery clamps on one end and plug the other end into the controler. It is stored between my 12volt fridge and the window on the right side of my camper.
 

Attachments

  • out west 2011 027.jpg
    out west 2011 027.jpg
    342.1 KB · Views: 152
FWIW: My PV panel is set up as free-standing becasue I like the ability to point it directly at the sun (when in camp), but my second one (which I'll add soon) will be permanently mounted on the roof.

Here's how I wired up/ connected my free-standing panel, which I posted as part of this trip report last year:
gallery_2431_103_52034.jpg


gallery_2431_103_27840.jpg

The wires that lead down from the controller lead to that plug that comes in from the outside.
The wires that lead down from the meter lead to the camper battery, permanently connected.
 
How stiff is the wire you got from Solar blvd?

When I was tesing my solar wiring design I ordered the 50' with male & female MC4 connectors, but after I was done with testing and had cut the wire, I thought it was too stiff to bend behind the roof lifter panels and go up and down with the roof.

So I used more flexible 10Ga wire from my local electronics store, got two more MC4 connectors from Solar blvd and did the assembly and soldering myself. Solar Blvd sells a very expensive crimper, but I just used my normal crimper, went slow all the way around and it's woking great.

If your wire is the same as mine (very stiff) and you decide not to use it, DON'T CUT IT! You can probably return it.

I think the stuff I got is made for non-moveable installations, like in a home. I wish I had thought to ask about the flexibility of the wire when I ordered it.

Anyone want to buy a 50' wire, cut in half into two 25' equal sections? Comes with male & female MC4 connectors and screw in terminal connectors on the other ends (they can be cut off easily). I paid $45, price is $25 plus shipping. This stuff is very stiff, does not bend easily. Maybe you can figure out how to make it work on a popup camper or use it on a home install. Not sure it would even work with the moveable panel applictions as it tends to stay "coiled" and not lay out straight.

Oh, I also got my "Z" brackets from Solar blvd, but can't find the web page with them, maybe you have to ask them or search better than I just did. Set of 4 for $9 with bolts & nuts that I didn't use.
 
...I did order a cable to do just what you said.


Did you get the cable you mentioned above yet?
How stiff is it?

- - - - - - - - - - - - -

Yes, the stuff in your workshop drawer is the stuff to use (I did the same).

I'd say, do the next owner of your rig a favor (or maybe yourself)... figure out what color wire your camper already uses for Positive and Negative, keep it the same.
 
Here is how I attached my PV panel to the roof with only two through the roof screws.
I used 2 inch aluminum angle stock to cut two brackets I could attach to the front roof rack bar with hose clamps.
gallery_2153_354_134699.jpg

I drilled two holes in the side of the front of the PV panel (and one in the rear).
The PV panel is pulled snug against the roof rack supports.
gallery_2153_354_14159.jpg

I attached a piece of 2 inch L aluminum to the roof with two screws (into the frame) and lots of sealant (Proflex Geocel)
gallery_2153_354_359260.jpg

I also added foam rubber weather stripping to the bottom edge of the PV panel so it would not be rubbing on the roof. I wish I had used something tougher than what I had on hand. I expect I will be replacing the weather seal in the next year or two.
 
Little rusty on posting.

Don't seal to roof. It needs to have some ventilation to keep it cool.

Looks sturdy.
 
Back
Top Bottom