Solar Wiring - pictures?

I bought a used 2011 Hawk in late 2014 that I added a trimetric and solar collectors to last winter. My hawk had the solar plug in the back and none on the roof. Using the wtw site I was able to find access to the wires and add a plug to the roof. I was also able to to remove the wood panels over the water tank and under the thermostat to find the other ends of the solar plug wires. I used a continuity tester to figure out what wires went to what and was able to wire my system up using what was there from the factory.

The solar wiring doesn't go to the fuse panel so you don't need to worry about that and when you find the right spot I believe the wire ends were taped together and marked, they are 12ga red and black wires. If you need more help let me know and I can send you some pics thsi weekend,
 
Ace,

I pick up mine 2-25 and it has FWC 160w fixed and 80w portable installed...I will take photos if none show up on this thread and send them to you..

Phil
 
Finding the wires can be frustrating. Just a suggestion, that has worked for me: Use your smartphone to take snaps of hard to see areas. It's a lot easier to diagnose the situation when you're not craning your neck.
 
I have a 2015 Hawk and haven't yet installed solar. In my unit, the wiring for the controller is coiled up and attached to the inside of the cabinet at the front of the camper just above the monitor panel, not above the sink. I removed the drawer just above the monitor panel and it was right there, very easy to see.

I hope this helps.
 
Ace!,
Could be helpful to know which dinette floorplan you have to locate the wires. My 2014 front dinette with factory solar has a two pair of solar panel wire bundles coiled up together inside the cabinet between the sink and the back of the Zamp controller. Each pair consists of a yellow & black wire with an Inline black large blade fuse holder with a reddish tape identifying to which panel that wire pair goes.

Paul
 

Attachments

  • image.jpeg
    image.jpeg
    131.5 KB · Views: 375
Ace, Have you called FWC? I think you will get an answer. I always got a reply to my e-mails within 48 hours. Strange you haven't received a reply. Hopefully they get you the answer
Jd

Sent from my SM-G900V using Wander The West mobile app
 
I communicated with Jeff in Tigard and they unloaded my Hawk today...tomorrow to Hood River and Thursday install Hawk and beat feet back home to this wonder corner of Oregon...

Ace...did you ever get through to FWC?

Phil
 
Probably best to gently slide out each cabinet drawer and look inside the cabinet with a flash light. The solar wiring is usually red & black wires coiled up. I have seen it in different places, sometimes on top of the furnace, sometimes all the way forward in the cabinet. Each camper & each floor plan can vary a bit as to the location. I think they have standardized the solar pre-wiring a bit better these days. But that said, it is still not plug & play for aftermarket solar installations. Customers will need a wire tester or volt meter so they can check continuity and they need to know how to test and troubleshoot wiring. You will need to check and confirm what plugs the wires go to, and what each wire will be on the solar plug (+ & -). The service department is crazy busy, so best to call them if you can. I will try and answers questions here for you as well, but we are understaffed in sales too. :( Hope this helps a bit.
 

Attachments

  • solar wiring inside camper #2.jpg
    solar wiring inside camper #2.jpg
    76.9 KB · Views: 342
  • Hawk Shell solar harness.jpg
    Hawk Shell solar harness.jpg
    130.1 KB · Views: 394
  • Solar Panel General Wiring Diagram.jpg
    Solar Panel General Wiring Diagram.jpg
    69.1 KB · Views: 390
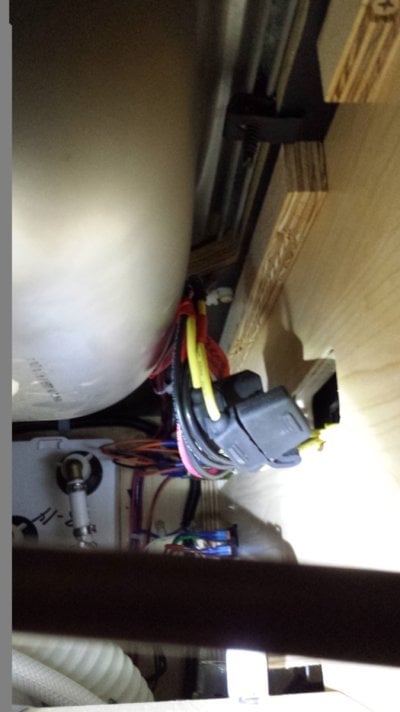
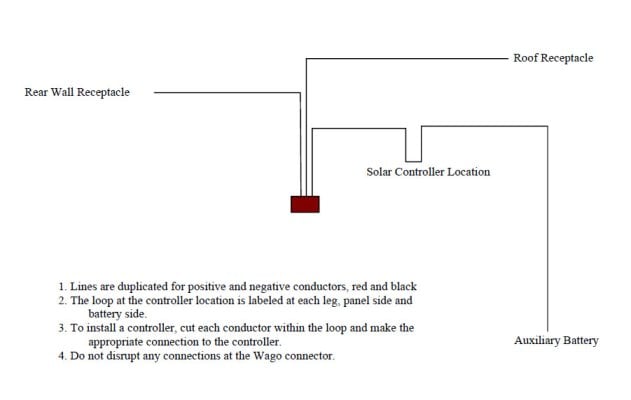
Finally got a chance to look around more. There is a coil of wires labeled at the right (driver side) front when I pulled out the drawer, just like the first picture. I'm guessing I would find one coil or the other, but not both?

Do I just need to hook that coil to my Zamp controller and confirm the connection at the battery? Or, are those wires the ones that are supposed to go to the battery, and the second picture is another coil I need to find for my controller?

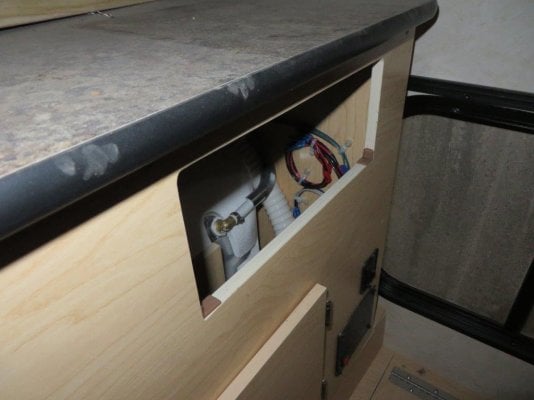
I have the Zamp connected to a panel (was going to use it like a portable), but I like the idea of mounting it on the space that's already cut in the cabinet area.
 
I have 2015 Grandby and found solar wires in the battery compartment. I assumed that they were coming from the solar plugs I will just need to connect a controller to those wires and then connect to the batteries. I hadn't heard about anther set of wires any place else. Can anyone advise on this situation? Thanks.
 
Verify each wire with a digital multimeter (DMM) first.

Put the DMM in DC voltage mode and connect the black (common) wire to battery ground. Touch the red wire probe to each unknown wire end connector to verify it is not already powered.

Next put the DMM in resistance mode. Connect one lead to a contact on the solar plug and use the other probe to see which wire end has zero ohms. If it isn't zero ohms, you haven't found the other end for that contact. Take notes and label each wire so you don't have to do it again down the road.

After mapping out the wiring, the rest is easier. Good luck with your project.

Paul
 
Just adding to this thread as I was also in search of my wires and found this thread helpful. I have a 2009 hawk, which does not have a junction box. So off I went looking in all the nooks and crannies I could find. After some frustrating moments of not finding them, I found them behind a wood panel in my cabinets. I had to unscrew the small panel, which was located by the water heater.

https://www.flickr.com/gp/133219607@N04/eePi9j

https://www.flickr.com/gp/133219607@N04/L04QJ8

Ended up installing my morningstar unit on the panel and running the wires through the board itself. https://flic.kr/p/Y6fJX2

Final mount of morningstar: https://flic.kr/p/WT65nx
Had to trim the lower cabinet door about 1/4 inch so it could swing open past the controller. No big deal.

Installed a 180w grape solar that I purchased through home depot online and went with 1.5 inch aluminum angle for the bracket that will attach to my Yakima rack. https://flic.kr/p/XRx6jU

Scariest part was drilling into the roof for the wire. Called fwc to get the coordinates. Worked out perfect. Final install will have a link solar cap purchased from Amazon. Did a temporary hook up to be sure it all worked.

https://flic.kr/p/Xvz26N

https://flic.kr/p/XvyWNQ

Now I'm just waiting for the isotherm 85 to arrive this week.
 
Back
Top Bottom