some issues with 10' CO

Anewway

Advanced Member
Joined
Jan 24, 2017
Messages
43
Location
Northern New Mexico
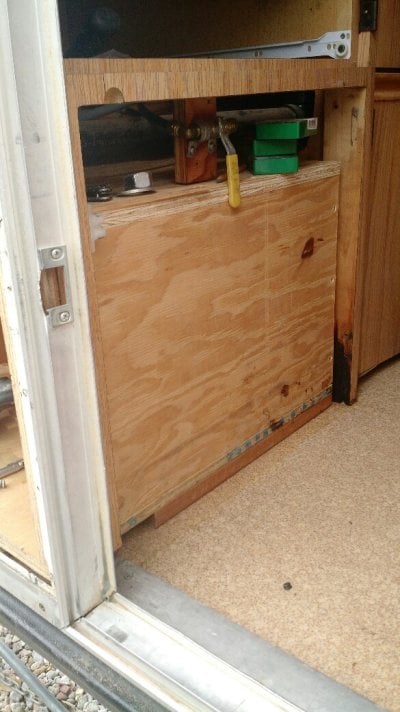
The other day while lifting the 10' CO from my truck I noticed quite a gap in the bottom door frame. It has always been there to some extent but this time seemed like it grew. looks like the top of the bottom section tilts inward and pulls the bottom out creating the gap.
Wondering if there's a fix to this?

alaskandoorgap.jpg


This shows the bottom section in relation to the top and the lean when the jack has weight on it.
alaskantilt.jpg


A couple of these small aluminum blocks got wedged in the front sliding tracks preventing smooth lift.
I'm guessing the sides attach to them?

alaskanaluminumblock.jpg
 
That's a sizable separation in the aluminum door frame....are there welds which were broken or was it caulked?

I'd be looking for other areas which have loosened or released to separate that jamb...older alaskand have separate thresholds which move independently of the jamb side....it's pretty common for the bottom section to sag a bit like that...one of the reasons it's not recommended to use the camper without support for the floor

as far as those pieces of aluminum go....from where..picture please...maybe a tape measure next to it for size.....looks like it might be 1" thick and 4" long.....??...they're interesting...but really....not a clue

what year a camper?
 
The camper is from 1996.
The welds did break on that part of the jamb.
That space gets a bit smaller when the camper is placed on its floor stand.

The aluminum piece is about 2" wide and 1/4" thick. They are in the top section in the front slides. Looks like there are 2 per side.
 
It looks likes like the floor dropped
I'd check for square to make sure it's not the right side drooping.
I had a trailer with the door all cattywompus..pulled the jam and one side was punched into the floor.
I looked on the roof and a branch had knocked the whole side of the frame down an inch.
When I got my 78 the floor sagged from under my pump to right where yours is.. I jacked it to level then screwed the floor to the side with some heavy L metal
All my interior slides have two horizontal bolts at the top.. They hold a metal cork at the top.
Maybe so nothing gets in there? or a secondary safety to stop the lid?
I think I see a screw hole in that square piece in your pic.
 
That opening is substantial


look for some camper frame members in the interior which have come apart....the welded aluminum frame wasn't designed to resist the torque developed by moving the camper....so there are other parts coming apart as well. most likely those other parts started some time ago and resulted in the final straw...the jamb opening

with the camper suspended by the jacks...take a look inside the lower storeage areas where the connections of the frame to the floor are made...i'm thinking you'll find some open joints which need some sort of angle iron support or reattachment.
 
Thanks for these suggestions. I'll be doing some crawling around checking these areas.

Here's another pic of the aluminum piece.
The screws originate inside the walls of the top and attach to these aluminum blocks that are in the guides.


alaskanaluminum.jpg
 
could they be very tiny guides?
If they bolt to the wall they must be stationary and move with the raise and lower of the lid whereas the interior guides don't move.
Or they're like a giant washer to hold the exterior guide in place.
 
After removing the propane tank and plastic liner the issue became clear.
Some water damage and floor separation from interior framing.

This shows door interference while camper sits on jacks.

alaskandoorproblem.jpg

Floor separation from interior framing.

alaskanfloorsepatation.jpg
 
I'm thinking that with a 10' you may ot have had enough support under that last two feet of camper and that combined with it being exposed to water more readily allowed the wood to soak up and deteriorate to the extent that it sags now. It will only get worse.

1) If you don't have that last two feet supported by the tailgate, put it back on.
2) Consider the possibility of getting a sheet of 4' x 10' x 1' plywood and really waterproofing it and putting it in the truck bed to help support the floor better, especially that last two feet.
3) If you have access to a dead-flat concrete driveway, try lowering it onto the concrete to see if the floor raises back UP to where it once was so you can try the "L" bracket suggestions but I get the feeling that the floor plywood may be too soft to use a simple "L" bracket so perhaps a 48" long section of "L" steel that can be screwed along the bottom of the floor and to the rear panel on each side of the door might help out.
4) A little poking of the plywood floor bottom with an ice-pick will tell you if it is rotted out when compared to other places on the floor panel.
5) You need to determine if the failure extends just a bit back from the door on both sides or if the entire floor is in imminent danger of falling out when the camper is up on its jacks.

in any case, this isn't good news....and it will only get worse with the winter weather turns rainy unless you have covered storage.
 
Great tips there.. thank you.

Luckily the rot is limited to the left rear corner. I checked the rest of the floor and it's solid.
That gap mostly disapears when the camper sits in the truck and yes the last 2' is well supported at least under my care.

IMG_20170927_155807536-585x1040.jpg

Rotted interior framing.
Seems like standing water inside the camper caused this over time.
Thinking the roof leak caused this as it sat unused for the better part of 10 years.

IMG_20170927_155848128-585x1040.jpg
 
you're looking at 10 years of rotting...carefully consider the edges of the floor and their stability to accept new material before you undertake any project....

not being able to see it and seriously check the value of the floor plywood, it's tough to say where to start.....if you have enough left of the original plywood to secure too would be the most important consideration.

trapping rot by applying a new layer may not be your best choice...replacing sections may give you enough to secure a new floor to but the structural integrity will be the consideration

when you attack this...seriously consider risers, strips spaced every 2' or so...to raise the floor off the bed of the truck to avoid this happening again

glad you found it when you did...that rot creeps out to the edge and destroys the entire floor....a thread on expedition portal a few years ago exemplified this only too well...he brought an Alaskan home, jacked it up in a garage, left it overnight....when he came back the next morning...the plywood flooring was laying on the floor of the garage...it had fallen off the camper overnight

stay with it......
 
Rusty said:
trapping rot by applying a new layer may not be your best choice...replacing sections may give you enough to secure a new floor to but the structural integrity will be the consideration
This is my dilemma. The good thing about dry NM is once taken care of water damage is easily preventable in the future.
 
Once you get to an area of the floor which has some structural integrity remaining...soak it with Smiths CPES from inside the camper....The CPES (clear penetrating epoxy sealer) will penetrate the remaining rotted section and stop the rot/harden up the remaining material. It won't give you an attachment for fasteners but will stop the rot from proceeding.
 
Keeping my fingers crossed but this may be turn out to be one of those instances where it isn't as bad as it looks.
The extended side piece of floor took most of the damage.
With that removed I'll add a new piece and replace the damaged interior framing. The main 4x10 floor is in good enough shape and surprisingly most of the rot was on the bottom layer.

IMG_20170930_161444225_TOP-585x1040.jpg

IMG_20170930_161406858-1040x585.jpg
 
Finally some updates. I made a wood box were the propane tank goes. This holds the tank and also reinforces the left corner of the camper as I was able to tie the floor and the side together.
All in all the this is a huge improvement and now feel like this part of the camper is structurally sound.

And to celebrate.. had to go camping :)
 

Attachments

  • IMG_20171205_085421704-585x1040.jpg
    IMG_20171205_085421704-585x1040.jpg
    167.8 KB · Views: 109
  • IMG_20171122_094814530_HDR-1664x936-665x374.jpg
    IMG_20171122_094814530_HDR-1664x936-665x374.jpg
    102.1 KB · Views: 119
Wow you didi a lot of work on that guy!! I just got a 96' and I do have a bit of work to do on it in the spring, but not to that extend, it is in pretty mint condition... Hope I don't have surprises!!
 
Back
Top Bottom