Switching Between House Battery and Starter Battery

byale292

New Member
Joined
Aug 29, 2022
Messages
4
Hi All,

Apologies if this has been asked before, I did some searching around and didn't turn anything up. My dad and I share an ATC Ocelot. He uses it mostly for overnight stops on the way to/from destinations, and I often use it for longer trips, staying in one place multiple days, etc...

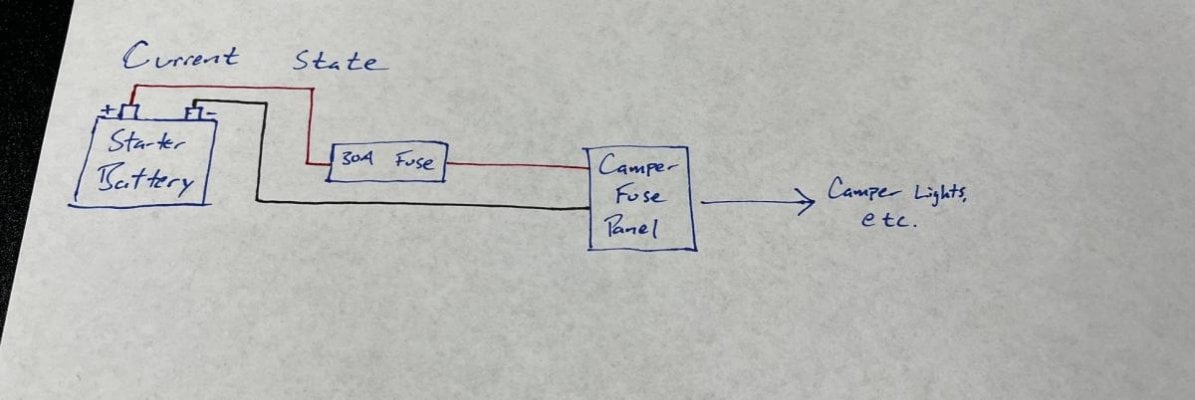
We're currently powering everything off of the starter battery, but I'm looking at adding a 12V Cooler, and therefor a lithium battery, solar, etc... I think I've got a good handle on the system requirements (thanks to many many helpful posts on here!), but I think there will be some instances where each of us have trips planned at the same time. In those cases, he gets the camper (he did pay for it after all) and I get the cooler/battery.

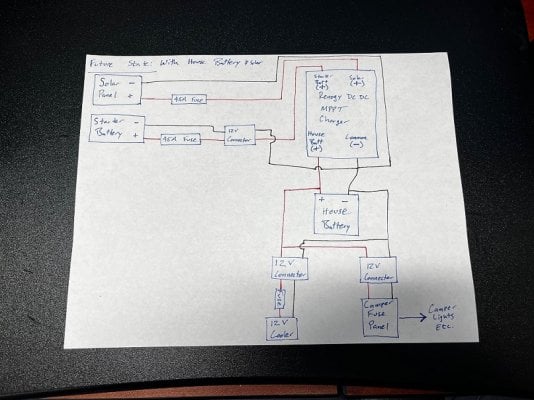
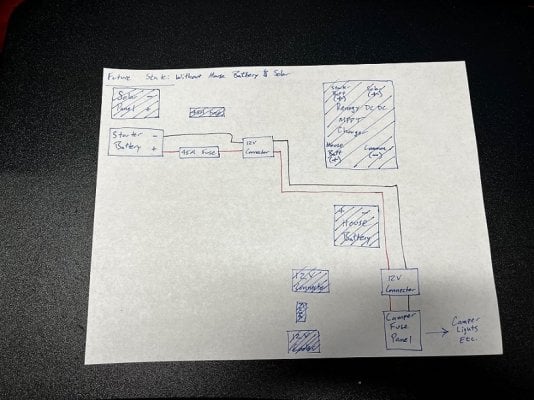
So, my question is: if we'd like an easy way to switch back and forth between the starter battery and the house battery, is it as simple as adding a few 12V connectors to our wire runs (before the starter battery to charge controller connection and before the house battery to camper fuse panel connection) so we can just remove the charge controller and house battery from the system and get back to our "current state"?

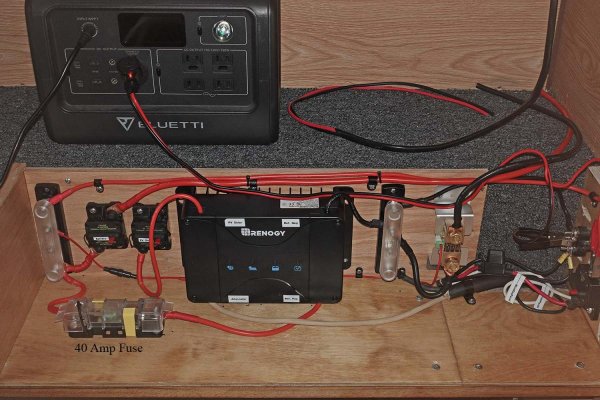
It can be difficult to put these systems into words, so I've attached a few simple diagrams of the current state, and both future states. Note, I do plan to add a shunt monitor to the house battery, but left it off the drawings for simplicity.

Thanks in advance for all of the help!

- Brian
 

Attachments

  • Current State.jpg
    Current State.jpg
    51.1 KB · Views: 49
  • Future State - House Battery.jpg
    Future State - House Battery.jpg
    191.3 KB · Views: 42
  • Future State - Starter Battery.jpg
    Future State - Starter Battery.jpg
    208.7 KB · Views: 39
I think there will be some instances where each of us have trips planned at the same time. In those cases, he gets the camper) and I get the cooler/battery.


Not the answer, you're looking for - but with a lithium power station, in my case a Bluetti EB70 I can easily place my 12 volt fridge into the back seat area of my pickup. While not ideal, in that configuration the Bluettin charges off a cigarette lighter port that draws about 96 watts while the truck is running.

The Bluettin power station on paper is able store a 700 watt/hour charge. In reality, due to conversion by it regulated DC output it provides 600 watt/hours of charge in use. It will easily run the 12 volt fridge for a couple of days.

In my second configuration with the Bluetti power station I now have two house batteries - if you include the house battery in the camper. In short I can also plug the Bluetti into a cigarette lighter port in the camper. Then charge the power station off of the LiFePO4 in the camper. The LiFePO4 is wired to a dual input MPPT controller, which relies on a 175 watt solar panel in addition to the alternator input. (Pllus if I need a 120 volt outlet, the Bluetti EB 70 substitutes for a proper inverter.)
 
Byare292,

Lithium Ion and flooded lead/GM batteries require different charging profiles. Combining Lithium and AGM batteries on the same charging circuit without using something to ensure each battery chemistry gets the appropriate charge profile will result in chronic overcharging oif the AGM starter battery leading to premature failure.

One solution is to use a DC-DC charge controller such as the Victron Orion.

Here is a brief video.

https://www.pysystems.ca/resources/videos/how-to-charge-a-lithium-battery-house-bank-and-an-agm-starter-battery-at-the-same-time/

I hope this is helpful,


Craig
 
Taking a good look at your first image - I see that there is no house battery in the camper.

One solution for now is to install, along with an automatic charging relay, an AGM house battery somewhere within the camper located between the 30 amp fuse and the camper's fuse panel. The problem with this OEM style install used by the RV industry is the house battery usually spends most of its life below 90% of its capacity.

A large enough self contained, plug and play, all in one lithium ion or LiFePO4 power station will work better in my opinion, mainly because it has its own built-in MPPT controller. It will draw about 96 watts / 8 amps from your current wiring while it is charging. So, the #10 gauge wiring to the front of truck that was installed by FWC will suffice. The downside to most off the shelf power stations is the 12 volt DC output is usually limited 120 watts, which is a measly 10 amps.

I ran my 12 volt DC fridge for six years in a canopy camper using a D.I.Y AGM predecessor before purchasing the Bluetti solar battery. Do note that it did use a regulated DC to DC converter - which charged the AGM battery at the proper voltage and utilized three different stages. The different stages were the usual bulk, accumulate and float profiles.
 

Attachments

  • Current State.jpg
    Current State.jpg
    51.1 KB · Views: 22
Craig,

I was looking at getting the Renogy dual input DC-DC/MPPT charge controller, which I think will eliminate the issue you’re mentioning. But, please correct me if I’m wrong on that!
 
byale292,

I am not familiar with the Renogy Dc-DC/MPPT controller. I scanned through the manual online and it was not explicitly clear if it can output two different charge profiles for two different battery chemistries. Be sure to dig into those details. If it does then it seems like a potential solution.

Craig
 
I have a 30A Renogy dual input charger with MPPT mounted into an ATC Bobcat. The install was not a simple as plug and play, mainly due to where one wishes to package the ancillary circuit breakers and fuses.

The battery box for the LiFePO4 battery is missing from the image below. Note also that the cables to the solar panel have not been installed to the Renogy unit.
 

Attachments

  • RenogyDCDC.jpg
    RenogyDCDC.jpg
    158 KB · Views: 47
TacomaAustin,

Thanks for taking the time to share that photo! It really helps to picture what this will end up looking like/how much space it will take up. Please forgive my ignorance, but would you mind helping me understand the need for the two circuit breakers on the left there? I'm not seeing those in the wiring diagram for the controller in the instruction manual (attached below), but if real world experience has shown them to be helpful, I would like to include them in my system design. Also, would you mind sharing the brand of those busbars? They look nice.

Thanks to all for the help and input!
 

Attachments

  • Controller Diagram.PNG
    Controller Diagram.PNG
    110.2 KB · Views: 27
The circuit breakers are a way for me to shut off and isolate two components in the camper's electrical system, if I desire without pulling fuses.

* The circuit breaker on left is to isolate the main positive cable to the house battery and if there should happen to be a short circuit, it will act as a fuse. My house battery is a wooden box that was added later to what is shown above.

* The circuit breaker adjacent to the Renogy charge controller is mainly to isolate my solar panel, if need be.

* The must have 40 amp Blue Sea mini-ANL fuse holder on the bottom is similar to what is shown at the bottom of the Renogy schematic drawing that you provided. It is connected between the positive output of the Renogy unit and the positive bus bar, which is at the far left far left of my electrical panel.

Due to my use of crimped-on ring terminals at the ends of each wire, I chose to utilize components that have 1/4" stud terminals.
 

Attachments

  • RenogyDCDC.jpg
    RenogyDCDC.jpg
    158 KB · Views: 32
TacomaAustin,

Thanks so much for the thorough explanation! After looking all of this over, I'm actually starting to think that going with one of those lithium power stations may be the best move for us. Seems worth a little extra money for the space savings of having the MPPT built in, and so much easier to remove the battery and cooler for trips not in the camper. Looks like your Bluetti has multiple DC outputs, so I'm thinking I could run one output to the cooler, and one to the campers existing fuse panel to power the LEDs and sink pump.... lots to think about.

Thanks again!
 
Back
Top Bottom