Total Noobs, doing it all wrong

N'kwala said:
If I'm not mistaken, ATC includes screen doors on all models and FWC regards them as optional. I agree about the furnace -- it really is pretty nice to have, but I'd say a screen door is a must. I'd agree on the struts, but that is from the perspective of a rather small and not very strong individual. And the solar cell opens a lot of options.

Enjoy, in any case.
I believe the screen door is standard equipment for FWC now.
 
Hello Noob and Welcome,

I bought the FWC Eagle shell in 2008 and built inside myself. I have been making modifications to it ever since! I think I now have it exactly as I wish it to be, and love it. I agree with the one fellow who feels we might have gone off topic a little. (be aware I do a lot of cold-weather camping)). The shell came with queen bed, battery, and furnace (furnace is very important for me). I designed & made all cabinets, sink, water supply, stove, (no frig). Key points about things that I think are important and that I added over time:

  • External Lift struts (30 lb)
  • Solar panel (85 watt is more than enough for me)
  • LED lights throughout
  • Outside LED flood light
  • Electronics (meters, etc) to monitor battery charge state (important)
  • Artic pack liner (made it myself) for cold weather camping
  • Automotive built-in stereo system & speakers (which is not a necessity but I love it!)
  • Wall-to-wall carpeting & pad (just added this month due to 20 degree camping recently)
Things I don't have and don't miss:

  • Refrigerator (I'd rather have the space, and don't care for power usage, and am seldom in hot climates)
  • Electric water pump (I use the hand version)
  • Water heater
  • Dinette table (I use a foldable table and foldable chairs all of which I can use outside)

Good luck!
Chris
 
Although I haven't sleep in one, it seems the model with the front dinette would be best for sleeping "down below". The rollover couch completely consumes the floor space and the first thing you'd have to do in the morning is convert from bed to couch. It appears with the front dinette you would have room to stand up, move about, get dressed, etc. before having to deal with the bed. If you don't need the dinette, you could leave it set up as a bed.

Although I think the front dinette would limit you to a specific mfg and model.
 
Its always interesting to see what one persons must have is another's don't miss. I'd just keep in mind certain things are difficult to add later if you change your mind. For example the fridge is an easy add on down the road, not so much with the heater. I always tell people to get the heater just for the resale value (unless you're like me and plan on keeping it forever).
 
I know everyone's out there with bated breath waiting on this report so I won't prolong the suspense. We spent a couple more hours at FWC Woodland today and we're now on the production line for our new Hawk camper!!!!1! And at 2015 prices too. Mike was a pleasure to work with and we timed it so that we were there when they walked around with some delicious burritos for all staff and customers. Dropping that kind of coin can sure stir up an appetite...

Made some last minute decisions, all of which added money of course. Got a side dinette just because the layout felt better to me. I can lay down fairly OK on the dinette conversion to bed which measures just enough at 73" long. I figure I'll lay my fat old thermarest on it to smooth out some bumps if I do end up sleeping down there. We may take out the little storage cabinet in the corner. Other items included: Side awning, yakima tracks, exterior steps, the furnace, the Fantastic fan, and the exterior struts. Skipped the water heater and shower. Hoping that I can install the solar panel myself when we decide it is essential.

We also really liked the look of the silver side exterior option so that was an out-of-character, pointless splurge but the retired architect in me liked the look on our new truck. The other debatable decision was to get the small, 3-way refrigerator which seems way too expensive and starting tomorrow will be part of the base package. We'll see if that was a mistake but I figure eventually we would want a refer so we'll learn the ins and outs of running one with propane. "Really? The rig has to be level?"

BTW, for those still in the market, there is an RV show at CalExpo in Sacramento in January which will include a free camper installation and Fantastic fan.

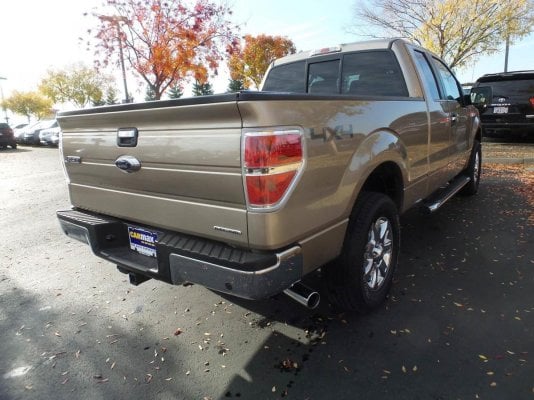
Now we've got nine weeks to prep our new F-150 truck. We've got to remove the bed liner and multi-panel tonneau cover. Anyone interested in purchasing? They are in great shape as there is only 14k miles on the truck. We plan to install a rubber mat. Next question involves the tailgate removal. There is an integral back-up camera located there below the Ford logo and my wife the driver will sorely need to have that feature replaced or reconfigured once the camper is in place. Any suggestions about how to re-use the existing camera and where to put it?

Woo-effin-hoo :D Thanks for all of the feedback in the last 24 hours!
 

Attachments

  • 5.jpg
    5.jpg
    174.3 KB · Views: 127
Yes, the camper has to be reasonably level for the fridge to work. You can be off a couple of degrees without a problem. If the camper is so unlevel you couldn't sleep in it comfortably, the fridge won't work well. I personally have never had problems with the propane refrigerators in campers or trailers.
 
When you get ready to do solar, Costco has a 100W panel for $129 (currently on sale), you can get a (indoor/outdoor) 15 amp Zamp controller from solardealz for $85 - $100 and wires for ~$15 or so to wire for the controller. You can use that as a portable kit or permanently mount it. As a portable kit, it's not unlike the Zamp 80 or 120 at half the price. Add another Costco panel for $129 and you've got something very similar to the $900 200W Zamp portable kit for much less than 1/2 the price.
 
You made good choices, nice camper! I moved the rear vision camera on my 2015 Chevy 2500 from the tailgate to the license plate. The easiest place I found was to drill a hole in the upper middle of the plate between the letters and make and bend a tin bracket to hold the camera tight in the hole. It is not noticeable and works pretty good except in mucky weather it can get cloudy with road spray in this location and may be necessary to wipe it off. You might be able to do something similar with your truck.
 
Thanks north, that does seem the most logical location without putting it on the camper shell somewhere under the door (maybe?). I was surprised that I couldn't find anything through teh Google that illustrated a relocation strategy.
 
Congrats on the new rig---you'll love it. Looking forward to some "in progress" build pics.

Sent from my SM-G900V using Wander The West mobile app
 
Nice pics.

Good solution for camera placement. No trouble mounting and dismounting the Tacoma tailgate.

BTW Never thought about travelling with an ironing board. If necessary I can use one of my surf boards! ;)
 

Try RV LIFE Pro Free for 7 Days

  • New Ad-Free experience on this RV LIFE Community.
  • Plan the best RV Safe travel with RV LIFE Trip Wizard.
  • Navigate with our RV Safe GPS mobile app.
  • and much more...
Try RV Life Pro Today
Back
Top Bottom