1979 Granby

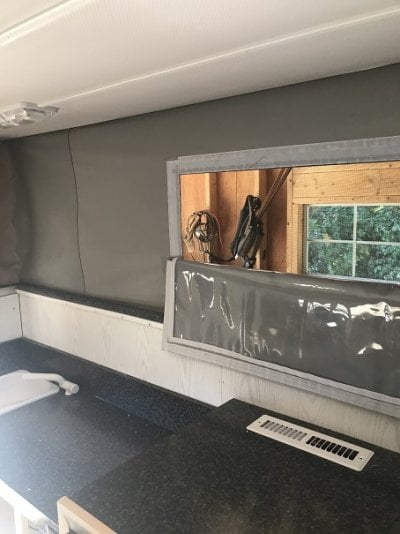
Messing around this morning, ripping stitches out and trying to resew. Still puckering. I think I know the problem now. If you look at the pictures on the previous page, you will notice that there is some puckering at the top where I sewed in the velcro. This was my first window and came out better than the second. So the puckering is shortening the material at the top of the window. Now in the picture the bottom is puckered too, but not as bad as the second. On the second window I kept the bottom seam straight and smooth. Therefore the bottom wasn't shortened, and when I got to the end, the bottom of the panel was actually longer than the top. So I landed up with a worse pucker than the first panel I made. Now the question is how to correct this when I make new window panels. I think I am going to call Sailrite and see if they have any suggestions.
 
Have a fishing trip to northern Ontario starting next week so I haven't been doing much with the camper. Still waiting on more material to redo the fabric sides. It's supposed to arrive tomorrow and it will have to wait for my return after the trip. Yesterday I visited with friends, and the wife does quite a bit of sewing, all kinds of fancy expensive machines! I brought my work to show her, and she pointed out how the feed dog on the machine had stretched the screen material and most likely caused my problems. Close examination showed the lines of the screen going from vertical to almost 45 degrees at the far side of the seam. She said this was due to sewing the 2 different materials. She suggested I should sew it with the screen side up and the feed dogs pushing the vinyl instead of the screen. The reason I sewed with the screen down was to be able to see the inside edge. I'm going to leave the bottom edge of the vinyl long, sew the seam, then cut the excess off after sewing. She gave me a neat pair of scissors that will allow me to cut very close to the sewn seam. I'll give an update after my return from Ontario.
 
Home from a fishing trip and back at the build. Have 2 mock up lift panels ready to install. Made a rack to set the roof on while I install them, and will have my son help me lift the roof on tonight. Opened up the new vinyl material I ordered to make new side canvas, and it's a different shade of gray! Drat! Well a little more was said than Drat. New stuff is being shipped tomorrow. If my lift panels work properly, I'll get the new one's built with composite material while waiting for the vinyl. I've decided to hire a carpenter friend to help me build out the interior. Couch, converting to bed on the passenger side, countertop and box for fridge on the drivers side. Then a seat across the front with the water tank, battery and converter under it. I need to have it finished by the end of August, so I can hit the road after Labor Day.
 
I got a couple mock up panels built and installed them today. They folded down properly. Granted I had no canvas sides yet, but hopefully that won't change how they fold. My top panel is 12 3/8 inches tall. The hinge barrel for the top and middle hinge is mounted tight to the edge of the panel. The height of the bottom panel isn't critical, but the placement of where the center hinge is critical. I mounted the bottom hinge barrel tight to the bottom of the lower lift panel, then positioned the center hinge barrel exactly 13 inches from the bottom hinge barrel. This was done due to the distance between the rivet holes on the roof and the rivet holes on the body. Front to back there was a 2 inch difference on my camper. The body having the longer distance. The roof hinge mounts on a horizontal surface, and the body hinge mounts on a vertical surface. When folded the horizontal roof hinge rivet holes had to be 1 inch more to the inside than the vertical body hinge. In this picture you can see that the bottom hinge is vertical, and the distance to the top hinge rivet holes is 1 inch. The 1 inch corrected for the different measurements between the roof hinge mount and body hinge mount. I have about 75 inches standing room, floor to roof.
 

Attachments

  • hinge pin difference.jpg
    hinge pin difference.jpg
    43.1 KB · Views: 89
I've got one composite lift panel finished, and the second ready to put together today. The finish is aluminum although it looks white in the picture. I also have my window vinyl panels made to my satisfaction. Not perfect, but not sure if I could do better another time. I need to get the bulk of the interior seating and cabinetry done before I finish the canvas and install the roof. Is there an easy way to reduce the size of photos? Every time I try to upload a photo, it says too large. Then I have to go to "paint" and reduce the size.
 

Attachments

  • resized.jpg
    resized.jpg
    210.2 KB · Views: 128
Did you use aluminum composite paneling? That's what I'm going to use for my build, though my 4x10 sheet of it was damaged in shipping and hoping I can still salvage it. My panels will need to be 28" overall height to give me 6'4" of interior head room. I think I saw yours are 26" in total height? In your opinion, what would be the best way to get the additional height? Your panels look great though!
 
Yes, I used ACM panels. My son works in a commercial glass business and they use a lot of ACM. Mine cost me $0, as it was cut offs from projects. I think if you just add 1" to each panel, you can get the height you want. The critical point in my opinion is the placement of the center hinge for them to fold properly.
 
That's kind of what I had in mind, thanks for the help and for posting all the valuable information!
 
Plugging along at my project. Got the composite lift panels made and installed them temporarily to make sure they would operate right. That done, I removed the panels and pulled the roof back off so I could work on the interior. Keep in mind I am a retired heavy equipment operator and have very limited carpentry skills. I was hoping a carpenter friend could help me out, but he just too busy right now, so I had to go at it myself. My plan is to keep as much weight forward as I can. So the water tank, battery and converter is all all up front. The fridge isn't all the way forward because of a window. Here's a few pics as I'm roughing it in. At the front, there is 2 different heights, one on the left higher over the water tank, battery and converter compartment. The lower height on the right will be seating and part of the bed. It's 28x24 and will have storage under it. Continuing back down the right side will be a couch that the bottom will pull out and the back lay down. So with the front cushion, it will make up a bed 28x74 inches. At the foot of the bed will be a permanent spot for a porta potty. I don't want to have to drag one out from under the counter. The pictures also show the fridge cabinet. On the left going back from the fridge cabinet will be a counter top, with the sink at the very rear, opposite the porta potty. There is sort of a method to my madness, my wife has MS so this camper build to to make her as comfortable as possible.
1 resized.jpg
resize2.jpg
resize3.jpgresize4.jpg
 
That wood does look nice. I used baltic birch for mine, and chose NOT to use framing at all, just small joining blocks or L brackets. It has proven to be plenty strong so far.
 
About the plywood, not really sure? Most of the vertical surfaces you see will be covered with the 1/8" paneling. and the horizontal surfaces will have the cushions, upholstery or carpet on them. Fridge top and counter top will be formica I guess. I wish I was a better craftsman, but my next birthday will be my 70th, and my skills are lacking. I think I really bit off more than I could chew with this project. It's slowing coming together, after some doubts. Without the help from many fine folks on this site and another, it might not have happened.
 
Plugging away, getting the interior trimmed. Cut out the plywood for the counter top and fridge top. Heading to Canada on Tues for a couple weeks. When I returned I'll finish the counter tops then start on the roof install.
 

Attachments

  • resized 1.jpg
    resized 1.jpg
    100.2 KB · Views: 199
  • resize 2.jpg
    resize 2.jpg
    113.3 KB · Views: 226
  • resize 3.jpg
    resize 3.jpg
    104.9 KB · Views: 250
Hey, thanks for the early help and advice on the camper. I asked a lot of questions. It helped out. I built mine late april - early july 2017.

Sits beautifully on the truck, handles great on rough roads.

Shell only (panelled, carpeted, all trim completed), with only a couch/bench inside. Came in at about 600 lbs. I will eventually add a heat source (thinking a wood stove, but still considering all the options - yes I am considering propane too) along with a small sink, propane stove (thinking a combined stainless steel SMEV unit). it's got a queen bed dimensions above the cab, and the couch/bench folds down

I will do a build thread of my own - but thanks for being willing to share information!


full

full
 
Looking good Shellback! You're making progress and doing a fine job. As my build went on I realized there's no right or wrong way to go about bringing a 35 year old camper back to life. They do take a lot of time though.

Thanks for sharing.
 
Another milestone today. Got the canvas half installed, the tough part, stretching around the roof and body! It took some pulling and tugging to get it around the roof, but my brother and I did it and have the top trim in place. I didn't fasten it at the bottom. I wasn't sure where to place the D ring tabs I made for the bungee pulls for the lift panels. I didn't want to try and raise the roof for a measurement without the canvas. The whole thing can flip forward or backward without the canvas. Now that the canvas is on I can get the right placement for them on the lift panels. I may have to block the roof up and unscrew the bottom hinge to drill the holes in the lift panels and glue the D ring tabs onto the canvas. Such a real PIA when you have none of the original stuff to check measurements against! I guess you pull the bungees pretty tight against the lift panels so the fabric pulls into the fold of the panels? Once that's done, the bottom trim should be a piece of cake. I also got the counter tops done with a granite style formica. Here's a few pics, couldn't get the outside of the canvas as I have a tight working area. Hopefully by midweek it may be done enough to load up and take to a scale. I'm really curious as to what it will weigh. The electric jacks and the battery added quite a bit.
 

Attachments

  • interior1.jpg
    interior1.jpg
    83.3 KB · Views: 222
  • interior2.jpg
    interior2.jpg
    74.1 KB · Views: 230
  • interior3.jpg
    interior3.jpg
    89.4 KB · Views: 221
  • interior4.jpg
    interior4.jpg
    74.1 KB · Views: 195

New posts - WTW

Back
Top Bottom