Looks great. Did you put velcro on the bottom as well, to create a sealed air pocket, or can air simply "fall" out the bottom?wcorbett said:I just re-looked at my linked post for the Arctic liner, and the pics suck. So, here's a few more:
You are using an out of date browser. It may not display this or other websites correctly.
You should upgrade or use an alternative browser.
You should upgrade or use an alternative browser.
2011 Cougar Build Thread
- Thread starter Rafter C
- Start date
Rafter C
Advanced Member
No. Nothing on the bottom. I suppose in theory air could "fall" out the bottom. Scientific theory anyway.... Practically, I don't think its an issue. The liner hangs from the velcro on top, and extends the full height of the camper soft wall with a negligent if not non-existent air space in between. Effectively, its the equivalent of being attached to the wall, so air movement is highly unlikely. Equally, the reflective surface should retain any heat produced within the camper, and would probably negate the minimal amount of air that might "fall" from between the two surfaces.Vic Harder said:Looks great. Did you put velcro on the bottom as well, to create a sealed air pocket, or can air simply "fall" out the bottom?
Rafter C
Advanced Member
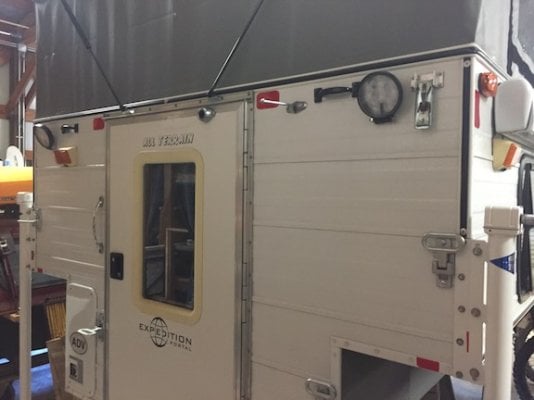
The sort of current final step of my build (for right now anyway) was adding items that could be/maybe could’ve been bought at the time of order of the camper. In my case, I think in 2011, ATC wasn’t doing lift struts, or Yakima racks rails, but they probably were doing rear wall steps and rear facing spot lights (at least if requested by customers). Anyway, I decided I wanted those items, so I made an appointment with the guys just after the first of the year to get them done.
As reported in another post, I showed up at 9 AM, and was out the door at ~11:30, with lots of work and BS-ing done. I opted for the full length Yakima rails on the roof. I currently have a Yakima rail system on my camper shell that was our primary shelter prior to the Cougar, so moving the mounts and bars will be very easy. I went for the full length so I would have greater flexibility/expandability down the road for additional racks, or solar panels (god forbid), or whatever I might need.
I probably could've done the rails myself, but since it entails drilling holes in the roof, I opted to let ATC do it. They’ve done a ton of them, know the tricks to be sure there are no leaks, and to be sure the rails are nice and straight. Both key concerns…
The rear spots I explained in an above post. They knew where to drill, and where to find the hot lead and put the switch (both also KIND OF important). They did a great job there, and then I could grab the power from their work to make my area lighting successful.
The gas struts, I opted to do myself. I bought the 30 lb units ATC normally installs from them, got some pointers from Jeff as far as placement, and they came out great, and work well, though with an empty roof, they can be more of a deterrent, than a help. Right now, we have to pull the roof down, so I attached some short straps to the “push” panels to assist that, but when we have our 2 kayaks on the Yakima rack, it should be well balanced toward lifting and lowering.
To mount the struts, I measured the suggested by Jeff distance away from the outside edge of the camper (~8”), mounted the top pivot, then raised the roof, and mounted the bottom pivot where the strut was fully extended, minus about a 1/2”.
I think they are a good addition, though maybe unnecessary for a few more years, as lifting the roof isn’t really a big deal for me or my wife. Guess we’ll see…
I also opted to mounted my own rear steps. Once I got the info from Marty as far as where there was structural aluminum, and realized that they need to be drilled and bolted all the way through the camper wall, I figured it'd be no big deal. And it wasn’t.
I bought the steps from ATC, though they are available all over the internet, and you can even get them in pure stainless if that suits you. The driver’s side lower step is bolted right next to the door frame, about 16” up from the door sill height. The bolts come through into the short section of rear wall between the door and the wall that the furnace is mounted behind. ATC uses just washers to back the bolts (which I’m sure is more than adequate), but I opted to make some backing plates out of 2” x 3/16” aluminum bar stock. Its nice and light, easily bought at my local Ace Hardware, and provides greater surface area than washers, and adds “compressional” strength in addition to the “sheer” strength of the bolts, and since I’m 200+ pounds, I wanna know that those steps are gonna support me.
The drivers upper step mounts directly next to the trim at the edge/corner of the camper, and the bolts come through into the space behind the fridge, so they are easily accessed. The passenger side steps are basically in the position as the drivers, except the lower step has to mount to the outside edge of the lower wall of the camper in order not interfere with opening the door. Its bolts come through into my rear compartment, and the upper step bolts come through the rear wall. They all have the backing plates, and use a jam nut for tightening, and an acorn not for aesthetics.
And since I had steps to allow me to climb the rear wall, I figured I bet have something to hold onto when I got there. So I mounted couple of simple grab handles on the upper portion of the rear wall, through the channel aluminum. I used the same method to back the through bolts as the steps, but I added a couple of aluminum plates between th handles and the siding of the camper, again, to spread the surface area out. On both the steps and handles, I used white 3M Marine silicone sealer (same stuff as ATC uses) to be sure leaks are averted.
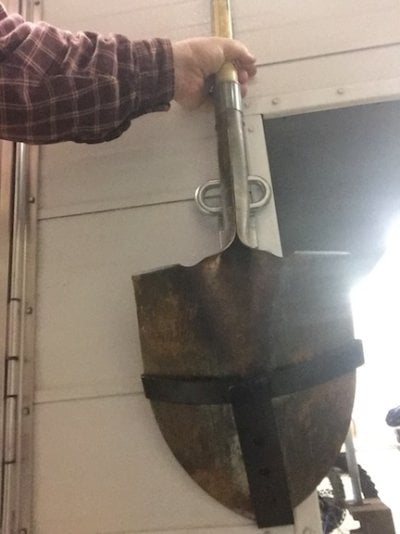
Coming next: Shovel mount and CO2 tank bracket……
As reported in another post, I showed up at 9 AM, and was out the door at ~11:30, with lots of work and BS-ing done. I opted for the full length Yakima rails on the roof. I currently have a Yakima rail system on my camper shell that was our primary shelter prior to the Cougar, so moving the mounts and bars will be very easy. I went for the full length so I would have greater flexibility/expandability down the road for additional racks, or solar panels (god forbid), or whatever I might need.
I probably could've done the rails myself, but since it entails drilling holes in the roof, I opted to let ATC do it. They’ve done a ton of them, know the tricks to be sure there are no leaks, and to be sure the rails are nice and straight. Both key concerns…
The rear spots I explained in an above post. They knew where to drill, and where to find the hot lead and put the switch (both also KIND OF important). They did a great job there, and then I could grab the power from their work to make my area lighting successful.
The gas struts, I opted to do myself. I bought the 30 lb units ATC normally installs from them, got some pointers from Jeff as far as placement, and they came out great, and work well, though with an empty roof, they can be more of a deterrent, than a help. Right now, we have to pull the roof down, so I attached some short straps to the “push” panels to assist that, but when we have our 2 kayaks on the Yakima rack, it should be well balanced toward lifting and lowering.
To mount the struts, I measured the suggested by Jeff distance away from the outside edge of the camper (~8”), mounted the top pivot, then raised the roof, and mounted the bottom pivot where the strut was fully extended, minus about a 1/2”.
I think they are a good addition, though maybe unnecessary for a few more years, as lifting the roof isn’t really a big deal for me or my wife. Guess we’ll see…
I also opted to mounted my own rear steps. Once I got the info from Marty as far as where there was structural aluminum, and realized that they need to be drilled and bolted all the way through the camper wall, I figured it'd be no big deal. And it wasn’t.
I bought the steps from ATC, though they are available all over the internet, and you can even get them in pure stainless if that suits you. The driver’s side lower step is bolted right next to the door frame, about 16” up from the door sill height. The bolts come through into the short section of rear wall between the door and the wall that the furnace is mounted behind. ATC uses just washers to back the bolts (which I’m sure is more than adequate), but I opted to make some backing plates out of 2” x 3/16” aluminum bar stock. Its nice and light, easily bought at my local Ace Hardware, and provides greater surface area than washers, and adds “compressional” strength in addition to the “sheer” strength of the bolts, and since I’m 200+ pounds, I wanna know that those steps are gonna support me.
The drivers upper step mounts directly next to the trim at the edge/corner of the camper, and the bolts come through into the space behind the fridge, so they are easily accessed. The passenger side steps are basically in the position as the drivers, except the lower step has to mount to the outside edge of the lower wall of the camper in order not interfere with opening the door. Its bolts come through into my rear compartment, and the upper step bolts come through the rear wall. They all have the backing plates, and use a jam nut for tightening, and an acorn not for aesthetics.
And since I had steps to allow me to climb the rear wall, I figured I bet have something to hold onto when I got there. So I mounted couple of simple grab handles on the upper portion of the rear wall, through the channel aluminum. I used the same method to back the through bolts as the steps, but I added a couple of aluminum plates between th handles and the siding of the camper, again, to spread the surface area out. On both the steps and handles, I used white 3M Marine silicone sealer (same stuff as ATC uses) to be sure leaks are averted.
Coming next: Shovel mount and CO2 tank bracket……
Attachments
Great write up. I've bookmarked this page for a future date!
Rafter C
Advanced Member
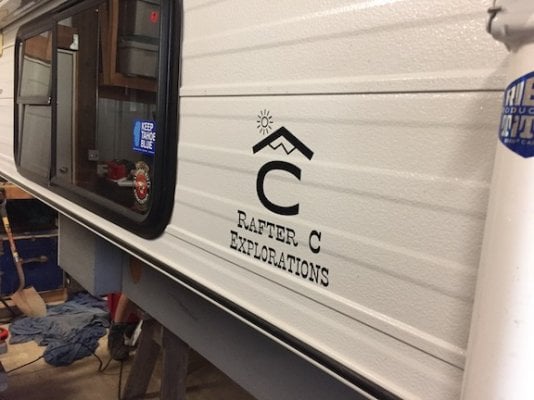
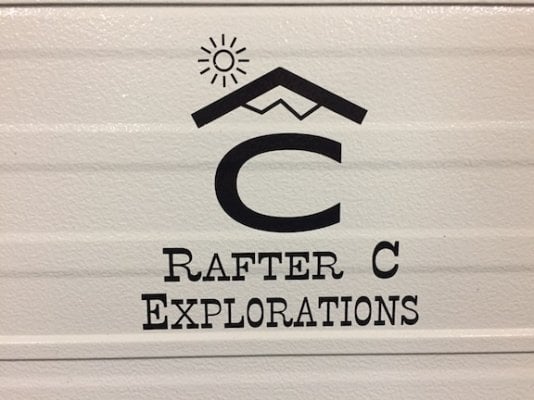
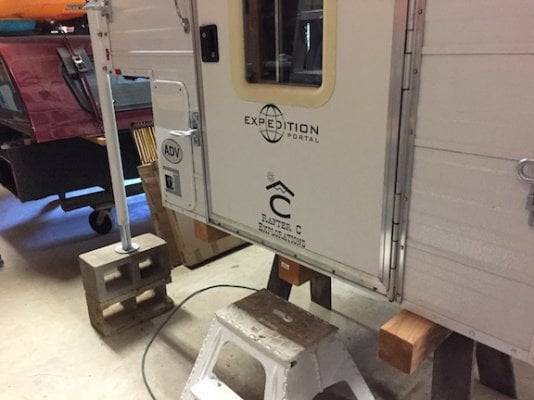
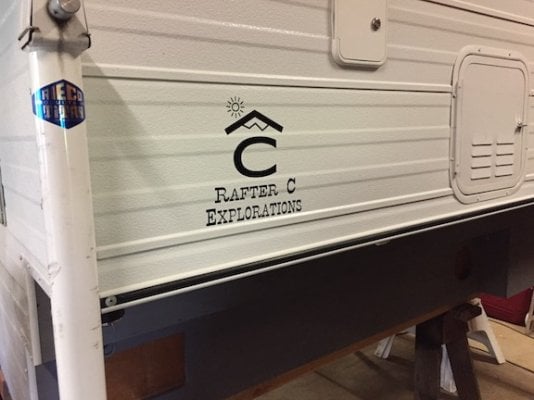
Not really a build subject, but got some new decals for my camper. Just a little logo for a travel blog I’m starting, and who knows where it’ll go from there. The basis of it is our “Rafter C” brand. For those not familiar, the “rafter” is the the peaked shape above the letter C, with the “C” being the first letter of our last name. Its a California registered cattle brand, that we have used on a few cows, but mostly its what we used to represent our family. It has served a basis for many things oriented around our family, and even a small business my wife used to run, and you all may not have noticed, but I recently changed my user name to “Rafter C” to line up with this idea.
The decals were made locally by a friend who has a shop that specializes in things such as logo hats, shirts, etc, and decals obviously.
Anyway, I kind of like them…..
The decals were made locally by a friend who has a shop that specializes in things such as logo hats, shirts, etc, and decals obviously.
Anyway, I kind of like them…..
Attachments
I like your ‘brand’! Nicely done...
Nice let us know when your blog is up to view.
Frank
Frank
longhorn1
Ouch, that stings!
Very nice
jimjxsn
Senior Member
Great write up.
Can't wait. Does the door hit when opened? I ask because I was thinking about adding a tank mount in that location for a small 5lb propane tank for outside cooking.

Really like this idea -

Keep'em coming!
Can't wait. Does the door hit when opened? I ask because I was thinking about adding a tank mount in that location for a small 5lb propane tank for outside cooking.
Really like this idea -
Keep'em coming!
Rafter C
Advanced Member
The CO2 tank mount is still in progress, but in my case, no the door won't hit it. But that's only because I moved the door wind catch inward. Meaning toward the door, so that the door doesn't open as far as it used to. To me, thats fine. The storage potential is more important, as well as an improved effectiveness of the spot lights, and clearance for some supports for a planned rear awning I will do. It will also allow me to mount the shovel next the tank.jimjxsn said:Great write up.
Can't wait. Does the door hit when opened? I ask because I was thinking about adding a tank mount in that location for a small 5lb propane tank for outside cooking.
Really like this idea -
Keep'em coming!
The table post seemed like a no brainer to me since the floor space is pretty valuable.
Rafter C
Advanced Member
I should mention that moving the wind catch does affect its effectiveness fairly significantly. Just a several inch move inward of mine greatly reduced its ability actually "catch" the door. The change in leverage is dramatic. Mine is now mostly a door "stop" now. For me, its fine. I'm planning to make a strap that will keep the the door open, and if the winds is that bad, it'd be closed anyway.Rafter C said:The CO2 tank mount is still in progress, but in my case, no the door won't hit it. But that's only because I moved the door wind catch inward. Meaning toward the door, so that the door doesn't open as far as it used to. To me, thats fine. The storage potential is more important, as well as an improved effectiveness of the spot lights, and clearance for some supports for a planned rear awning I will do. It will also allow me to mount the shovel next the tank.
The table post seemed like a no brainer to me since the floor space is pretty valuable.
Rafter C
Advanced Member
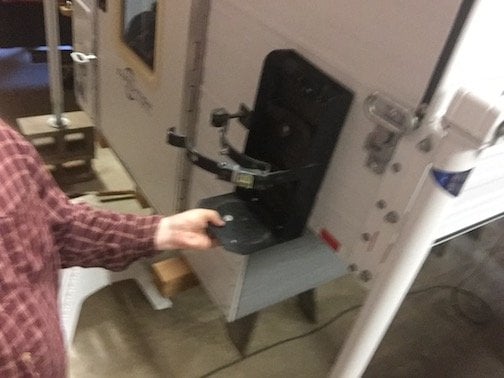
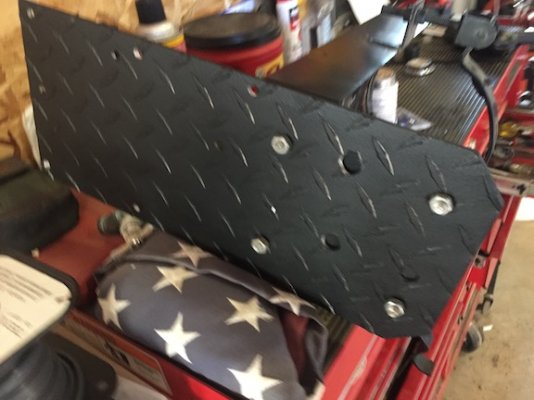
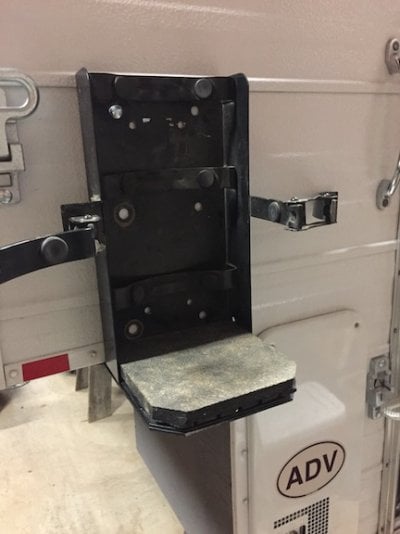
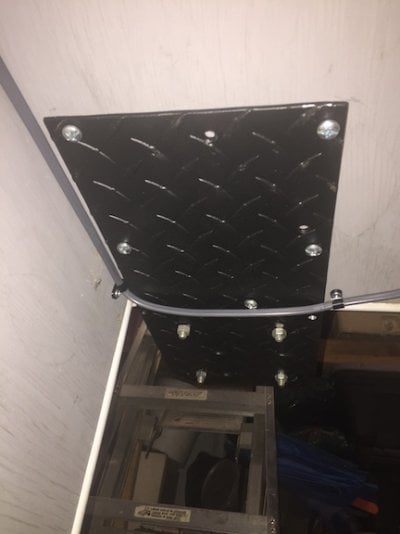
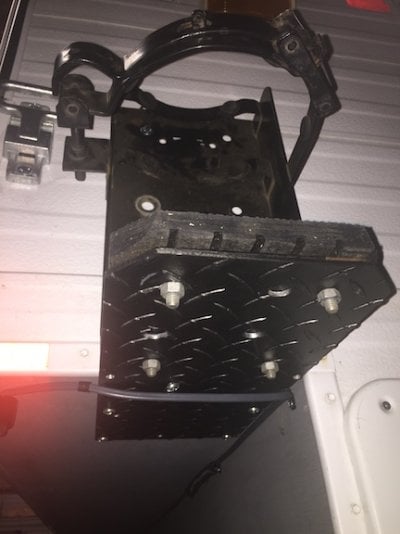
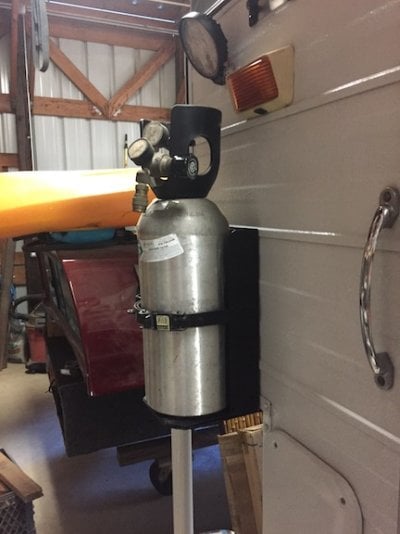
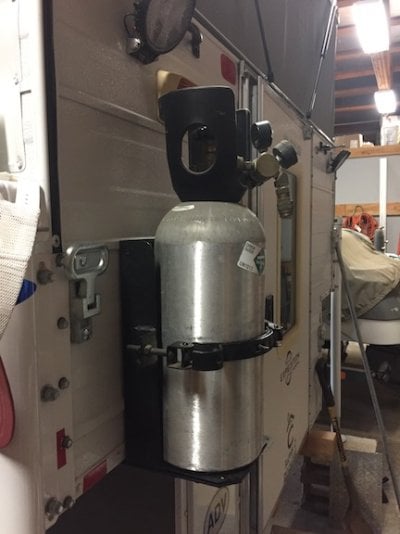
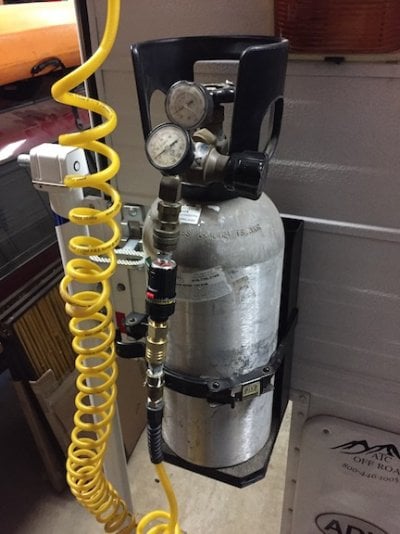
Got my mount for my CO2 tank bracket done today. Pretty simple deal really. Took a piece of aluminum diamond plate (3/16” nominal thickness, but effectively 1/4” with the “diamonds”) I had in the shop, cut it on the band saw to the width of the bracket x 18" long. This particular piece had been used for something in the past, so it already had a few conveniently placed holes in it to help mount it, and I drilled a few more where needed.
Before mounting it, I painted it with some Dupli-color truck bed lining paint because I think the black looks better...and because it was an old piece of diamond plate that needed some flaws hidden.
I bolted the bracket to the diamond plate, then held it up (actually, my wife held it) next to the camper so that the back of the bracket was flush with the camper wall, and the diamond plate slid under horizontal plywood under the fridge. I fastened the plate to the plywood with some #14 x 3/4" wood screws, and then triangulated the bracket by drilling through the back wall (and one of the vertical aluminum frame members), then bolted it through into the space behind the fridge with 2" backing plate I made from some aluminum bar stock. Finally, I cut a leftover piece of horse stall matting (heavy duty 3/4” thick rubber) to minimize noise, and abrasion to the bottom of the tank from the bolts attaching the bracket to the diamond plate.
The resulting mounting system is quite solid, has virtually no movement or apparent vibration concerns, and should work quite well.
Now.... I'm sure there's plenty of folks out there asking: What the hell is the CO2 for? Good question. Answer: It's a "replacement" for compressed air. CO2's characteristics relative to "air" (~79% Nitrogen & ~21% ) are very similar, and as such can be used as a "replacement" for many common uses. My primary use will be as a means to air tires back up after some off road situations. But obviously, it could also be used to for airing up inflatables, blowing out filters, and even running air tools during repair situations or tire changing.
A 10 lb cylinder of CO2 has the capability of airing a 33" tire from 15 to 30 psi ~40 times before running empty. And because of that volume capability, can run air powered tools better than most on-board air compressors, even in combination with storage tanks. CO2 when compressed is stored in a liquid form, and converts to its gaseous state when released. This allows much greater volume than a same sized tank of compressed air (i.e., a scuba tank), BUT the downside is weight. Being stored in a liquid state means it has mass, unlike stored air.
The total weight of the liquid CO2, the tank (aluminum) and the bracket (stamped steel) is about 30 lbs. Roughly the same as about 3 gallons of water plus the bracketry to hold. So its not outrageous compared to what some folks have mounted on the rear of the camper, but it does give cause for monitoring the mounting system for any signs of stress. The liquid CO2 doesn’t have the same “sloshing” factor as gasoline or water, so it think the stresses relative to that will be minimized. Additionally, I don't anticipate taking the tank on all trips, so it wont be a constant weight on the bracketry.
I’ve carried an identical bracket on my rock crawler Jeep for almost 20 years, and have had it in much more adverse conditions than I ever expect to have my truck and camper, so I’m quite confident in the brackets ability to retain the tank, though will be adding some rubber weatherstripping to the tank to make it slightly more snug, and will have to put a small cable lock through the latch to keep it secure.
Overall, I think this’ll be a nice addition for the occasional need use, and adds to the self contained nature of my truck and camper.
Attachments
Rafter C
Advanced Member
jimjxsn
Senior Member
Great job on the tank mount. It's looking good.
Rafter C
Advanced Member
Thanks. I know I initially showed that I was going to put it behind the door, but decided to go for the other side because I identified that the vertical support member was right where I need to bolt through. The behind the door side didn't seem like it was as stout, and without Marty or Jeff there to tell me where the frame was, I went with what I could confirm. It seems to have worked out well, though truth be told, I'd forgotten the total weight of the tank until after the bracket was in place, so as I said, I will exercise some caution and monitor the mount the first few times I travel with it.jimjxsn said:Great job on the tank mount. It's looking good.
Rafter C
Advanced Member
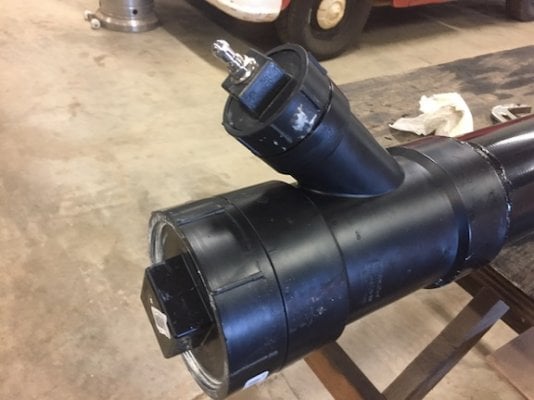
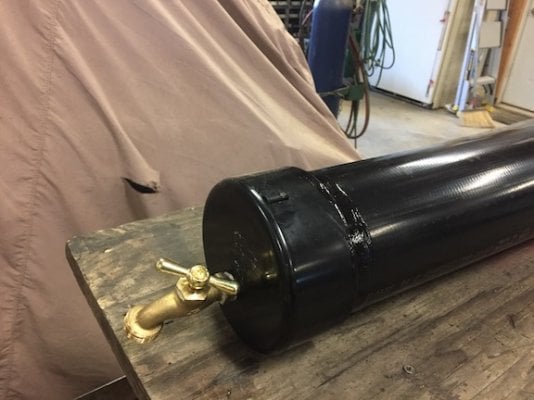
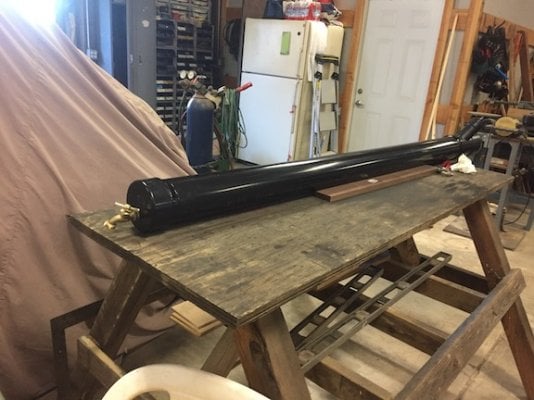
Latest add on is a quickie solar shower. 6' of 4" ABS pipe, a slip cap glued on one end with a hose bib tapped into it, a 4"x 2" 45* tee glued on the other end with threaded cap adapters fitted to it. And an automotive tire Schrader valve mounted through the small cap. Easy peasy...
Fill the "tank" with water (through the small threaded cap), drive or sit around in the sun for a few hours, apply about 30 psi of air pressure (in my case, CO2) to the Schrader valve, hook up the hose, take a warm shower. No propane used, no electric power used.
I haven't mounted it yet, but I saw a neat set up using carved canoe blocks on a Yakima rack that I probably will try. When full, the whole thing should weigh around 40 lbs (~5 gallons), so not outrageous relative to solar panels, but with my kayaks also on top, may require some helping lifting from my Crossfitting wife (truth be told, she is our roof lifter anyway!).
This obviously not some great new idea. There are lots of iterations of these out there on the inter web (YouTube). Mine is a copy of one of those. You can also spend about $500 on the aluminum Road Shower version, but since I've only got $17 into mine (with $75 off because of a new Home Depot credit card), I'm feeling pretty good.
I will post again when I mount it, and will probably paint it with the same spray on bed coating I've used in the past, or maybe just flat black paint to help with heat absorption (or maybe its to reduce heat reflection?). Anyway, follow up coming....
Attachments
Rafter C
Advanced Member
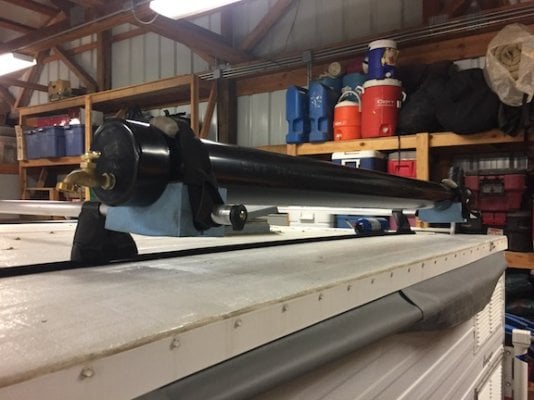
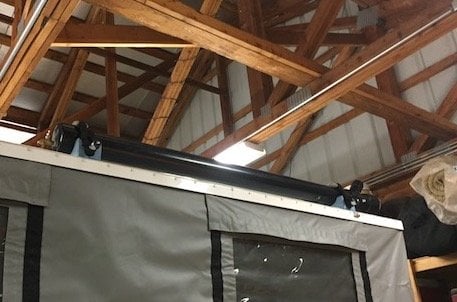
Mounted the solar shower up on the camper yesterday, which was the result of an additional project; mounting the Yakima racks up on the roof.
A while back, I had the guys at ATC mount Yakima rails over the full length of the roof of my Cougar, but hadn't gotten around to buying the actual rack parts yet. A recent trolling of CL in Sacramento, yielded an ad for some used Control Towers at a good price. The ad implied just a set of 4, and I was looking for 6, but replied anyway. Turns out the seller was part of a "kayak club" (his words), and had multiple (as in MANY) sets available, so I made a deal for 6 towers with all the necessary rail mounting hardware for $200 (a hell of a lot cheaper than new, and they are in perfect condition).
For bars, I wanted them to be full width of the camper, which in my case is 84", and Yakima's 86" bars are hellaciously expensive (and heavy), so I stole an idea from the TARDIS build over on ExPo, that Hadley stole from our own Ski3pin, and ordered 20' of 6061 aluminum tubing from my local steel supplier for $90. Its outside diameter is 1.125 (1 1/8"), with a wall thickness of 1/8". This mimics exactly the steel tube used by Yakima, and so allows use of their locking bar ends that minimize any chance of strapping slipping off the end. I cut the tubing into thirds (80" pieces), which I'll take as close enough to full width, and it gave me the pieces I wanted for my triple rack system.
So back to the shower mount...
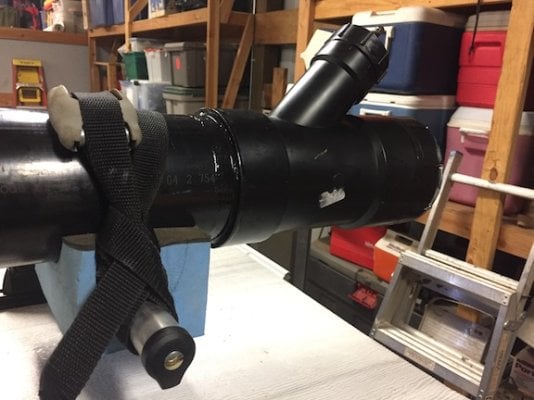
As I mentioned in my last reply, I'd seen an idea to mount this using foam blocks normally used for canoes, and I just happened to have a couple I hadn't used in years. So my wife scribed a 4" radius on them, and cut them with her pocket knife, and voila, bar mounts. I strapped the the tube down using Yakima's boat straps (again, already had them, wasn't using them), and it is quite secure.
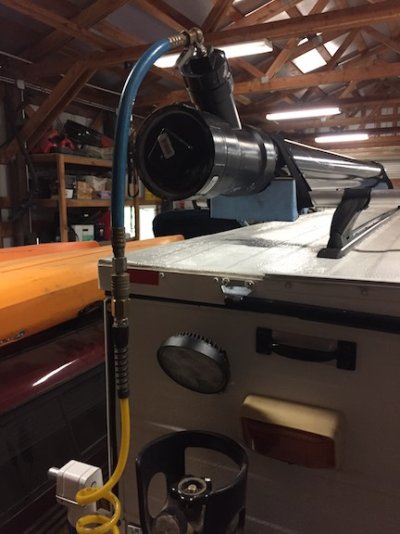
I then mocked up how it would be used in the field relative to how the the CO2 would pressurize the water. The full output pressure of the C02 is over 120 psi, so I'm using an adjustable pressure relief valve from Home Depot to bring it down to ~40 psi (common household water pressure).
And of course, here's the pics to easily show what I so verbosely just explained...")
A while back, I had the guys at ATC mount Yakima rails over the full length of the roof of my Cougar, but hadn't gotten around to buying the actual rack parts yet. A recent trolling of CL in Sacramento, yielded an ad for some used Control Towers at a good price. The ad implied just a set of 4, and I was looking for 6, but replied anyway. Turns out the seller was part of a "kayak club" (his words), and had multiple (as in MANY) sets available, so I made a deal for 6 towers with all the necessary rail mounting hardware for $200 (a hell of a lot cheaper than new, and they are in perfect condition).
For bars, I wanted them to be full width of the camper, which in my case is 84", and Yakima's 86" bars are hellaciously expensive (and heavy), so I stole an idea from the TARDIS build over on ExPo, that Hadley stole from our own Ski3pin, and ordered 20' of 6061 aluminum tubing from my local steel supplier for $90. Its outside diameter is 1.125 (1 1/8"), with a wall thickness of 1/8". This mimics exactly the steel tube used by Yakima, and so allows use of their locking bar ends that minimize any chance of strapping slipping off the end. I cut the tubing into thirds (80" pieces), which I'll take as close enough to full width, and it gave me the pieces I wanted for my triple rack system.
So back to the shower mount...
As I mentioned in my last reply, I'd seen an idea to mount this using foam blocks normally used for canoes, and I just happened to have a couple I hadn't used in years. So my wife scribed a 4" radius on them, and cut them with her pocket knife, and voila, bar mounts. I strapped the the tube down using Yakima's boat straps (again, already had them, wasn't using them), and it is quite secure.
I then mocked up how it would be used in the field relative to how the the CO2 would pressurize the water. The full output pressure of the C02 is over 120 psi, so I'm using an adjustable pressure relief valve from Home Depot to bring it down to ~40 psi (common household water pressure).
And of course, here's the pics to easily show what I so verbosely just explained...
Attachments


Rafter C
Advanced Member
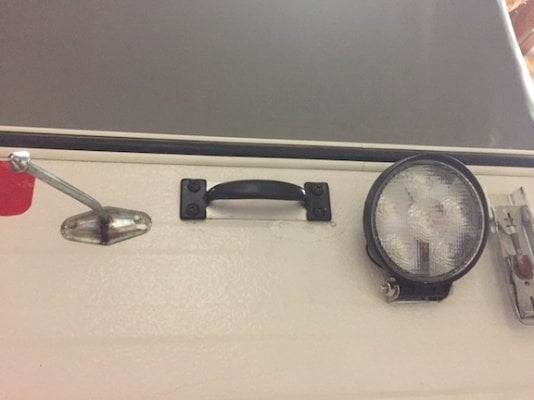
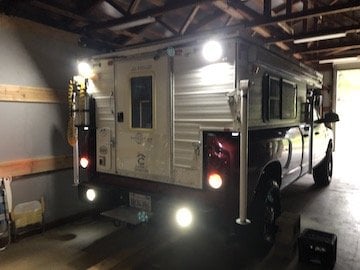
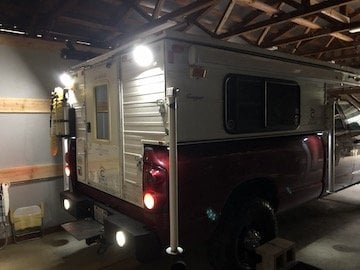
After not quite a year, I'm back to camper mods.... The latest is just a quick and dirty one, but kind of handy I think.
Recently, I upgraded the backup lights in my truck bumper to LED from incandescent, as well as putting some brighter LED bulbs in the factory reverse light location on the truck (taillight housing). They make a hell of a difference in general, but then it occurred to me that the rear facing flood lights on the camper would be a great addition as well, and especially because the camper blocks so much view when its on. So I figured why not wired those to the vehicle system lights, and really make it so I can see when I'm trying to fit the truck/camper into some tight spot in the dark.
The rub was that I also wanted to be able to use the camper spot lights as they were intended; still on the switch near the back door. BUT, I didn't want to back feed the truck system. Answer?: In line diode...
Ordered one up off Amazon from Dorman; kind of spendy ($20), and it came ready to wire, with shrink tubing already in place, and male/female bullet connectors on each end.
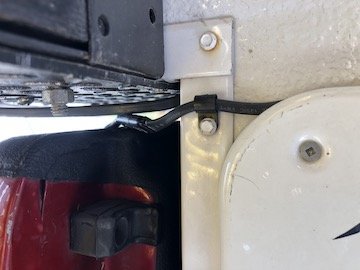
I accessed the power wire to the lights (purple) through the furnace cover, tapped into it with a splice connector, ran a wire with the diode spliced into it from that to a two wire waterproof connector, and connected the other wire to a ground. The lead comes out of the top of the furnace cover, and runs over to the edge of the lower vertical corner of the camper, right near the top of the truck bed, where the tailgate corner would be.
Then, from the truck side, I removed the left side taillight housing where i could access the wires going to my truck's auxiliary reverse lights, and just tapped into that with a matching two wire connector to the camper (again, grounding the other wire), ran those leads up through the stake pocket, where they can easily be reached when putting the camper on the truck, and plugged into its counterpart from the camper.
Worked great, very bright, no back feed to the truck when switching the spots on from the camper, AND, I got the added bonus of having g the LED's I put on under the flat side of the camper come on when the truck is put in reverse, so I can see my rear tires, and the ground around them when backing too.
It came out pretty slick and it didn't cost much.
Recently, I upgraded the backup lights in my truck bumper to LED from incandescent, as well as putting some brighter LED bulbs in the factory reverse light location on the truck (taillight housing). They make a hell of a difference in general, but then it occurred to me that the rear facing flood lights on the camper would be a great addition as well, and especially because the camper blocks so much view when its on. So I figured why not wired those to the vehicle system lights, and really make it so I can see when I'm trying to fit the truck/camper into some tight spot in the dark.
The rub was that I also wanted to be able to use the camper spot lights as they were intended; still on the switch near the back door. BUT, I didn't want to back feed the truck system. Answer?: In line diode...
Ordered one up off Amazon from Dorman; kind of spendy ($20), and it came ready to wire, with shrink tubing already in place, and male/female bullet connectors on each end.
I accessed the power wire to the lights (purple) through the furnace cover, tapped into it with a splice connector, ran a wire with the diode spliced into it from that to a two wire waterproof connector, and connected the other wire to a ground. The lead comes out of the top of the furnace cover, and runs over to the edge of the lower vertical corner of the camper, right near the top of the truck bed, where the tailgate corner would be.
Then, from the truck side, I removed the left side taillight housing where i could access the wires going to my truck's auxiliary reverse lights, and just tapped into that with a matching two wire connector to the camper (again, grounding the other wire), ran those leads up through the stake pocket, where they can easily be reached when putting the camper on the truck, and plugged into its counterpart from the camper.
Worked great, very bright, no back feed to the truck when switching the spots on from the camper, AND, I got the added bonus of having g the LED's I put on under the flat side of the camper come on when the truck is put in reverse, so I can see my rear tires, and the ground around them when backing too.
It came out pretty slick and it didn't cost much.
Attachments

billharr
Senior Member
Rafter C said:.................. . So I figured why not wired those to the vehicle system lights, and really make it so I can see when I'm trying to fit the truck/camper into some tight spot in the dark.
The rub was that I also wanted to be able to use the camper spot lights as they were intended; still on the switch near the back door. BUT, I didn't want to back feed the truck system. Answer?: In line diode...
Ordered one up off Amazon from Dorman; kind of spendy ($20), and it came ready to wire, with shrink tubing already in place, and male/female bullet connectors on each end.
I accessed the power wire to the lights (purple) through the furnace cover, tapped into it with a splice connector, ran a wire with the diode spliced into it from that to a two wire waterproof connector, and connected the other wire to a ground. The lead comes out of the top of the furnace cover, and runs over to the edge of the lower vertical corner of the camper, right near the top of the truck bed, where the tailgate corner would be.
Then, from the truck side, I removed the left side taillight housing where i could access the wires going to my truck's auxiliary reverse lights, and just tapped into that with a matching two wire connector to the camper (again, grounding the other wire), ran those leads up through the stake pocket, where they can easily be reached when putting the camper on the truck, and plugged into its counterpart from the camper.
Worked great, very bright, no back feed to the truck when switching the spots on from the camper, AND, I got the added bonus of having g the LED's I put on under the flat side of the camper come on when the truck is put in reverse, so I can see my rear tires, and the ground around them when backing too.
It came out pretty slick and it didn't cost much.
You can do without a diode. I used a relay and triggered the relay with voltage from the backup lights. You are right does make a great back up light.

Similar threads - WTW
- Ralph
- All Terrain Camper Discussions
- Replies: 10
- Views: 863
- go4custom
- All Terrain Camper Discussions
- Replies: 9
- Views: 2K