Another Awning

BillM

Senior Member
Joined
Dec 12, 2009
Messages
293
Location
Reno
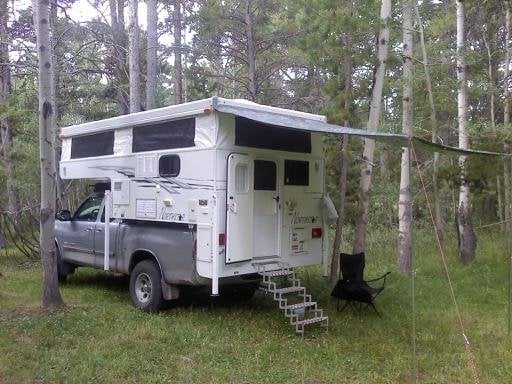
Setup a simple awning on my camper. Had a similar setup on my previous rig and used it every day for a year. Cheap, durable and dependable.

phptgmtCBPM.jpg

The key is using a heavy duty tarp and loops of bungy at the 4 attachment points, this lets it give some in the wind without over stressing the tarp or lines.

phpFs71JMPM.jpg

phpwUEnFWPM.jpg

Here is a link to higher quality images for better detail:

http://cmd.shutterfly.com/commands/pictures/slideshow?site=awning&page=awning/pictures&album=8
 
give us some detail on the two attachment points.

eye bolts? used existing hole?

I actually use 4 stainless steel eye bolts on the camper and attach the bungy to the four eyelets on the tarp. That way the stress is spread out over a larger area and not just the corners. Got the eyebolts from Home depot, they are threaded for wood and I drill a hole the size of the screw shank and then carefully self tap them into the hole. Use some silicone caulk to seal them. Did it this way on my old camper and they were solid for over 10 years, I'm actually reusing the same eye bolts on my 4 Wheel. I got the adjustable poles from REI and put them through the corner tarp eyelets and then loop a line over the top of the pole. I usually use 2 lines per pole to keep the tarp tensioned.

phpc3vAdSPM.jpg

Sorry, can't get this to rotate.
 
Very timely...this is exactly the concept I've been considering except I've been thinking off using bungies on my rack crossbar.
 
Looks good!! Did you all ready have the poles or can you buy them somewhere?


I already had the poles from my old camper but I bought them years ago from REI, I would think they still have them. The slide adjustable poles are great because you can adjust the tension of the tarp by raising or lowering them.

Just checked REI, they still have them in 7 & 8 ft lengths: http://www.rei.com/product/358078

Campmor has them too.
 
I actually use 4 stainless steel eye bolts on the camper and attach the bungy to the four eyelets on the tarp. That way the stress is spread out over a larger area and not just the corners. Got the eyebolts from Home depot, they are threaded for wood and I drill a hole the size of the screw shank and then carefully self tap them into the hole. Use some silicone caulk to seal them. Did it this way on my old camper and they were solid for over 10 years, I'm actually reusing the same eye bolts on my 4 Wheel. I got the adjustable poles from REI and put them through the corner tarp eyelets and then loop a line over the top of the pole. I usually use 2 lines per pole to keep the tarp tensioned.

View attachment 9080

Sorry, can't get this to rotate.

I know this is kind of a dumb question, but do the eye bolts go through the fabric on the inside of the roof trim? I don't know where the popup material actually attaches. Would there be any reason to fear puncturing the material that high up?
 
I know this is kind of a dumb question, but do the eye bolts go through the fabric on the inside of the roof trim? I don't know where the popup material actually attaches. Would there be any reason to fear puncturing the material that high up?


There is an aluminum drip rail trim piece screwed around the edge of the camper top. I attached the eyes at the same level as the screws. If the screws go through the fabric so do the eyes. I figured if they put the screws through there it would be OK as long as I used sealant on the eyes.
 
My thoughts exactly GSB! I've got the Yakima bars up there, so why not run a rod between them?
I've got some spare Yakima round clamps and it seems it would be simple enough to make some sort of attachment.
Really the only reason for the bar is to provide some intermediate tie points, so it could be a cable.
Just thinkin' out loud here . . .

I bookmarked the Eureka adjustable poles, those are perfect if a bit pricey at $24 each.
The only other item to source is a tarp that's the right size.

Andy


Very timely...this is exactly the concept I've been considering except I've been thinking off using bungies on my rack crossbar.
 
nice truck! I have the same but with a little lift on it. do you have overload springs, Timbrens or airbags? I killed my stock springs when I first got my camper, they were warped over the axle.

I love the tarp set up. I did a similar set up but used small stainless boat cleats on the side of the camper roof to attach the tarp to. like you said, simple, quick and dependable.
 
My thoughts exactly GSB! I've got the Yakima bars up there, so why not run a rod between them?
I've got some spare Yakima round clamps and it seems it would be simple enough to make some sort of attachment.
Really the only reason for the bar is to provide some intermediate tie points, so it could be a cable.
Just thinkin' out loud here . . .

I bookmarked the Eureka adjustable poles, those are perfect if a bit pricey at $24 each.
The only other item to source is a tarp that's the right size.

Andy


Check out campmor, they have some steel adjustable poles for 9 bucks and the Eurekas for around 20.
 
nice truck! I have the same but with a little lift on it. do you have overload springs, Timbrens or airbags? I killed my stock springs when I first got my camper, they were warped over the axle.

I love the tarp set up. I did a similar set up but used small stainless boat cleats on the side of the camper roof to attach the tarp to. like you said, simple, quick and dependable.


I have stock springs, haven't noticed any issues yet. My camper is just a shell model so I'm hoping I'm OK without beefing up the truck. I'll definitely keep an eye on it though.
 
Here's my first outing with my new awning.

Harbor Freight tarp (8X10) - $7.00
awning rail - $19.00
Walmart tent poles (2) - $10.00 each

I had a friend sew in a length of rope into the tarp. This slides into the awning rail. This worked really well. One thing I noticed: cheap tarps are not square so getting them taut is a chore.
 

Attachments

  • Beartrap \'10.JPG
    Beartrap \'10.JPG
    138.7 KB · Views: 230

New posts - WTW

Back
Top Bottom