Another custom design, also part 1 design

Right on, if I was sticking to a traditional slide in I'd likely be looking at a floor plan like you have. The flatbed opens up the option to but the dinette in the back and not have to step over the lower bed to get to the top.

When you getting the new unit?


Ordered late December, hoping to have by April. Really looking forward to camping out of something bigger than a truck topper this year.

Back when I was looking at a camper for my stepside p/u one of the options I looked at was a flatbed. I decided against it for that rig but think it really opens up interior layout and exterior storage options. One nice thing about your rear dinette and side door is that they eliminate the through traffic that mine has.

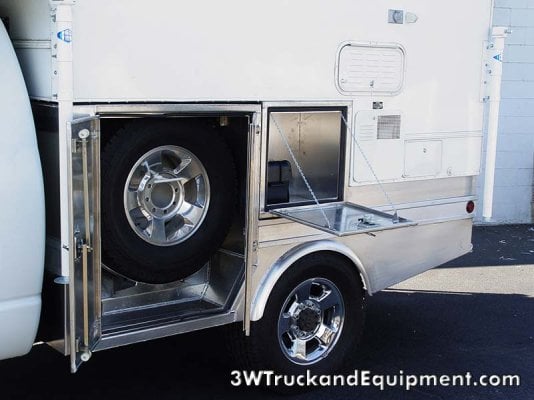
If you don't use a standard camper this might not apply but I thought this was a great storage feature that we miss with factory beds.
 

Attachments

  • custom bed storage.jpg
    custom bed storage.jpg
    56.2 KB · Views: 246
I like the layout you have so far. It looks really simple and functional. The rear dinette should help keep the weight forward too. I envision it with the fresh water tank under the fridge, batteries in on the floor left of the water tank, dual 20lb propane tanks under the counter in the front. A section of counter top could bridge between the counter and the fridge. You could easily run a ducted 18k btu furnace close to the floor and run ducts to the water tank, dinette and some aimed up to the cabover.

Something else to think about is a simple 7 gallon portable water container for the gray water. I know some places are picky about people dumping water on the ground, so a portable jug would be an easy gray storage that you could dump anywhere, or yet another place to store 7 gallons of clean water if you don't need the gray water.

I would put some though into the full height door before you commit to it. I think you would sacrifice the structural integrity too much. I have seen some palomino pop-ups with the two-piece full height doors and after time the walls tend to fold in or out, and the top doesn't come down and seal correctly. In fact I know I have seen several pictures of four wheel campers where the aluminum frame broke above the door even.
 
I envision it with the fresh water tank under the fridge, batteries in on the floor left of the water tank, dual 20lb propane tanks under the counter in the front. A section of counter top could bridge between the counter and the fridge.

Other than switching the propane and water tank that is generally what I'm thinking right now. I was potentially thinking with the propane being under the fridge I could have a sealed off access hatch from the inside but still have external vents (need to verify the legality on that). It would allow access to the compartment when something other than propane is in the one spot along with the ability to deal with swapping propane tanks/turning them on/off, etc. and being shielded from the weather.

Something else to think about is a simple 7 gallon portable water container for the gray water.

That is where I'm leaning now. I'd still likely put a Y valve or something in the line to either go to tank or to an external drain. I was thinking a tube out of the front of the camper going down between the flatbed and the truck would be inconspicuous (but a wet spot under the truck might catch more attention...)

I would put some though into the full height door before you commit to it. I think you would sacrifice the structural integrity too much.


I've been stewing over the door thing a lot and still don't have a great answer. The main issue I run into is since I'm doing overlapping hard sides I can't just do a typical 4' door and still be able to access it when the camper is down. One thought I did have is if I did a split vertically hinged door like sonke's rig (if you aren't familiar the picture is below). The bottom door would still be able to open with the top down so you could slip through the ~20" gap there but its definitely a compromise.

3087532.jpg
 
So another thought running through my head is about stealth camping / solo camping with the top down. On my current hawk there have been times I wouldn't have minded being able to access the faucet and stove to make a quick boiled water meal. I'm thinking the top down interior height on this will be in the 50-54" range and potentially a 40" counter height, so that will likely give me access to the sink (as long as I don't have cabinets on the topside coming down and covering it). Also it would give me access to the stove but not enough clearance to actually fire it up. I was curious for the stove if I used a partner stove (or similar) in a recessed box for normal cooking and then I could yank it out in these situations and use it on a short stand on the floor (and also the ability to take it outside).

Are there any combustion differences between the normal indoor propane stoves and something like a partner? Obviously with both some ventilation through the camper is needed.
 
From what I recall of the tuning of the MicroSol (I was the mechanical, not the combustion engineer) if they burn w/o yellow flame (blue only) then you're in the "good zone", but NOx may still be a problem.
 
From my research the jets in the SMEV units burn 30% less fuel, thus emitting 30% less fumes, while still producing an extremely hot flame.

This is what made me decide to go with a SMEV hob instead of a Partner stove.
 
From my research the jets in the SMEV units burn 30% less fuel, thus emitting 30% less fumes, while still producing an extremely hot flame.

This is what made me decide to go with a SMEV hob instead of a Partner stove.


Yeah I know the SMEV claims better numbers (and in my opinion its less stinky than the atwood wedgewood stove I replaced with it). What I'm curious though is if the partner burns any differently that an atwood/suburban cook top. I'll probably shoot them an email in the future it I want to pursue that route further.
 
Did a "rough" model of my truck and the potential camper exterior shell. Pardon the crude shaping and rendering of the images.

Side shot to show the overhang verse windshield. I want a wider bed that a full (48") but going to a queen (60") would really overhang past the window aerodynamics. Right now I could fit a 54" wide mattress but I might be a tad too long still.
Truckandcamper1.jpg


Frontal shot:
Truckandcamper2.jpg


Angled shot:
Truckandcamper3.jpg


Another angled shot with the roof turned off. Door size/style is TBD, I just showed an opening for clarity that is where the door would be.
Truckandcamper4.jpg
 
Not a ton new in terms of design wise going on for me, I'm just running various ideas through my head trying to refine things. I originally was thinking of just using stock 20lb propane tanks for their availability, familiarity, cost, etc. However I'm giving those clear view fiberglass propane tanks some more thought now, I didn't realize they were translucent at first and just though folks were talking about them for the weight savings only. Which wasn't justifiable for the cost in my mind, however seeing how much propane you have visually is pretty nice.

I got my test supplies in last week and got my first taste of working with epoxy and foam board to make up some core sample pieces, so far so good. Hopefully this weekend I'll get time to layup the fiberglass fabric layers over them to see how I feel about that work. Additionally I'm trying out two different fabric weaves to see how they lay up and each test pieces has a variety of different radius corners. Overall this should give me a good representation of what each fabric is capable of in terms of layup. I can then take that information forward in how the shell is designed.

From there I'll do an interior mockup as DD did to see how it really feels spacially, I'll probably utilize cardboard as much as possible to save time/cost/waste.
 
I made up some test parts that would have about the worst case curves I'd need to deal with I think. The smaller one I went ahead a quickly faired/finished (I'd take a bit more time on a final product but it was good enough to fill in the weave and seams). I was just using a squeegee and noticed it difficult to try and work some of the air bubbles out of the fabric on these parts because it would drag the fabric some and disrupt the inside corners and edge wraps. I think I'll need to pick up a laminating roller and see how well they work for working out air bubbles without dragging the fabric around.

Parts1.jpg


Parts2.jpg
 
I mocked up the potential camper outline on my current truck/camper to get a true visual interpretation. The increased cab over thickness didn't appear as thick in person so that is reassuring there is room to play with.

IMG_0867small.jpg


IMG_0868small.jpg


IMG_0869small.jpg


I also mocked up part of the interior layout to again get an in person spacial interpretation. It was a little tighter than I would have thought but since I'm planning to have a lot of flexibility in the table it really doesn't have to be as snug all the time, esp. when the table is completely removed. Right now I'm thinking a 25/50/25 table split (or something of that nature) that is on slides to more around when in place. Mocking it up definitely confirmed the extra counter space over the fridge will be needed. I'll probably build a thin cabinet over over that and have the fridge pullout on slides. It'll narrow off the door during that time put will provide an working space to set things on while loading/unloading the fridge. The driver side bench will be ~48" wide and that works for 2 adults if needed. The passenger side will be 40" which would be a little snug for 2 adults. Both would work well for an adult and kid which is what I'm designing for.

IMG_0889small.jpg


IMG_0890small.jpg


IMG_0891small.jpg


No to try and make a final decision about a single or dual pop up and figure out window placement, door design, etc.
 
Thinking about having a gray water tank as well with a bypass right to an external drain for areas where going right to ground is okay. Not sure if I want to put in a fixed tank, maybe 10gal or so, or try and do a removable tank of some sort. A fixed tank would make the best use of space but then would require some other bucket or such be carried if I ever needed to ferry the gray water somewhere to drain it.


My wife and I have been using an external grey water tank for years. I think this is one of the best solutions to grey water for use of space and minimizing complexity. We simply had a 10G external grey tank with wheels that we would pull out of the camper on arrival and drop the drain hose into. Then we would tote it off and drain it into grey water drain or away from camp when dry camping.
Sure, this meant having to put to the tank into the camper when traveling and having one more thing taking up space, but it was light and easy to move. If you have any external storage going into the build this would be one item to put there. It is certainly better than trying to find a place for a fixed tank.

Home Skillet
 
Okay here is my non-scientific test piece summary.

Three parts were tested, the corner piece made of 2 plys (all the way around). Then a piece with 3 plys and a piece with 1/8" plywood with 2 plys over that. Note on the last two pieces I didn't bother to laminate the backside, more on that below. All made from 1" foamular 250.

Here are the 3ply and 1/8" plywood with 2 ply sample pre-test.
DSC_0637s.jpg


Okay here is the 2 ply corner piece.
1A: Medium hammer hit, localized matrix failure and a spur out to the edge, don't think that spur would have shown if this was a bigger piece. This generally intact, not really any foam damage, could be repaired fairly easy.
1B: Hard hammer hit, punched into foam, no damage on other side. Would require a foam patch as well, and more extensive surface repair.
1C: Same as 1A
1D: I put the piece on the ground with the corner up and was jumping on it. In shoes my 200lb didn't do anything in terms or surface damage or flexing the part (reassuring!). I put a board over it and jumped again. It didn't do any wide spread structural damage but the stress concentration of where the board was making contact failed the matrix partially. Overall still fairly rigid though and holding together fine. Would need to be repaired for weather ability and to regain strength to full potential.
DSC_0640s.jpg


3A: Medium hammer hit, only a tiny bit of matrix failure, nothing really to be concerned about.
3B: Hard hammer hit, matrix and some glass failure, dented but not a punch through. Might not require going all the way to foam for a repair.
3C: Hammer hit with everything I had, punched through a bit. Damage was fairly minimal considering (no deformation on backside) but would require going down to foam for repair I'd say.
DSC_0641s.jpg


2A, C, E, H: Medium hammer hit, some localized failure. Some running cracks but I'm thinking more so a function of being closer to the edge.
2B, I: Hard hammer hits. Localized and runner cracks, but no punch through. Doubled foam might factor in some but I'm thinking the close vertical planes might have dispersed some of the load.
2D, F: Hard hammer hits. Punch through and some cracking, 2F showed worse damage but see picture below, the foam failed through. I don't think that would have happened with the other side laminated.
DSC_0642s.jpg


DSC_0643s.jpg


My take away is I wish I would have taken the time to laminate the backside of the 3 ply piece to really compare now. In general though the stuff takes a decent hit, the same kind of hits would punch through thin aluminum siding I'm sure. All are repairable, some just requiring varying degrees. However even with all the hits on them the pieces are still darn solid feeling.

This didn't clearly answer to myself in regards to a path forward for a layup schedule but I have some things I can consider as I look at my design, surface area, weight/cost of each ply.
 
Just a little follow up note on the testing. It dawned on me in my enthusiasm to beat up those samples I probably didn't let them cure long enough (epoxy developes a good chunk of strength early but it takes a while longer to build the rest and it is also a little more brittle early on). Anyways now that its been over a week I smacked the #2 test part (with 3 plys) again in the areas that hadn't already had a punch through failure and didn't have any hits bust through. There was some cracking but no complete failures, so there is an improvement. I'm not going to bother with pictures since all the damage areas are intertwined now. I may make some more test pieces and if so I'll see how the clean pieces react after a longer cure.
 
Exterior lighting:

Lets hear some thoughts on exterior lights. I'm thinking a basic side porch light by the door is in scope.

My current hawk has rear floods, I don't ever really sure them. I'm thinking about not bothering with something like that mounted on the camper (I'll probably add some rear floods on the flatbed for backing up in the woods, etc. but I don't necessarily think they need to be up higher on the camper).

I see some rigs doing front floods on the camper overhand. I'm thinking normal bumper/front of the truck mounted lighting suits me just fine).

So right now I'm really only thinking about a porch light (or two, maybe one with a yellow/amber lens and the other brighter white). Any thoughts for consideration on this? I'll need to embed this wiring early on.
 
I'm with you. My floods rarely get used, unlike the porch lights (rear and both sides). My big lighting is done from the truck, not the camper.
 
unlike the porch lights (rear and both sides)


So you have and use porch lights on all 3 sides?

Right off I can't really recall too many times I'd have wanted one on the driver side. With this new camper having a side entry door I'm wondering if I'd even want anything on the rear or not. The only reason I'm hanging around the rear or the FWC is because the door is there.
 
I was able to use my awning on both sides so it sort of made sense to have Awning (Porch) lights on both sides. Having said that I have lights I can string onto the awning as well. My new Cougar (the current one will be delivered in April) will also have the ability to put the awning on either side. I must admit there is no real good reason to have an awning at night unless its' raining straight down and warm out. I guess if it's already out and its night lights are nice. And he goes on and on and on and on. OK never mind.
 
I cook on the drivers side (where the propane connection is) so having a light there makes a lot of sense for me. Passenger side will come in handy when I eventually get an awning. Plus you just never know how you'll wind up being situated. Nice to have options.
 
The new Cougar will not have an indoor stove top. Since I (read Pam) cooks on which ever side works for the camp site and we'll be carrying a couple of small propane bottles with a refill adapter we will be using the Coleman in the camper on the few occasion when we cook inside. I've never been able to figure out why camp stove manufacturers say "don't use inside." Isn't a stove a stove?
 
Back
Top Bottom