Couple things I noticed at 5 degrees F.

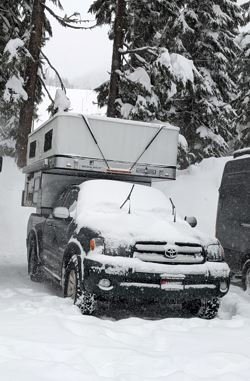
Hopping into the conversation after a few days in the Cascades.

Nighttime low was 10-15 degrees.

Heater always on (45 degrees at night and 60 during the day).

While I used the grey water outlet to drain some water after cooking, I had my tanks all winterized....

Damn @Wicked1 yeah I guess you could wire heaters to all of your pipes... that would do it.

Since we already are dealing with a grey water tank to move around, I've been using a standard 5 gallon jug for water during winter adventures, as I care more about the hot water than using the normal tank.. but I think I'm afraid of ruining the water heater and then having to deal with that ha!

I read through and didn't hear anyone talking about insulating windows or even the door area, which have huge heat loss.

Any window / door insulation mods?
 

Attachments

  • winter time.JPG
    winter time.JPG
    32.6 KB · Views: 50
ShopK33per said:
Any window / door insulation mods?
Yes. I put foam insulation in my cabinets, and made covers for my windows. Including the door window.
I simply cut foam insulation boards from the hardware store, to the sizes needed to cover the windows. Taped the edges to stop the foam from crumbling. And currently, I tape them in place. My first idea was magnets, holding them to the window frame screws. It held them, but wasn't air tight and cold air was pouring in around them. Velcro all the way around the edges might be good enough. But tape is working well for now. I leave them installed all winter.
 
wicked1 said:
Yes. I put foam insulation in my cabinets, and made covers for my windows. Including the door window.
I simply cut foam insulation boards from the hardware store, to the sizes needed to cover the windows. Taped the edges to stop the foam from crumbling. And currently, I tape them in place. My first idea was magnets, holding them to the window frame screws. It held them, but wasn't air tight and cold air was pouring in around them. Velcro all the way around the edges might be good enough. But tape is working well for now. I leave them installed all winter.
What I did on the Bobcat was to use canvas snaps that screw into the window and door frames. Put a little petroleum jelly or silicon grease on the female side to help them fasten/unfasten. It works for curtains and insulation.
 
Wandering Sagebrush said:
What I did on the Bobcat was to use canvas snaps that screw into the window and door frames. Put a little petroleum jelly or silicon grease on the female side to help them fasten/unfasten. It works for curtains and insulation.
And the cold air leakage isn't that bad?
 
I cut reflectix about 1/8-1/4 inch larger than the windows, its the perfect thickness to seat itself inside the window frame and provides a nice seal. I've been using this method successfully for two winters and it helps enormously. I also have recently added reflectix down lower, covering the full span of the (lower bulkhead?) ie. where access doors are for the truck bed mounting hooks.

Great Success!
 
I replaced an old Eagle with a '20 Fleet last year that has all the plumbing (hot water, shower etc). I never thought about winterizing on the Eagle as it had so little plumbing and no PVC. I was down to -5 in the old Rig. So of course didn't think about it with the Fleet until I got onto the CO/WY border heading to Summit County from SLC in early Jan. Pulled over around 11pm and it was -15 and still falling. Everything froze solid. Bundled up overnight and then headed to Winter Park. Finally unfroze when I came into the San Juans and the 2 PVC distribution valves both cracked. Easy replacement and I added insulation around those and everywhere else I could as well. Will winterize before heading back to Colorado next year. Insulation pics in link

https://lightroom.ad...fe227e4032aa752
 
I have a concept not yet fully implemented to make a canvas skirt that snaps to the outside of the popup fabric at the roof and camper body (some camper trim screws replaced with screw in snaps of same shank and thread size). The canvas would have a pocket that holds insulating material, reflectix or whatever.

It is somewhat bulky and needs to be removed and stowed before moving the camper. My estimates suggest it can all be folded or rolled up and placed in the space between the counter and the roll over couch.

I have the snaps in place and tried a couple of 42" wide x 10 foot canvas pieces that local restaurant put up in winter to allow block wind and allow outside dining (I bought as surplus when they closed 2 years ago). The canvas I have does not have the pockets but it does create a dead air space between the outside of the popup material and the inside of the snap on canvas. However, no actual before and after test data with a thermometer yet.

An added benefit of this approach is that it should reduce or eliminate condensation on the inside of the camper pop up material. In summer it should help cut down on heating (the solar panels on the roof help cut down heating too).

Obviously the downsides are needing to carry the wrap around skirt and put it on and take it off when ever setting up or moving the camper.
 
Great idea ckent, would love to see what you come up with!

This could also act as exterior storm windows. I get a lot of snow stuck in between the mesh screen layer and the clear window layer during windy snow storms which then melts and can lead to water getting inside. One of my biggest frustrations so far is the lack of a storm window, which ive seen on other camper brands.
 
camsf said:
Everything froze solid. Bundled up overnight and then headed to Winter Park. Finally unfroze when I came into the San Juans and the 2 PVC distribution valves both cracked. Easy replacement and I added insulation around those and everywhere else I could as well.
Wow, they've completely changed the plumbing from what I have in my 2015 fleet.

I'm wrapping my pipes with 12v heat tape, to solve this problem. You could likely do that as well, around that distribution piece.
I'm just doing manual control for now, but it would be easy to wire it to a thermostat.
 
wicked1,

Exactly!

I bought a 2 rolls of reflectix to wrap around the pop up section but I was fussing about how to make it easy to put on and take off. I was planning to use glue on velcro tabs and was unsure how long the tabs would stay in place because I have had problems with adhesive backed velcro coming off before.

Shortly afterwards I came across the canvas deck rail covering from the closed restaurant and that led me to the idea to use screw in snaps in place of some of the camper body screws and attach the canvas wrap, having pockets in the canvas to hold reflectix or some other insulating material, to the camper with the snaps. Also I realized that the canvas would be sturdier and less prone to punctures and rips.

I am engaged in a lot of multi week out of state contract work until May so it is going to be a few months before I pick this up again.
 
I'm interested to hear how well it works.
It will definitely function as a wind break and keep the hot sun off the sides. In the summer, I think the shade would be an incredible help.
My observations of insulation though, like if you're hoping to get a good R value from the air gap, has made it seem like it really has to be sealed to work well. If it's 10 degrees outside. You have a sealed air gap, that inner air could be 30, and your camper could be 50. While, if it's not sealed, that air gap will be 10 degrees, just like outside. (I suppose it's more complex than that, and depends on how much leakage and the wind, etc)

I've got a couple rolls of that reflectix.. Maybe I'll do a test some day to see what difference it makes keeping the heat in, between tacked up, to completely sealed.
 
Wandering Sagebrush said:
It’s not too bad at all. You can also use som construction foam, then use the snap curtains to hold it in place to make it even better.

With a foil side, I have cut insulating foam board to fit my side and front windows and as SB says, used the curtains to hold them in place...easy to store and remove.

Lots of words spilled about trying to insulate a FWC to prevent plumbing from freezing and to lessen either heat loss or over-heating in summer...still of the mind that at best such efforts are very marginal...covering the window openings in the pop up fabric not only turns the interior in to a dark cave, but greatly loses any cross ventilation...

Effectively insulating stick homes in cold weather is a toss-up but trying to insulate a trailer or FWC to retain and maintain heat inside will always be a losing proposition...burn propane, drain water and you can enjoy the FWC in below zero outside temps...

Hey, I could be wrong! :cool:
 
Not certain why this tread is so long lived...if you leave water in your system and it goes seriously cold [single digits or lower] then something will freeze and or break...

I routinely camp in below zero while skiing...no water in system...7 gallon jug for water inside with me...no catalytic heater since all combustion produces CO and I am adverse to that :cool: ....good down sleeping bag and with my solar panels and LiPO4 BB heated battery I always have power and propane to keep the heater going inside if needed or in AM to heat up my ski boots..

Look you can add insulation panels/boards/sheets [I have] "until hell freezes over" and a FWC is impossible to add truly effective insulation to in near zero conditions or even prolonged single digit temps...just will not happen.

When possible I use two hedges; a small plug in AC cube electric heater if power box is available at ski area. Backcountry I sometimes need to run DC/DC power to bring the BB charge up due to snow on panels or clouds.. tedious to brush snow off top, but often necessary...

Again, this is not rocket science and I wish there was a simplistic one-size-fits-all way to prevent our water systems from freezing in severe cold...ain't going to happen....enjoy what we have, beat the hell out of a tent....

Phil

Least you forget, PG antifreeze kills cats...be careful where you drain your system..only water in our system.
 

Latest posts

Back
Top Bottom