Dogwood, a '75 10' Cabover Rebuild

Wooddog

Member
Joined
Jun 13, 2012
Messages
18
Location
The Baptist Kush of East Tennessee
I guess I should start my own thread so I can hijack it at will. I'm over a year into it already so this may not be chronological. Last year I got a hankering for an RV and started researching. Found WTW and ExPo and knew the camper had to be 4WD. Good, there's a 03 F-250 4WD 7.3 6sp already in the drive. Now I know why I bought such a beast of a truck after something like 4 Toyotas...

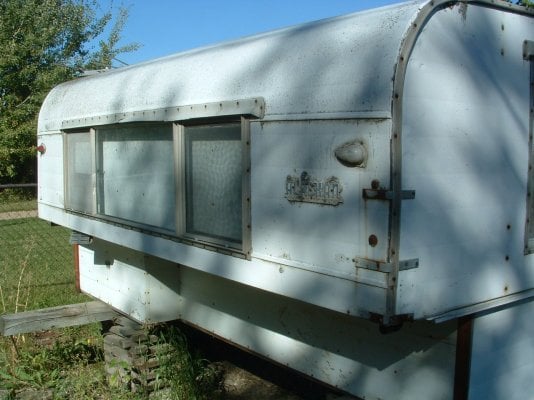
Pop-ups make the most sense but I don't like canvas in a camper; too many rainy camping experiences. I don't want to fold up wet cloth. The only hard-side that interested me was the Avion. Still does... But that's a little top heavy. The Alaskan I thought to be the best of both worlds. Finding one in Tennessee is a little bit of a challenge though.

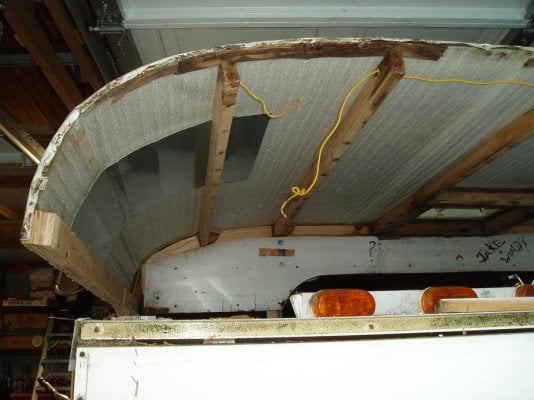
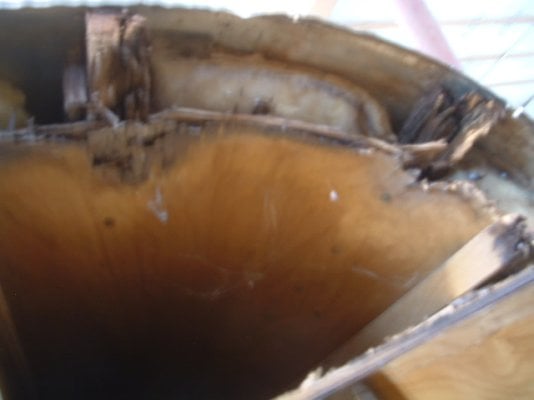
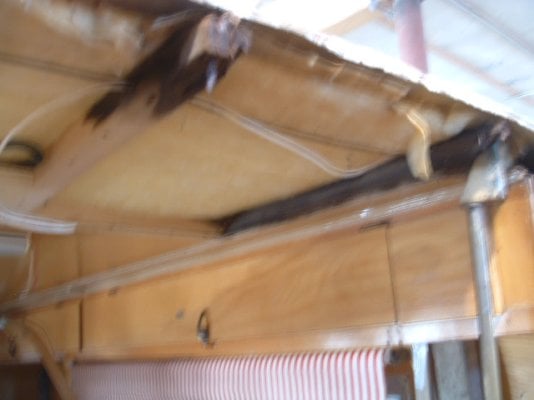
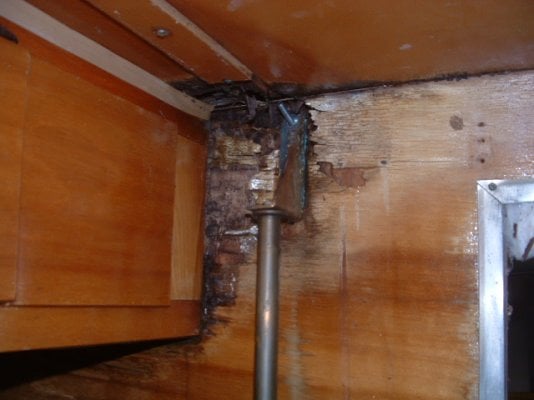
Against the CL advice I called some folks outside Pittsburg PA and made an offer. They went for it so I took off knowing this could turn out badly. Giant thunderstorm when I got there but I got to see water leaking in the rear vent. Dented, paint's half gone, and leaking. Every thing was there but one window screen. Yep, it'll do.

He unloaded it from an old Chevy 2WD and shoved it into mine using a roll-back tow truck as a giant spatula. Kinda painful to watch. I had installed Tork-lifts but the camper had no brackets to hook to so heavy duty cargo straps went over the roof (more dents) and I was off. Loved it immediately as I could feel the weight but but not the wind resistance.

It took three hours to unload it onto some crates using the forklift at work.

gallery_3492_390_124475.jpg


That was mid-May. Skip forward to the end of January when she went outside again for the first time.

gallery_3492_390_11171.jpg


Rusty, you mentioned steps; well here's my hillbilly step prototype #1. The eye-bolt struts don't carry the weight, they are only tight enough to keep it from rocking. The insert tube is cut down a couple inches and redrilled to let it go in as far as possible. That's where the propane and leveling blocks ride now. It obviously will not work in serious off-roading; it kills the departure angle.

gallery_3492_390_175310.jpg
 
i'd like to see some inside shots. outside looks great. i'm starting on my 74 10' co.it's in pretty bad shape. lots to rebuild.but started out cheap 250 bucks

wes
 
OK then, it was June last time I posted. Life took a turn leaving little time to play RV just after I returned from two weeks wandering the west. This is how far from Tennessee I made it:

gallery_3492_390_125307.jpg


But this is a build thread so back to summer of 2011. When I started pulling paneling down in the nose the ants ran behind the next panel so it came off too, until:

gallery_3492_390_202277.jpg


gallery_3492_390_16449.jpg


To get the side paneling off the nails on the bottom edge had to be pulled out. To get to those the roof metal had to be peeled back from the bottom edge. I built these to hold the roof higher than the tub:

gallery_3492_390_175178.jpg


I just needed a little wood putty:

gallery_3492_390_193022.jpg


gallery_3492_390_173984.jpg


gallery_3492_390_295489.jpg


A note to anyone who might be following in my footsteps (Caseboy, sorry it's taken so long to post; I hope it's not too late for this): I did my framing repair with Gorilla glue and construction cement then painted it with spar varnish. Soon after I was introduced to the joys of epoxy. I would glue and paint the framing of the cabover with epoxy if I could go back in time. Much better waterproofing for the weakest part of the Alaskan design. Personally, I like the WEST System for the three different hardeners but I know it's expensive.

I started glueing and clamping and hoping it was right:

gallery_3492_390_78976.jpg


gallery_3492_390_87469.jpg


gallery_3492_390_185722.jpg


gallery_3492_390_27387.jpg


gallery_3492_390_59799.jpg


gallery_3492_390_86653.jpg


gallery_3492_390_169323.jpg


The stick that starts atop the arch and defines the lower edge of the cabover was a puzzle. When I made the plywood arches I started with square outside corners but that pushed the front end of the stick up above the bottom of the nose piece. Both sides. I pondered this for a long while as the sticks used to be continuous into the rear section framing before I cut their little rotten stubs off. It took alot to quiet the trim carpenter and cabinetmaker in me (not to mention the OCD) before I could accept that it wasn't square and I had to follow the metal edge and connect the dots. But it works so it was the right thing to do:

gallery_3492_390_214189.jpg


gallery_3492_390_4878.jpg


Then it was time to replace the 110v wiring (they used solid conductor), expand the 12v wiring, run speaker wires and insulate. There's closed cell foam above the foil bubble since I didn't have the confidence to spray foam it. I like reversible processes for some things:

gallery_3492_390_102632.jpg


Then cheap 1/4" beadboard with tung oil and gloss spar varnish. I say cheap as it was inexpensive and would not make the bend in the ceiling without cracking. I reused good portions of the original paneling for the radii. Now those pieces are painted but will mostly disappear behind new upper cabinets. Eventually...

gallery_3492_390_182390.jpg


A couple more interior shots from this summer's trip:

gallery_3492_390_246417.jpg


gallery_3492_390_70134.jpg
 
I suppose I should explain the tighter curve of my new arches. The F-250 regular cab doors conflict with keeping the camper as low and as far forward as possible. The new curve helped but the Pirelli seal doesn't like it. More on this later.
 
Great job on your rebuild, isn't it fun. When I did my 94 I didn,t have go near as far as you..and I am thankful for that.
I used treated wood to replace my stringers seams have worked out well.

Also around the leading edges I used a blue rubber type material called blue skin that my contractor Sons use when they install windows in new homes this stuff is now code in Vancouver. You use a spray activator and let in soak in for a few minutes then apply the rubber skin over it, 24 hours latter it will tear the wood if you have to remove it yup I had to try.

I did take pictures of my rebuild and when I find them again I will try and do a post as well.

Thank again for the fine presentation perhaps it should be it,s own post and saved in the picture section.
 
wow great pics! beautiful finished camper.i've been making slow progress on mine due to lots of work and even more laziness.some of the lazy was camping in our 64 10ft nco(thank goodness). both corners are framed up and i'm right at rebuilding the front panel now. just glued my first couple of wood blocks on both sides of roof support ends as they are in a little distressed shape.glad to see that's how you did it also.after i get all those and in between struts fastened in, it will be time to cut the front panel and try to reclaim or replace the front outside metal skin.looks like i'll eventually have to do the lower sections below the windows in the main area as well. those pics will help greatly.did you use the wood strip that runs on top of the front panel when you put back together? i'm not sure if it's needed, or is it?i'll list some other challenges i'll be looking forward to incase you ran into them and have advice.

roof in main area sags slightly--might not be a big deal after i replace both top vents, but right now it puddles on roof and leeks if outside

the bozo owner before me spraypainted red and black paint in most of the corners and roof lines. i'm going to have fun cleaning that up. maybe have to stain darker or paint or ---?

i took off boat rack and brackets--leaving big rusty bolt holes in sides--i may fill and cover with strips and/or use capped bolts.

i took out fridge and will build a cabinet accessible from both inside and out(maybe for firewood)

i'll need to replace the light fixtures that also have 110 plugs in them.i will also run some 12v lights inside. i also like to use puck lights a few places.

the hydraulics seem a little week. i get a lot of travel before it lifts on each stroke. it does seem to get better after each raising . i haven't gone up and down many times.the manual says pump with quick motions and that helps as well.

lots more little stuff as i see something new every time i go out to the shop.

thanks so much for your pics and advice.

wes
 
Thanks for the compliments, guys.

Wes, here's how I did the front panel. I started by tracing the aluminum onto a piece of 1/4" plywood then flipping it end to end and tracing again. I then straightened and smoothed the line to the outermost dimensions (the aluminum had been cut, um, in a hurry). Jigsawed the pattern out, smoothed it with a sanding block, and traced it onto the workbench. Flipped, traced, and sanded til symmetrical. I laminated 3 pieces of ply to get the original thickness then jigsawed and pulled out the router.

The joist spacers/ceiling panel anchor blocks I copied from the blocks on the bulkhead. The original nose piece was intact enough to help place the blocks so I glued and screwed them to the new nose. Since the camper was sitting 3' up on old military surplus crates I had to use the forklift to install it. Screwed some plywood brackets to a pallet to hold it vertical and raised it into position. That way I could fit the sistered joists into their notches between the blocks and know the nose was where it used to be. After drilling and putting screws into the ends of the joists (bonus: the sisters make that a stronger joint) the whole thing could be rotated a little to achieve symmetry with the roof's lower edges.

Wish I had more pictures of this part:

gallery_3492_390_44190.jpg


gallery_3492_390_29180.jpg


gallery_3492_390_26622.jpg


I reused the aluminum nosecap but installed it with the top edge under the rolled lip of the roof. Someone put it in front of the lip originally...

Wood strip on top of the front panel? I'm not sure what we're talking about here. Maybe mine rotted away?

Regarding the sag in the roof; I finally determined that was the cause of my leak. Water kept showing up (down?) at my rear vent even though the vent was putty taped, caulked with 3M 4000, screws removed and reinstalled with 4000 in the holes, and then 4000 over the screw heads. Perhaps it was soaking through the flat seams in the aluminum? All ponds leak somewhere... So I built the brace over the sink to give the roof back its arch (there is a structure thread on here with some more detail about that) and caulked the entire 14' length of the two seams. With the Dupont Imron Industrial Coating paint covering everything up there it hasn't leaked since.

If your front end is as bad as mine was I'd pull all the paneling out of the camper just to see what else you need to know about. Then either new panels or at least refinishing the old ones would be easier.

The rack holes could be fixed with puttied and caulked carriage bolts put through from the inside. The threads outside might could become mounts for a detachable awning? Just thinkin' out loud here.

Mine came with the fridge-looking ice box. That came out (with the rest of the cabinetry on the passenger side) to be replaced with a cooler. I'm wanting the Engle that is, ahem, bear resistant. At least it has rubber seals and latches which should help with food smells (and when off pavement). Warning: the cabinets give strength to the long lower side walls. My passenger side wall is a little flexy but the paneling kinda makes a torsion box out of it. Its working well enough.

Sounds like the seals in your pump dried out from non-use. I haven't tried rebuilding my pump; it seems slow but steady. About 40 full strokes all the way up. After 16 days of set up I'm starting to think electric. I screwed a nylon strap across the doorway to hang from to equalize the weight when lifting and lowering. Bryan Wheat told me to never lift up the low corner, only pull down the high corner to level the top with the bottom. Makes sense, you don't want to suck air into a cylinder. The strap is fitted so it rides stretched over the top of the roll-up door screen box. Can't find a single useable picture with the strap in it out of over 400 pictures, grrr.

Oh, hey, one more thing. I haven't tried to rebuild the tiny front awning window. Having now learned that the sliding side windows require removal and complete disassembly (as in a pile of aluminum sticks, two rubber glass surrounds, the fuzzy strips and two plates of glass) just to replace the fuzzy strips I'd do that before reinstallation.

Thanks for your interest and comments, Bruce
 
Great rebuild and great pictures Wooddog.Showing whats under the skin realy helps other Alaskan owners thinking about a rebuild. Great work Thanks, Banderswipe.
 
bruce,
thanks again for all your pics and advice.that strap seems like a great idea. i do have to guide the slides a little on my nco and probably will have too on the cab over too.that's a great tip about not lifting corners. unfortunatly, i have been.i guess i've been lucky so far. i'll have to drive down to the alaskan factory and see bryan someday soon.he'll probably have ideas about my pump and answers to the other thousand questions that come up.i'm also anxious to see the new ones and how they make them. it's only a couple hours away. whats left of that wood strip is visible in this picture.it was stapled along the top of the front panel.it must not be needed as your rig is beautiful and functioning without it.it does look like your front panel is shaped a little different than mine. must have been manufactured in different part of country way back when.

thanks,wes
 

Attachments

  • front1.JPG
    front1.JPG
    99 KB · Views: 417
Wow...what determination....nice pics

A couple things....3M makes a marine adhesive 4200 used in sealing hull penetrations in boats....seems like it would be a good fit for Alaskan roofs...

LVL lumber when sized properly will give you a bit more strength for radius corners and sisters

I would agree on the west system epoxy soak for the NCO overhang...pricey but no mas rot

Bruce your pictures take me back a long way...the glue covered apron hanging in the background...I miss my old shop...with lots of room

Nice work...you guys deserve a medal ;)
 
Wonderful work but you got me scared

I recently got a $200.00 69 NCO 10' that looks good except for the top front section has good dry rot.
Hoping I don't find much hidden rot.

Wondering if you removed some of the cabinet etc. I'm considering removing the cabinets and moving the kitchen setup across the front of the Alaskan similar in concept to the new mini that they have come up with. I envision 8' from the counter to the rear door as space to make a full time usable unit.

Question is how easy to they come out and condition of the walls behind the removed units?

Enjoy your Alaskan

dkoug
 

Attachments

  • Alaskan Camper 033.JPG
    Alaskan Camper 033.JPG
    321.9 KB · Views: 332
Again, thank you for the compliments. Nathanael, I have been admiring your work for quite awhile. Wes, mine has a name plate from the Sun Valley factory which matches the story PO told of getting it in southern Cal. You'd think they were the same profile but... Rusty, I believe that is the caulking I used; love the stuff. I think it says "below water line" on it. Gotta work for this.

Dkoug, don't let it intimidate you; it's just a big, water resistant cabinet. Perfect size to work on solo. I gutted mine except for the kitchen cabinet frame since I wanted to reuse it. The walls of the lower half of the camper (I call it the tub) are 1/2" ply on the sides, 3/4" ply for the back wall, and curiously, the front wall, IIRC, is a lattice frame of 1x2 with 1/4" ply inside and the aluminum outside and some old crunchy foam in the spaces.

Here's what I learned when I removed the cabinetry from the passenger side: Mine was built by a guy with a brand new wide-crown staple gun and lots of ammu-, er, staples. Many put through from the outside of the shell. There are some screws coming from outside the shell, too. They used glue, too; hence the durability of the thing. I finally found a use for the "Multimaster" type tool I had gotten for Christmas earlier. The flush cutting metal blade will be your best friend. Another useful tool is end-cutters ground down so the cutting edge is flush to the outside. These will pull out nails and staples or just cut them off flush. I was not able to remove the cabinetry without destroying it.

You will also find, as I mentioned earlier, that the cabinets stiffen the side wall so putting a 2' kitchen counter across the front will leave 8' of flexy wall. My passenger side is all 10' unsupported so I shimmed the plywood with 3/4" "studs", filled the gaps with rigid foam, and screwed 1/4" ply over that. It's stiff enough now but it may not age well. We'll see.

A big desire of mine was to be able to sleep 2 guys without raising the roof. One across the front, the other down the side. The open L shape gives better floor space and more flexible cargo capacity than the original design. My cushions are 24" deep and two fit end to end across the width of the camper. I widened the wings with little "tables" so I can re-configure and have a double bed if desired. I haven't completed this project; the pictures show it mocked up as a double bed.

My kitchen counter runs forward 6" past the cabinet frame and overhangs the desk/dining table which runs from the cabinet to the front wall. There is a leaf for the desk which extends across the aisle if I need it. The desk is mounted on a piano hinge so the leading edge can be raised to provide foot room for sleeping.

Here's some fuzzy pictures:

gallery_3492_390_60667.jpg


gallery_3492_390_220451.jpg


gallery_3492_390_50360.jpg


gallery_3492_390_223284.jpg


gallery_3492_390_186084.jpg
 
I added top rails to cover the tub gasket on all four sides. It also has the added benefit of stiffening the side wall after I removed all of the cabinetry on the right side.

Mike
 

Attachments

  • Trim.JPG
    Trim.JPG
    394.5 KB · Views: 353
Mike

Interesting and provides motivation for me. Hopefully it will go into my friend's shop on Dec 22nd.

Thanks much for the pictures.

Curious why the sides are not a heavier plywood.

Thanks very much, will try to post pictures as I proceed.

dkoug
 

Attachments

  • Alaskan Camper 029.JPG
    Alaskan Camper 029.JPG
    324.9 KB · Views: 390
Mike

well got the 10' NCO vintage 69 into my friends shop on Xmas Day.

Pulled the top forward wall off, some good rot but could be worse ( I guess)

Some pictures of the first 2 days of destruction.

Got new hip in January and this project reminds me I have not been doing my workout as I should be, waking up with cramps in both legs-lol

top of the season to all

dkoug
 

Attachments

  • Top right Rot.JPG
    Top right Rot.JPG
    123.9 KB · Views: 337
  • Ceiling Rot.JPG
    Ceiling Rot.JPG
    129.2 KB · Views: 381
  • driver side.JPG
    driver side.JPG
    122.2 KB · Views: 375

New posts - WTW

Back
Top Bottom