Fleet roof measurements for solar panel install?

EnviroProf

Advanced Member
Joined
Jul 7, 2017
Messages
96
Location
Western Pennsylvania
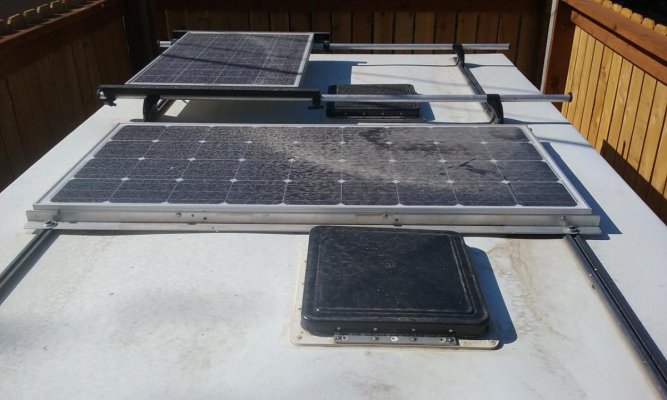
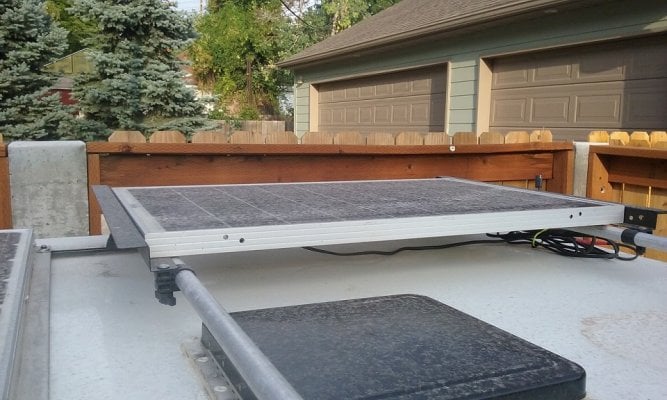
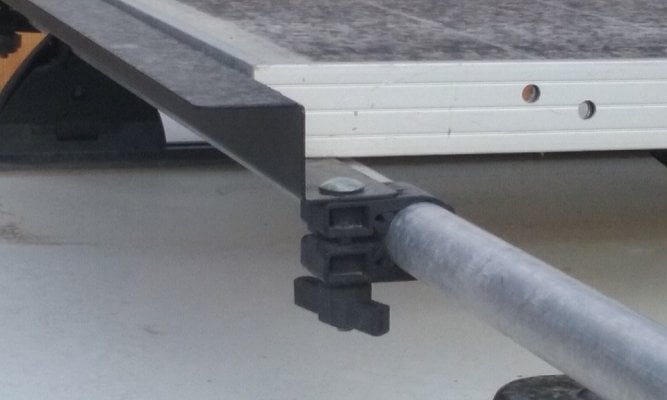
I ordered a fleet with two roof vents and Yakima tracks and am trying to design the solar system before I have the camper installed. I'm driving about 1,500 miles to pick up the camper, and then am continuing on for about another 3,000 miles before returning home. My plan is to bring the panel, charge controller, mounting bits and cable adaptors, etc. and install the solar setup on the road.

I've been learning about all the previous solar setups by WTW members on this forum, especially from http://www.wanderthewest.com/forum/topic/13230-i-need-more-power-scotty/?hl=%2Bmore+%2Bpower+%2Bscotty

While I have several (painful) weeks to get this done, I would like to begin shopping for all the parts and maybe catch a sale. As I am planning to put one large panel between the vents, I'm reluctant to order a panel without measurements. I'd like to add a portable panel, but will probably wait until returning home for that.

Would any Fleet owners be willing to measure the distance on the roof between the vents, and the distance between the Yakima tracks?

Thanks
 
Prof,

Here are the measurements from 2012 Fleet, Yakima tracks, 2 vents-

Yak track rail center to center: 54"
Yak rail center to camper edge: 11"
Yak rail center to vent lid drivers's side: 11.5"
Yak rail center to vent lid: 27.5"
vent lid to vent lid: 27.5"
vent lid to rear camper edge:39"
vent lid to front camper edge:27"


The panel attached to the rails is a 160 watt solar synergy from solar blvd. The panel attached to the cross bars is a 100 watt from grape solar and is meant to be removed for remote placement if camper is in shade, etc. It can tilt up from one of the cross bars in low sun angle situations.

Have fun!
 

Attachments

  • fleet_front2rear.jpg
    fleet_front2rear.jpg
    108.4 KB · Views: 186
Williak, you da Man! Thanks for the measurements and photos of your setup. That is really close to what I want to do and that gives me the info I need to order some panels.

I want to never mess with the 160, and then design something for a second panel, maybe semi flexible type for weight, that can be removed for when camping in the shade. After slogging through all the detailed threads by Vic and others, I think I will try to buy both from the same company so that the voltage will be the same or close enough that I can avoid two controllers.
 
EnviroProf,

You did not say if you have a camper pre-wired foe solar and if you know where the wires are. In case you (or others) do not know where they are here is some info:

The location of the wires not only varies from model to model, it also varies from year to year.

I suggest that if you have not already done so that you contact FWC and ask for the location of the wires. They marked the location on the build plans for each camper up until they standardized the pre-wire set-up (sometime after 2008 - 2010 or 2011 I think).

I believe FWC started pre-wiring for solar in mid-2005 for some models, then for all models in 2006.

I have a 2007 Keystone and have very recently exchanged emails with Terry Budd at FWC to locate the pre-installed solar wiring. He has been very helpful.

I hope this is helpful,

Craig

I have a 2007 Keystone and have very recently exchanged emails with Terry Budd at FWC to locate the pre-installed solar wiring. He has been very helpful.
 
Good idea Craig. I should probably contact FWC as I gather all the parts and pieces together before I leave to pick it up. As my camper is new, it should have everything prewired. From reading other posts it sounds as if all the prewired options (solar, vents, ??) terminate near the batteries or fuse box. You would hope that both of the solar plugs wires are labeled, but I'll take a voltmeter with me so I can make sure that I'm connecting the right wires.

I haven't seen the dual battery setup and other electronics on a new Fleet in person, so I'll just have to wing it when I pick it up. My plan is to set up a pretty simple temporary system so I can continue my trip to the west coast, and then I'll complete the final system when I get home and can put more thought into placement of various components. I don't want to be cutting holes in cabinets and mounting controllers or monitors until I've lived with the camper a bit. This first trip should be a good shakedown cruise.
 
Williak, I would love to see another pic with the 100w at an angle and another close up of the way you get it set that way. I am looking for ideas to do the same with a secondary panel but have the stock aluminum rack on my '15 Fleet so would need to adapt. Nice install for sure.
 
here's my Fleet with two 100w panels mounted to Yakima tracks

IMG_0921.JPG


Before installing mine I asked FWC if they had engineering data on the best mounting location for two panels - front and back, front and middle, middle and front. Never got any specific info.

I also asked given a specific configuration of panels, which roof lifts do they recommend on front and rear. Again, did not receive any guidance.

I was hoping to hear something like - front and middle is best location for 100 w panels and use 40# lifts in rear and 30# lifts in front. It seems they don't have that information.

I also carry a flexible 100 w panel for early am or late pm if in camp at that time.
 
Sharx,

The "Z" metal attached to the 100w panel is part of a bracket for securing a table to a FrontRunner rooftop rack. I picked that up thinking I would attach under the camper cab overhang to stow the panel for easy access. I wasn't brave enough to drill holes into the overhang though, and then stumbled on this idea. The Front Runner bracket is steel, but I would think you could use heavy gauge aluminum L bar.

The bar clamps are just-re purposed Yakima cross-tube clamps. To incline the panel for low sun angle, the clamps on one end would be unscrewed, and loosened on the other end so the assembly can rotate on the cross-tube. Haven't yet worked out a way to secure the panel when inclined, but I have lots of spare yakima parts in the garage.

To be honest, I haven't tried to attach/re-attach in the field, but the idea is to unscrew the tube clamps, then carefully lift off. Likely easier said than done and could require some climbing skills I'm not sure I have, or maybe pack a ladder, but we'll see. In reality, the panel will likely stay on the rack on most trips. I wired a second plug near the rear tie-down access door, and added a 20 foot extension to the panel cable, so I can just keep it plugged in while on the rack.
 

Attachments

  • PanelBracket.jpg
    PanelBracket.jpg
    226.7 KB · Views: 117
  • PanelBracket2.jpg
    PanelBracket2.jpg
    127.4 KB · Views: 75
Williak,

Thanks for the additional pics and info. I think Solar is still so new to MFG's they are still trying to figure out the best ways to "bring it" to us users. We seem to be designing and buliding Mods for them to consider before they can R & D it and then manufacture it so not surprised a lot of needed info is still N/A. I saw another panel install that had a bracket like you'd see on a chaise lounge chair where it had holes every so many inches so that one could angle the panel at different degrees by raking the the bar at different positions to max out absorption. But that was one way only facing the panel upward towards the back I believe it was. We all park our "poppers" at different angles in the field so having the panel articulate front/back and side/side would be perfect short of a panel that can "follow the sun" like commercial and some home units can now. How 'bout any "engineers" out there, can a mod be made to angle a panel towards the north/south AND east/west. You would need an easy way to lock it down for travel, but be able to disconnect the panel basically on all four corners, Then having 2 bars on each set of sides, be able to rake the panel at the proper angle. Dreamy yes, impossible not. Getting one of the devices to pinpoint the best angle for the sun would be smart as well. But w/o some way to re-position it, you'd have to manually every so often. Boy I wish I had my old garage to tinker on that idea.
 
DonC said:
here's my Fleet with two 100w panels mounted to Yakima tracks

attachicon.gif
IMG_0921.JPG


Before installing mine I asked FWC if they had engineering data on the best mounting location for two panels - front and back, front and middle, middle and front. Never got any specific info.

I also asked given a specific configuration of panels, which roof lifts do they recommend on front and rear. Again, did not receive any guidance.

I was hoping to hear something like - front and middle is best location for 100 w panels and use 40# lifts in rear and 30# lifts in front. It seems they don't have that information.

I also carry a flexible 100 w panel for early am or late pm if in camp at that time.
DonC, thanks for more photos of a Fleet with solar. Interesting to mount the panels front and back and not use the big space in the middle. Is that to balance out the weight? Hadn't thought of that, probably because I'm thinking of putting a 150 or 160 in the middle. Could you tell us which flexible panel you have, and where you store it. I was wondering if you could store it under the bed mattress.
 
So here's my idea for a removable panel mounted on Yak Tracks. Attaching the panels on the aluminum angle "iron" or L-shaped bars seems to be the best method for spanning the tracks, especially for the smaller 100w panels.

Instead of attaching the panel to the aluminum bar at several points, the panel would only be attached at each corner. At one end of the pane, pins would protrude from the side. These pins would slide into a groove you cut into the aluminum bar, or something you bolt to the top of the bar to capture the pin. This would allow no upward or outward movement of that end of the panel. So to secure the panel to the camper you would slide the end of the panel with pins down the aluminum bars until the pins drop into the groove or under the piece added to hold it in place. The end of the panel in your hand could then be secured to the bar with a couple of wing nuts. If you added a slot at this end of the aluminum bar you could leave the bolts and wing nuts attached to the panel. A few turns of the two nuts and you're done.

Hope that makes sense. If I was more of an artist I'd draw it. Better yet, if my ordered camper had arrived yet, and I had a panel in hand I'd build something and take a photo. :)
 
20170411_123402_resized.jpg20170401_105853_resized.jpg

I have a 150 watt panel mounted pretty much center just in front of the vent on my Eagle. I made it a point to get a panel wide enough so it would reach the Yakima tracks and then made my own mounting feet. There's no need to run angle all the way across and this helps to keep it as light weight as possible. Ron
 
EnviroProf said:
DonC, thanks for more photos of a Fleet with solar. Interesting to mount the panels front and back and not use the big space in the middle. Is that to balance out the weight? Hadn't thought of that, probably because I'm thinking of putting a 150 or 160 in the middle. Could you tell us which flexible panel you have, and where you store it. I was wondering if you could store it under the bed mattress.
with no direction from FWC, I thought it might be best front and back where the roof lift struts are, but not being an engineer I have no idea if there is any validity to that. With Yakima racks I can put them anywhere, and they are easy to move if I decide/need to do that.

I was one of the early adopters of the Renogy flexible panels and installed 3 panels, twice, all 6 failed. And I glued them down which most were doing at the time So major hassle and expensive.

I now have this panel which was recommened on this forum. I have it mounted to some styrofoam insulation to provide stiffness, and I just store it along the back seat of my extended cab, so it takes virtually no room.
https://www.amazon.com/gp/product/B017OMTAV6/ref=oh_aui_detailpage_o02_s00?ie=UTF8&psc=1
 

New posts - WTW

Back
Top Bottom