Full build - Reconstructing a 1981 Grandby into a custom Hawk!

PokyBro

Senior Member
Joined
Apr 10, 2016
Messages
472
Location
Las Vegas, Nevada
ImageUploadedByWander The West1460339565.012973.jpgImageUploadedByWander The West1460339751.593067.jpg.jpg]

Well, I'm new as a subscriber to WTW, but have been following the forums for quite awhile.

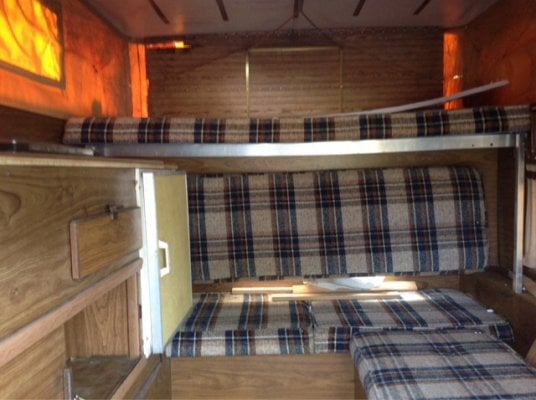
So, here I go. A couple of years ago, I see this add on Craig's list for a free pop-up camper. I go and take a look, and just looked inside with top down, notice it's a bit rough, smelled of mildew, and was leaking. I think to myself, hey it's free, and...any things fixable, right? Maybe I should have passed, but like some of you, it followed me home.

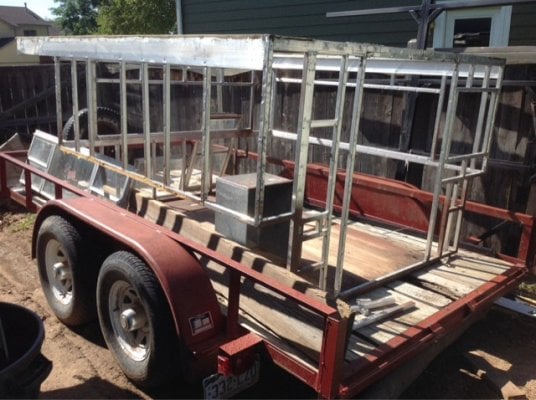
First problem...it wouldn't fit in my 1999 Superduty. No problem, can we get it on a flat bed trailer? That's what we did, and the journey began.

I'm fairly handy at most things around home. Finished a full basement in our home, work on my own vehicles, accomplished with wood working, can weld reasonably well, and turn a wrench. Thing is, I'm not afraid to try. Did I mention I'm pretty optimistic?

So I've been on this project awhile now, and will post more photos of the process, so stay tuned. I'm looking forward to sharing what I've done, and what I've learned. Thanks for taking a look.


Sent from my iPad using Wander The West
 

Attachments

  • ImageUploadedByWander The West1460339709.690325.jpg
    ImageUploadedByWander The West1460339709.690325.jpg
    91.2 KB · Views: 1,162
  • ImageUploadedByWander The West1460340673.787984.jpg
    ImageUploadedByWander The West1460340673.787984.jpg
    105.8 KB · Views: 1,184
So, as I got into looking at things, it quickly became apparent, that it was all or nothing. That last picture on the previous post shows how there were cracks in the aluminum frame, the corner posts were looking like Swiss cheese from jacks, and it was simply in really bad shape. The door was sloppy loose, there were holes all over in the side liner, the panels were rotted, the cushions were wet and mildewed, the floor was rotted in one corner.

So, I gave it some "aluminum surgery".

I gutted the inside, and then then the siding outside. I figured from the start I would re-skin the siding later. So, I took it down to the bare frame.

View attachment 23367View attachment 23368View attachment 23369


Sent from my iPad using Wander The West
 
ImageUploadedByWander The West1460431546.547670.jpgImageUploadedByWander The West1460431580.521596.jpg

Here's a couple more pictures of the progress.

Basically, I cut off the front wall, under the cab over bed, shortened the length of the camper body by one foot, and reattached the front wall with L-brackets until I was ready to have it welded. (More on the welding later). That gave me a 36 inch bed over the cab, and it will have a 1 foot slide out inside for a total of 48 inch width by 78 inch length for the cab over bed.

The attached photos were taken when I placed the camper frame in my pickup to see what I needed to adjust on height for the bed rails, and the cab. I ended up adding two inches to the bottom of the frame, front and back, with two rows of 1 inch square tubing to raise it up enough to clear the cab. I may add something under the floor of the camper later to insure water drainage, as well as a little more height if needed. I have additional photos of that later.


Sent from my iPad using Wander The West
 
Interesting! Are you going to be able to keep the tailgate on (and up)? I think that would be a nice option for some trips, like when you want to lock the tailgate to protect camper contents, or to retain the stock backup camera in the badge.
 
Thanks for the comments and encouragement so far fellas, I appreciate it!

So Wandering, you asked if I'll be able to close the tail gate? The answer is no, because I wanted the maximum inside dimensions for one (although that wouldn't have made a huge difference), and because that was my mindset. Looking at all the other examples, I just figured it best to bring it to the edge of the side rails.

One thing that has been cool with this build, is always thinking ahead on what I'll work on next. No directions, just all the pictures I've looked at here. One especially was the series from ski3pin's factory build. Kind of a blue print for me. I've never stepped foot in a finished FWC before. It's really fun to be in control of what it becomes, and my list of options is up to me. I've found quite a few things on Craigslist along the way, that I'm installing at bargain prices, as this was the goal, to be able to keep the cost down kind of project. That hasn't necessarily been the case.

Anyhow, here's a few more photos:

ImageUploadedByWander The West1460516949.586195.jpgImageUploadedByWander The West1460516997.223262.jpg

This is where I like to go in the fall. This was a hunting outing in November a few years back. Sleeping in a fiberglass shell isn't all that fun in cold, cold weather, ...............and that's why I "needed" a four wheel camper.


Sent from my iPad using Wander The West
 
ImageUploadedByWander The West1460517713.286295.jpgImageUploadedByWander The West1460517751.611897.jpgImageUploadedByWander The West1460517811.010057.jpgImageUploadedByWander The West1460517844.495583.jpg

After checking the fit on the pickup, I bought a couple hundred dollars worth of 1 inch square tubbing from a local metal store, where they have about anything you need, and went to work on the restore. I wanted to replace some of the corner posts, and all four corners now have three tubes each direction for the camper jack bolts to bite into, and keep thinks solid. In 1981 they weren't using corner jacks on these campers, so it's no surprise the weight of the jacks took a tole on this outfit when installed by the previous owner.

I bought an "organ donner" Palomino pop-up, that had had the top blown off on the highway in windy Wyoming, for a reasonable price, that I could repurpose parts. So you'll notice different window configurations, and vent holes for a 3-way fridge, I intended to use as I re-framed this shell. After taping things into place, I later used a boat-load of L-brackets and screws to hold it all together until it was ready to be welded. I am not experienced or set up to do aluminum welding. So I would still have to find someone to do that for me after I got things assembled.

More to come......


Sent from my iPad using Wander The West
 
PokyBro said:
Basically, I cut off the front wall, under the cab over bed, shortened the length of the camper body by one foot, and reattached the front wall with L-brackets until I was ready to have it welded. (More on the welding later). That gave me a 36 inch bed over the cab, and it will have a 1 foot slide out inside for a total of 48 inch width by 78 inch length for the cab over bed.
I've wondered about the size of the bed myself. I'd love to not have to pull out the bed at all, AND have it be wider than 48" for sleeping two shorter folks East/West. Have you thought of making the bed wider (even 6" would be nice - even though it is not quite Queen Size) and having cabinets under the over hang?
 
Vic Harder said:
I've wondered about the size of the bed myself. I'd love to not have to pull out the bed at all, AND have it be wider than 48" for sleeping two shorter folks East/West. Have you thought of making the bed wider (even 6" would be nice - even though it is not quite Queen Size) and having cabinets under the over hang?
I sold my old 2002 Hawk short over hang and got a 2013 Hawk, long over hang. Just because we wanted not to have to pull out the bed. We have found that pulling the bed out 6 inches and sliding the mattress out will give the person in the front enough room to use all of the 48" mattress and not hit the lift panels. Room to hang your arm out.

IF FWC makes a Hawk with the deep queen size over hang they use on the newer flat bed models I will be in line for one. Yes I know the camper might be 4 inches higher. That would also allow us to sit at the dinette for a quick lunch in bad weather without lifting the top.

Tom/Stan are you reading????
 
ImageUploadedByWander The West1460589444.823025.jpgImageUploadedByWander The West1460589489.842854.jpgImageUploadedByWander The West1460589529.243309.jpg

To answer Vic's question, I was pretty decided from the start to do a pull out inside. I have a 48 inch wide mattress from the donor camper, that's in good shape, and I do like the extra room of 48 inches, vs just 36 inches for top bunk, especially if there's two people. The bottom bunk is about 30 inches, and will be just right for one person to sleep comfortably.

A few more photos.....

The frame back from the welder.........and looking good!

A few modifications to say the least, from the original Grandby.

Added two extra 1 inch tubes to both the top of the frame and the bottom. This provides for extra height for the top bunk, and the extra 2 inches on the bottom was necessary to clear the side rails on my pickup. This collectively gave me four more inches of standing room height inside.

Yard is looking a little messy, wish I had thought of that when I took the photos. Oops But you know, a guys needs his project place around the house, right?

You may have noticed the "organ donor" camper. Anyhow, more progress.


Sent from my iPad using Wander The West
 
Whenever I see ambitious projects like this I imagine how fun and self satisfying they must be...
and then I think how much I enjoy just jumping in my Hawk and going camping :)

Good luck on the build. It looks like you are off to a great start. Keep posting pics, it should help keep you motivated to progress with the build.
 
Thanks so much for the compliments and encouragement ski and Bill.

I have to agree with Bill, on both sides. There is a lot of satisfaction in building and creating, so yes, there is an element of fun in this project. But, as you might guess, it is a time consuming prospect for sure. The other side of just getting in your rig and heading out, is the carrot I'm working hard for, and can't wait!


More photos:ImageUploadedByWander The West1460677819.738400.jpgImageUploadedByWander The West1460677867.640046.jpg


The floor pack was completed, and installed, the underside painted with marine exterior paint.


ImageUploadedByWander The West1460678155.644726.jpgImageUploadedByWander The West1460678211.231957.jpg

It was my good fortune to find three new radius Windows to replace the square ones I was going to use, at a screaming good price of $60.00!

A guy on Craigslist was just looking for someone to take them off his hands to get them out of his garage. With only minor adjustments to what I had set up originally, and had been welded, they were set up for installation. Totally changed how the camper will look, and definitely not so aged. Yahoo! I was soooo happy about that!


Sent from my iPad using Wander The West
 
ImageUploadedByWander The West1460682861.498065.jpgImageUploadedByWander The West1460682912.914454.jpg

I came up with a simple way to put a radius in the window framing, by stapling in a piece of plastic strap, with solid foam insulation as a backer.

This would be necessary once the paneling goes in and window opening are routered out.


Sent from my iPad using Wander The West
 

New posts - WTW

Back
Top Bottom