Full build - Reconstructing a 1981 Grandby into a custom Hawk!

Nice job. You might want to consider a small drip gutter above the door. I couldn't tell by the photo whether there was something like that as part of the door frame. jd
 
Thanks guys, for the last several comments, encouragement is a good thing, your kindness is appreciated!

Longhorn1, I have a drip rail to put on the back end of the roof, above the soft side material, but I also see that the new campers that have the option of an awning over the door use an aluminum piece that allows you to slide in the awning material, but also appears to act as a rain diversion channel without the awning on. Curious what you or others would install, given the choice, just a drip channel, or would you go for a rear awning channel as described above? I have both pieces to work with.

I will also be putting a rain Chanel directly above the door. I'm tight on space there, because there is a brake/ marker light going in above the door as well, so still working that out.

Bill, your last comment was very generous, thanks.

I have another question I haven't decided on yet, that some of you might help me with. I have been planning to keep things relatively simple, but when I start the inside part of the build, I was trying to decide on just a hand pump for water, or possibly a switch for an electric pump as needed, or an on demand electric pump. what recommendations would you all offer?

With this question, I am additionally wondering about installing a hot water heater. I'm not sure if they're prone to problems, or pretty simple, and very useful? So any insights on these two things would be a big help to me. Thanks!


The things I am planning to have for accessories include: a forced air heater, a 12v DC fridge, sink, stovetop, two fantastic fans, usb, and 12v outlet, and solar.

Appreciate any ideas. Thanks!


Sent from my iPad using Wander The West
 
PokyBro said:
I have another question I haven't decided on yet, that some of you might help me with. I have been planning to keep things relatively simple, but when I start the inside part of the build, I was trying to decide on just a hand pump for water, or possibly a switch for an electric pump as needed, or an on demand electric pump. what recommendations would you all offer?
With this question, I am additionally wondering about installing a hot water heater. I'm not sure if they're prone to problems, or pretty simple, and very useful.


Appreciate any ideas. Thanks!
Sent from my iPad using Wander The West
Since you're going with an electrical system, I would recommend an electric pump.

I'm not a fan of water heaters in small campers, as they cut into storage space. We just heat water on the stove and take sponge baths, but try to swim or find a RV park on a regular basis.
 
I would go with the elec pump. Hard to wash your hands with one hand pumping water. For the price difference I would get a presure pump that will shut off if faucet is closed. To save water I have a belly bump switch that will turn on the pump (valve needs to be open) and I only run water when I need to. I had a knee switch on my old Hawk but it did not work with my new cabinets.


med_gallery_1903_734_23910.jpg


med_gallery_1903_734_156057.jpg
 
Thanks for your responses Wandering Sagebrush and Bill. I'm thinking an electric water pump does make the most sense at this point. As for the water heater, I have been leaning against for the reason WS gave. In a Hawk there is minimal storage space under the galley side counter.

Here's a next series of photos. I decided to go with aluminum corner brackets, and so bought the materials, and based off of measurements I've seen here on WTW, fashioned my own.

I also cut rough iron and matched up the mounting bolt holes for my jack plate mounts. These will soon be welded to the jacks, and then painted white.

ImageUploadedByWander The West1461242820.000629.jpgImageUploadedByWander The West1461242871.026519.jpgImageUploadedByWander The West1461242892.661048.jpgImageUploadedByWander The West1461242907.155354.jpgImageUploadedByWander The West1461242920.484435.jpgImageUploadedByWander The West1461242934.241345.jpgImageUploadedByWander The West1461242947.017007.jpg

As you can see, the corner brackets were mounted with three inch roofing screws. I think 9 per bracket should be sufficiently strong, and I was careful to not over tighten. I added butyl tape putty between the bracket and the camper body.


Sent from my iPad using Wander The West
 
Nice job on the corner brackets. Are you going to leave the jacks on all the time? If not and you are welding up plates and not using the clamp brackets that the Rieco jacks use I have a suggestion. Tack weld bolts to the plate you weld on the jacks. Buy some Star knob nuts like in the pic below. This will save you a lot of time when you take the jacks on and off. They would be plenty tight for taking on and off; could get by with just two per corner. I would not do this if you are leaving the jacks on.


fsk.gif
 
As Billharr said, I would install an electric pump. Also, if you want hot showers or hot sink water you could carry a portable tankless water heater. I put together this setup for tent/truck camping.

2.jpg4.jpg8.jpg10.jpg

You could go as simple as "timber" from Exped. Portal did: http://www.expeditionportal.com/forum/threads/60142-Hot-Water-Systems-Eccotemp-L5-v-s-Zodi-X-40
Heater.JPG

The "on demand" pumps are very low amp draw and have plenty of pressure. There can be a waste of water however, because they don't fire up instantly. In that case, if you can run the initial 1/2 gal into a container for reuse, you will save water.
 
ImageUploadedByWander The West1461257228.691443.jpgImageUploadedByWander The West1461257246.356146.jpgImageUploadedByWander The West1461257263.111217.jpg[attachment=23546:ImageUploadedByWander The West1461257277.992857.

All the corner brackets installed, along with rear and side porch lights.....

Hey, this is PokyBro.....and we'll leave the lights on for you!

Well, folks this brings us up to pretty much current on the build. I have the lift panels underway, and will be tackling the roof next.

Stay tuned!


Sent from my iPad using Wander The West
 

Attachments

  • ImageUploadedByWander The West1461257277.992857.jpg
    ImageUploadedByWander The West1461257277.992857.jpg
    51.6 KB · Views: 447
Hello again folks, I'm checking back in with a bit more progress.

I wanted to say thanks to billharr, rudhawk and Dynobob for your comments and suggestions. I think it's nice to ask for other people's point of view and different perspectives. It will help me with this build. I appreciate it guys!

Before moving forward, I wanted to provide a closeup view of the screws I used to mount the corner jack brackets. I suppose I felt one single 1 inch tube at each corner of the old Grandby frame, was in no way adequate for corner jacks, and likely was never meant to be. When I beefed up the frame prior to welding, you will recall, I had three 1 inch tubes each direction to provide plenty of strength and material for mounting screws to bite into.

So here's a quick look at those screws in a cross section. I picked these up at Home Depot.

ImageUploadedByWander The West1462168624.662176.jpgImageUploadedByWander The West1462168639.234136.jpg

I like that these screws are made to be weather resistant, and there's no loss of the coating after screwing them into the tubes.


Over the last few weekends I have been working at getting trim pieces ready, by cleaning, cutting to size, and repainting.

Also, the old Grandby's roof trim ring was originally unfinished aluminum. To bring it up to date with new campers, I went ahead and cleaned, sanded, primed, and painted the trim pieces to be ready for installation when that time comes.

ImageUploadedByWander The West1462168927.319607.jpgImageUploadedByWander The West1462168942.403832.jpgImageUploadedByWander The West1462168957.911666.jpg


Sent from my iPad using Wander The West
 
I've also been working on the lift panels.

Here's what I started with, they were in pretty bad shape. The front panel had been redone once by the previous owner. The rear was the original from the factory. Both had deteriorated due to water damage over time.

ImageUploadedByWander The West1462169652.784035.jpg
ImageUploadedByWander The West1462169680.155908.jpg
ImageUploadedByWander The West1462169604.613182.jpgImageUploadedByWander The West1462169625.797867.jpg

I have remade the panels using a birch plywood, which is about 3/16" thick. I used the old panels for reference dimensions, but added 1 inch for the top piece, and 1 inch for the bottom, to give me two more inches of internal height.

ImageUploadedByWander The West1462171380.923042.jpg
ImageUploadedByWander The West1462169890.991424.jpgImageUploadedByWander The West1462169909.336237.jpg

I was able to reuse three of the lift panel hinges, and I purchased three new ones from All Terrain Campers, for $40 each, working with Jeff.

As you can see, this old hinge has stretched out springs, and the rivet/ screw holes are much larger from already being rebuilt once, and drilled out. The new hinges holes are 1/8", but the old hinge are more like 3/16", which is too large. I want to stay with smaller rivets for uniformity.

ImageUploadedByWander The West1462170448.359066.jpg


Sent from my iPad using Wander The West
 
It may be overkill, but I also decided to fiberglass the panels for two reasons.

First, I was thinking this would provide an improved barrier to water damage, instead of just a polyurethane finish. And second, it will also increase the vertical strength of the panels. Of course if there's no water leakage, there's no risk for the panels to sustain deterioration due to water damage, so again it's overkill for water protection, a plus for strength and durability.

I got the fiberglass matting off of eBay.

The polyester resin provided a finished wood look to the panels.

ImageUploadedByWander The West1462171740.458810.jpg


Sent from my iPad using Wander The West
 
A while back, rudhawk asked when I started my rebuild project, so I thought I'd do a rough breakdown of the process.

I'm sure it goes without saying, that when you do this kind of work mostly on weekends, and some evenings, it takes quite awhile. Also, I find some days I simply get tired, and so my productivity isn't what I'd like it to be. Good thing I'm not being payed for the job on some of those days. I'm a pharmaceutical sales rep by profession, and cover a very large geography, so I use up a lot of energy during the week. There's also family time, home maintenance, and numerous other things that require time and focus. With all that being said, here's how the project has been on a timeline.

April, 2014 - First brought the camper home. Spent awhile thinking and pondering what I would do with it. Originally, I wasn't
thinking a full rebuild.

May, 2014. - Bought a Hallmark Ute pop-up for $1200, thinking I could use it that summer, while I was working on the FWC.
Problem was, it had wood rot in the front and back on the roof, so I ended up spending all my free time repairing it.
I ended up never using that camper, I just sold it at the end of summer, for a profit, bc I didn't want to keep it over
the winter.

August 8, 2014 - Dismantled the Grandby
August 16, 2014 - Shortened the Grandby frame from 8 feet, to 7 feet, or 83 inch length.
August 19, 2014 - Began frame remodeling, and beefing up corners, and various other stress points, and 2 rows of stock on the
top perimeter, and two additional rows on the bottom, placing additional 1 inch square tubing stock in place
with tape, and then with L-brackets and screws.
September 19, 2014 - Camper frame returned from being welded up. Placed back in pickup bed to check for fit.

October - November, annual hunting season I focused work time off for.

April - May, 2015 - Built floor pack, attached to frame, and painted the bottom side with marine paint, painted inside floor and
installed linoleum.
May 23, 2015 - Started fitting new radius windows, requiring a little cutting, and adjustments of previous window framing.
June 13, 2015 - Built, painted, and installed new bed overhang board(s)
June, 2015 - Worked on wiring for exterior lighting, and cut and installed solid foam insulation.
July, 2015 - Worked on cutting and installing inside paneling.
December 24-January 2, 2016 - Cut out lift panels, and did some fiberglassing. Began installing exterior siding.
January, 2016 - Began working on door, first try.
February, 2016 - Continued working on door, started cutting, drilling, painting corner jack brackets, and painting stripes on siding.
March, 2016 - Finished and installed 2nd door build
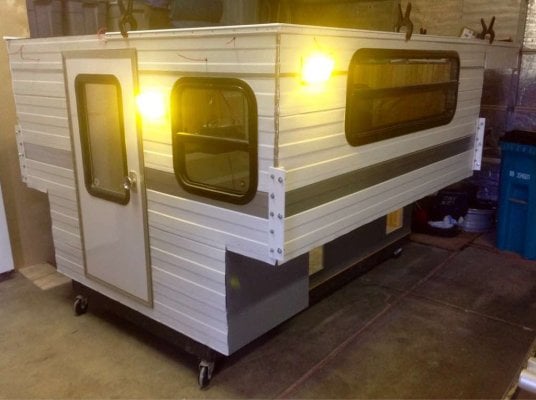
April, 2016 - Worked on cleaning up and painting trim pieces, installed corner jack brackets, and installed porch lights.

Thought this might be interesting to all following this post. At this point, I'm not sorry at all that I started this project. If others might consider doing this kind of project, I'd say if you can work on it daily until completed, the timeline would be much shorter. I don't think my initial thoughts were to go to the extent I have for the finished project, but my perspective on what I wanted it to be changed along the way. So, everyone would approach this differently, this was just my journey. I'm pushing myself now, because I want to use it this year, even if it's just a shell initially. Wish me luck!


Sent from my iPad using Wander The West
 
I could use some help on assembling my lift panels. If anyone would take some measurements from your camper, it would help me prevent making any mistakes.

On the two panels I have, the distance from center of rivet hole on one edge of the panel to the opposite edge rivet hole center appears to be the same on the top small panel piece, which is roughly 11 1/2". The smaller panel pieces on both front and rear, are both 12 1/4" wide.[

attachment=23732:ImageUploadedByWander The West1462502410.098020.jpg]
ImageUploadedByWander The West1462502447.759956.jpgImageUploadedByWander The West1462502471.750372.jpg

The rivet holes attaching the bottom hinge to the bottom triangular panel piece, measured to the rivet hole attachment location in the middle of the triangular panel piece, center to center, where the middle hinge attaches, are slightly greater. As the attached photos show, they appear to be 11 7/8" apart.

ImageUploadedByWander The West1462503003.214265.jpg

I'm just wondering if they are normally the same measurement for both panels, 11 1/2", so top and bottom panels fold with the exact same distance. I hope this makes sense.

Thanks, if anyone is willing to take these measurements.


Sent from my iPad using Wander The West
 

Attachments

  • ImageUploadedByWander The West1462502410.098020.jpg
    ImageUploadedByWander The West1462502410.098020.jpg
    90.6 KB · Views: 162
Pokey-
I tried to get a couple of measurements for you, but access to that upper panel is difficult with an assembled camper!

I measured the bottom (triangular) piece to start - I got a bit of variance and noticed the rivets don't all line up, they wander up and down a bit. So an "eyeball average" (you measured 11-7/8") seems to be about 12", +/- 1/8" or so.

For the upper panel, I measured from the upper rivets on the panel to the rivets attached to the lower panel (middle hinge), getting about 12-1/2". From that number, we can subtract out the center to center distance of the hinge, 7/8", arriving at 11-5/8" center to center for the upper panel itself (you measured 11-1/2"), close enough?

Hope this makes some sense to you, but they do appear to be slightly different to answer your question.
 
Back
Top Bottom