Full build - Reconstructing a 1981 Grandby into a custom Hawk!

ImageUploadedByWander The West1460694882.142305.jpgImageUploadedByWander The West1460694905.867913.jpgImageUploadedByWander The West1460694957.058303.jpgImageUploadedByWander The West1460695118.313402.jpg

Based on what others have posted about condensation issues in cold weather because these campers have no insulating feature for the top bed, I chose to do something a little different for cab overhang bed board.

From my salvage camper, I cut out a section that would be on the bottom and exposed, because it was only 3/8 thick with an aluminum skin that was glued to it, thus very weather/ water resistant, and I used butyl tape to seal it the channel perimeter.

Then a middle section for 1/2 inch foam insulation R-3

On top was 3/4 inch pre finished Birch plywood, which is the primary support for the whole bed arrangement.

I know I'm giving up a little space in the bed area for mattress thickness, ( there's still 5 inches), but I'm hoping this will reduce condensation under the mattress from warm bodies in cold weather. We'll see?


Sent from my iPad using Wander The West
 
PokyBro said:
To answer Vic's question, I was pretty decided from the start to do a pull out inside. I have a 48 inch wide mattress from the donor camper, that's in good shape, and I do like the extra room of 48 inches, vs just 36 inches for top bunk, especially if there's two people. The bottom bunk is about 30 inches, and will be just right for one person to sleep comfortably.

So still just 48" wide, not 54" (which is what I was hinting at)? I'm with Bill Harr.... give me a queen size option without the FlatBed! Note, I did talk to ATC about this option as well, and they are trying it, but finding it twists too much. I guess the answer is ... so far... stay tuned?!?
 
ImageUploadedByWander The West1460765044.301818.jpgImageUploadedByWander The West1460765076.187600.jpgImageUploadedByWander The West1460765130.386185.jpgImageUploadedByWander The West1460765171.441603.jpg

Next up, I worked on wiring for exterior marker lights on the four corners, porch lights on the back, and one on the passenger side, and two flood lights on the back end. Additionally, I ran wires from the left front of the camper near the propane box, to the over head bed for solar, and separate ones for roof lights and fantastic fans.

On the drivers side rear, I had to swoop down with wires so the hold down camp screws don't intersect wires causing a potential short. Because I'm doing rigid foam insulation, I tried to stay high in the frame with wire routing, vs more direct path through the tubes.

I also installed boards for the slide out bed support to fasten to through the paneling.


ImageUploadedByWander The West1460765616.902310.jpgImageUploadedByWander The West1460765671.151466.jpgImageUploadedByWander The West1460765749.195021.jpg


The insulation process was kind of fun, because it seems you get a lot done real fast. I used a table saw, and cut each piece to size so the fit was good and snug. Afterwards, I applied aluminum duct tape over everything for an even tighter seal. With an aluminum frame there will be still be cold spots, but this was my approach anyhow.


Note: We're going fast on the photo progression here folks, as this is the work I've already done. Eventually, you'll be up to date, and my progress will seem slower.

I hope you're all enjoying the ride. I'm weird, but I really do enjoy building things, but as I said earlier, I can't wait to get to use it, hopefully this season. I mostly have just used weekends over the winter, but can now add some evenings with more daylight to keep moving along. I can see why the factory takes weeks or months for each build, and they know what they're doing!

Cheers!


Sent from my iPad using Wander The West
 
ImageUploadedByWander The West1460787436.245852.jpgImageUploadedByWander The West1460787460.875314.jpg

As many have noticed on these older campers, there once was a foam covering over the top of the frame between the paneling and exterior siding. I'm not sure what is used now in the new ones, but I picked up a small role of auto carpeting from Walmart in the auto accessories section. I cut it into 4inch strips, and sprayed the backing with 3M contact cement. I also taped off the top of the camper frame and sprayed it as well. Once tacky, I went around and installed the carpeting strips around the perimeter. It came out looking quite nice.

Ready for paneling inside.

ImageUploadedByWander The West1460788030.326618.jpgImageUploadedByWander The West1460788064.413600.jpgImageUploadedByWander The West1460788099.632187.jpg

I decided to go with pre finished birch bead board paneling from Menard's in Cheyenne, WY, for about $30 a 4x8 sheet. (I live in Ft Collins, CO). I liked the warm, inviting feel it gives, and it gives a nice contrast with the black carpeting trim. I also added black j-cap molding around the edges, which I'll show in subsequent photos.


Sent from my iPad using Wander The West
 
ImageUploadedByWander The West1460827437.669286.jpgImageUploadedByWander The West1460827498.258182.jpgImageUploadedByWander The West1460827573.090300.jpgImageUploadedByWander The West1460827624.759103.jpg

Here you can see the nice wood tone/ black window trim contrast. To me the black enhances the wood tone.

This paneling is real wood, finished veneer, and not a vinyl veneer. The advantage is, it won't separate with time, and can have a refinish touch up, if scratched or wears off.

All the panels are screwed on and can be easily be removed without causing damage, should the need arise, for wiring, etc.

Also notice the three rocker switch for each porch light, and one for the flood lights outside. All will be LED.


Sent from my iPad using Wander The West
 
ImageUploadedByWander The West1460838994.544065.jpgImageUploadedByWander The West1460839010.393462.jpg

In case anyone hasn't cut out window openings through paneling before, the first photo shows the router bit I used, the second the full panel removed.

The roller bearing portion of the bit runs along the framing in whatever shape it is. Earlier I showed how I used a plastic strip stapled in the corners to get a radius shape matching the window to be installed.

Of course the paneling either needs to be fastened to the wall, or you must press the router firm enough so it doesn't slip out of rolling along the framing perimeter. Otherwise #€¥^~ happens! I learned this by experience the hard way.


Sent from my iPad using Wander The West
 
ImageUploadedByWander The West1460850813.150237.jpgImageUploadedByWander The West1460850838.592221.jpgImageUploadedByWander The West1460850875.165391.jpgImageUploadedByWander The West1460850901.647709.jpgImageUploadedByWander The West1460850940.586890.jpgImageUploadedByWander The West1460850984.180665.jpg

Exterior siding! I can't tell you how exciting it was to finally get to this phase! Oh man!

After searching and checking at numerous RV supply and repair facilities for used or new siding at reduced pricing, without much luck, I found a business in Denver called "The Metal Company". They offer many different patterns, all in white only, with smooth surface, cedar wood grain, or pebble finish. I chose the cedar because, as with the interior of this build, it had a homey, inviting feel to it, which appealed to me.

I ordered a pattern called Mesa, which is a balance of peak and valley configuration. It cost about $2.75 per sq ft, so it wasn't cheap. Instead of also trying to find something used I could salvage (remember I am trying to keep costs at a minimum), I am glad I went this route. This is turning out much better than I originally thought it would. Truthfully, it's looking more like brand new, and in a sense it is.

I used tin snips for cutting the doorway and window openings. I placed the pieces where they would go, and then marked them from behind with a sharpie. Easy to cut the shape when turned over.

To fasten the sheets I used an 18 gauge, small crown staple gun from Harbor Freight. The staple gun easily pushes staples into the aluminum tubing. Pretty easy, really, and like the paneling you see real progress at this stage. You have to be careful, though so you don't get off on keeping each row straight and uniform.[

attachment=23460:ImageUploadedByWander The West1460852354.359889.jpg]ImageUploadedByWander The West1460852471.157140.jpg

attachment=23460:ImageUploadedByWander The West1460852354.359889.jpg]


Sent from my iPad using Wander The West
 

Attachments

  • ImageUploadedByWander The West1460852354.359889.jpg
    ImageUploadedByWander The West1460852354.359889.jpg
    53.4 KB · Views: 613
Sent from my iPad using Wander The West
 

Attachments

  • ImageUploadedByWander The West1460852576.572316.jpg
    ImageUploadedByWander The West1460852576.572316.jpg
    53.5 KB · Views: 251
Interesting that you're using staples. Is that what FWC originally used, or did they screw the paneling to the frame?

I think we are all learning a lot from your build, thanks!
 
PokyBro your build is way more than "like brand new". Your camper will be "custom hand built" Great job.

Bill

PS I bought the same HF crown stapler for my inside build.
 
Wandering Sage, the siding on the original Grandby was attached by staples. If you look at ski3pin's build photos, you'll notice they had a staple gun out for that assembly. The staples do hold quite well, and it's a lot more efficient, and less expensive than using screws would be.


Bill, thanks for your comments, I appreciate that. You're very kind Sir!

I believe I saw your inside build as well, Bill. Great job to you!


Sent from my iPad using Wander The West
 
ImageUploadedByWander The West1460912978.641278.jpgImageUploadedByWander The West1460913087.668519.jpgImageUploadedByWander The West1460913118.783748.jpgImageUploadedByWander The West1460913145.542341.jpg


The next part of the build had a real hassle factor to it, the need for a solid, tight fitting door.

The original Grandby door was toast. It was so broken, it was not at all useable. Plus it was shorter than the new doorway, so the aluminum framing wasn't tall enough anyhow. The door from the Palamino salvage camper was originally designed with a hinged top portion, so you ended up with a full size, walk-through door.

So I didn't have the top pieces for the new door or the top of the door jam, as the extruded aluminum parts for the hinged door were different from the rest. That was problem #1.

I figured I could probably make something up. So I built the camper frame with the width of the Palomino doorway, since those were parts I could use (24 x 48). And thus, that was the opening that was welded up, and my permanent opening dimensions.

Problem #2 was that the bottom of the Palomino door was rotted out. So, my options were now to find another door somewhere, purchase a custom made new one, or rebuild a new door with the pieces I had. New custom doors could be in the range of $350 to $600, so that wasn't going to happen. I chose to rebuild with the parts I had.

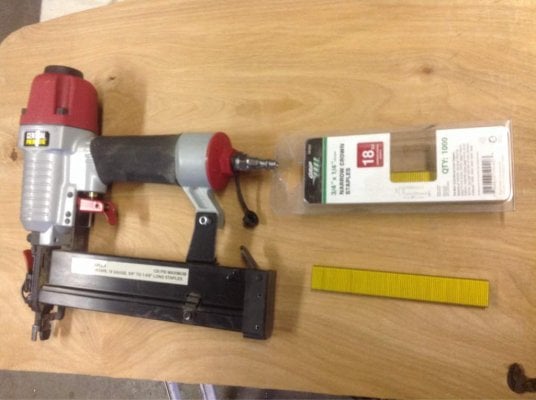
So, in the first photo, you see the pieces I started with. In the upper part of the Palomino doorway not being used, I took pieces and ground off the surfaces I didn't need, and basically came up with close to matching pieces for the top of the door jam, and the top of the door, just not exact.

Second photo shows the aluminum channel jam pieces installed.

Third photo shows the inside and outside skin of the door, and my first configuration of the inside framing of the door.

Fourth photo is the outside skin attached to the inner frame, using contact cement, as the original was done. There were a number of dents in the aluminum I thought I had gotten out, but we're pretty obvious, so I wasn't happy with how it looked, even when painted. The square window just didn't fit either. So......I trashed this first attempt.


Sent from my iPad using Wander The West
 
ImageUploadedByWander The West1460915198.888101.jpgImageUploadedByWander The West1460915215.636885.jpgImageUploadedByWander The West1460915236.341611.jpg

Here is the outcome from spending a lot of time to get it right. I mean hours, because of the process. I made a complete new internal core frame that end up being almost a solid core door. Only a little foam insulation.

I picked up a 24" x 48" piece of aluminum sheeting from the local metal business. I found the window on eBay, but that had to be figured out too, because the door is 1" thick, but the window was 1 3/8" thick. I just mad a a spacer inside out of wood. I painted the aluminum sheeting with white Rustoleum oil based enamel paint with a spray gun. And so forth....I think you get the picture, this took some time.

I used the hinge and door handle from the original door, and had the lock re-keyed.

I am very pleased with the out come. It looks good, and is solid, tight, and should last.


Sent from my iPad using Wander The West
 
Wow - just saw this build today - I couldn't stop reading & marveling. P - I love the beadboard-always have and the black trim - it's beautiful. That is a great job on the door - then working out the window with the inside trim. I see you suffer from the same affliction I have: I've been saving this (item) 10 years for just this occasion - "dammit Jim" I'll make it work or else.

Will you be putting together a cost list - what did the aluminum frame welding cost you. And when did you initially start this build?
 
Thanks takesiteasy and rudhawk for your comments!

Rudhawk, I will do a cost breakdown, but it may not be completely accurate. I was being very careful from the beginning to keep my costs low, and will continue. I tried to sell unneeded things I've accumulated over the years to finance as much as I could. I find you meet a lot of interesting people using craigslist. (For example, the swamp cooler in one photo was sold to a guy coming down through Wyoming on his way back to Mexico.)

I sometimes just decided to just get what you want, it's ok! The welding took about 10-12 hours by an experienced welder, but he only charged me $50/ hr, so that was I think $700, the single highest expense. I thought later maybe I should have bought my own tig welder, and sold it afterward, but also realize it would not have produced the same result.

In the end, I figure it will be mostly new throughout, and should give that impression, so it's far less than one from the factory. Nothing against factory new, just outside of my personal budget. Thanks again for checking in.


Sent from my iPad using Wander The West
 
I was going to leave the exterior siding solid white like ATCs, but on second thought, I decided I like how the FWCs look with conservative striping. The FWCs appear to have individual siding pieces of a different color for the stripes. Since I didn't have access to such materials, I chose to paint the stripes on. Here's the sequence of photos.

ImageUploadedByWander The West1461039443.660795.jpgImageUploadedByWander The West1461039463.613023.jpgImageUploadedByWander The West1461039483.712778.jpgImageUploadedByWander The West1461039503.067929.jpgImageUploadedByWander The West1461039519.532581.jpg

I used Rustoleum high performance rattle can paint, first a grey primer, then aluminum for the color. I like that it is not too bold of a color contrast, and it gives the camper a little more character, for my taste. I guess it also helps it stay close to its roots, as originally a FWC.


Sent from my iPad using Wander The West
 

New posts - WTW

Back
Top Bottom