Full build - Reconstructing a 1981 Grandby into a custom Hawk!

Tim,

The countertop material is plastic laminant, Formica is a brand name you might be familiar with. I bought mine at Menard's in Cheyenne while I was over there awhile back. They carry a number of different colors and sizes of rolled laminant in their countertop section. I'm sure there might be someplace closer to you if you checked around. I think Home Depot or Lowes can order it for you, but don't keep it in stock like Menard's.

To apply it, check out some youtube videos, but it's pretty easy to accomplish. You use liquid contact cement on both surfaces, and you want a liquid version vs spray on. I used a foam roller to get a good even coat. You then let it dry until there's no more sheen and its not sticking to your finger. You set up some dowel rods on the surface you're applying the laminant to, set the laminant on top and position it where you want it, and while keeping it steady you remove the dowel rods one at a time, and then roll it out with a pressure roller for a bit, and that's it. Then you you use a flush cutting bit on your router to bring the laminant even with the edge of your board.

I chose to use T-molding on the edge of mine for a nice finished look. This requires a special T-molding slot cutter router bit. Once the slot is cut, you simply tap in the T-molding, also pretty easy stuff. Hope that answers your question(s).

full
 
Thanks for your comments above Takesiteasy and Portercassidy, failed to say that awhile back!

Cold weather and life interruptions have interfered with much new stuff to share. However I have added a couple of mods since I last posted.

First Longhorn 1 asked a long time ago if I planned on adding a rain gutter over the doorway. Well I made one up out of Aluminum sheet metal and had a 45 degree angle formed with it at the metal shop, then I formed a slight lip on the out side edge, and made cuts for it to fit the narrow space above the door. It had to be cut in a few places so the lift struts would not be interfered with. I also added the marker/ third brake light just above the gutter (Found a narrow LED brake/ marker light at Summit Racing online). Where I previously had water collect on the top of the door, and when it was opened, it usually spattered down on top of me, now that has been rectified and the water drains to either side of the door. No big deal but a welcome addition.

full


I also added a 12 volt charge center inside under the counter, which will be handy to keep the phone and iPad charged inside the camper, and a 12 volt outlet for other misc stuff, like a cpap I need at night.


full

full


A life event that occurred recently was moving to a different city where I'm closer to my adult children and grandkids. The old 7.3 F250 Super Duty loaded with the Hawk handled the heavy trailer just fine.


full


Still need to pull the seat boxes back out and stain and finish them when we get a bit warmer weather. I will also finish cutting the seat cushions to size, and sewing up the covers. Then there's the drawers and cabinet doors. I still have a ways to go to finish things up, but I plan to get out much more often to enjoy using it this summer.
 
Nice work Poky! I need to address a gutter over my door also. With the door frame almost tight against the trim, and the strut mounts, it has been on the back burner. Since my build, the door is out of rack with the frame. I think when it warms up some, I will build a door with a welded aluminum frame. I kinda rushed the door build and ran into many problems.
 
Shellback,

I'm sure you'll sort out how to get some sort of a rain gutter on your camper, because we've seen your resourcefulness. You might consider sliding a piece of aluminum channel under you trim that holds the side liner on as one possible idea. It could be in a 45 degree bend as I did mine, or maybe under the door trim at the top of the door frame, that is if you don't have any room in between. Or if you have a new door frame welded up, maybe you could incorporate a gutter on that frame. Just some thoughts.

Poky
 
On one of my earlier entries, I discussed my furnace failing to light, and that I thought I had solved the problem. My son borrowed the camper in January to take my grand daughters camping for a Daddy/ Daughter thing. Though the furnace worked before he left, when he got up on the mountain in snowy conditions and low temperatures, the darn thing wouldn't fire up. When it was back home it worked again. So it was inconsistent at best, and not something to depend on, even though it is a new furnace.

Recently I was checking it again, and it wouldn't come on for me, so now was the time to diagnose and repair it. It is an Atwood Hydroflame II 7920, 18,000 BTU, DSI (Direct Spark Ignition) furnace. So here was the process I went through to get to the bottom of things.

On the front of the furnace is a plastic plate, and when unscrewed, behind the plate is the control board. At the bottom of the control board is a grid that tells you what to look for based on a blinking red light and the number of pauses between blinking. In this case when the furnace was turned on the by the thermostat, the blower fan would come on for 30 seconds and then stop, and the flame wouldn't start. The light blinking indicated it was the Air Flow/ Limit fault, referring to one of two things. The Sail Switch and the Limit Switch, which are integral to each other.

full

full


I went ahead and ordered both online and then installed one at a time to see if it resolved the problem. I replaced the Limit switch first which I believe if it gets too hot, it will shut the system down. Changing this switch did not resolve the problem, the furnace would still not light. I then took the furnace out, removed the blower fan assembly, and down inside the body of the furnace, just below where the fan spins is the Sail Switch. When the blower fan turns on, it closes this switch by airflow. I replaced the switch with the new one I bought, reassembled the furnace, hooked the propane line back up and gave it a try. The fan came on as before, and then the flame fired up after about 30 seconds, and it seemed to fix the problem.

I've fired it up multiple times over several days with 100 % success, so I believe the Sail Switch was the culprit, a $6.00 part. The original seemed okay, and there isn't much to it, but it wasn't functioning properly for some reason. Here's a series of photos for those who haven't seen these switches or know where they are.

full

The furnace body, with the fan assembly cover exposed.

full

The sail switch

full

The limit switch

full

Both switches removed and a driver bit next to them for size reference.

Anyhow, just thought id post in case anyone else has run into this problem. More to come soon....

Poky
 
With my move in January, and cold or wet weather for several winter months, it's been difficult to make any headway, but now its been nice weather for awhile to work in, I'm back at it with a final push to completion. I don't have a garage at my new place of residence, so it's been a little more challenging to work on things, but you just have to adapt. Now the excuses are out of the way, here's what I've been doing and what I have accomplished, in addition to the furnace repair in my last post.

One of the things that has sort of bugged me, was that when the bed cushions, and counter tops were in, the floor was not matching the rest, and it was a definite mismatch. I could of ignored it and it would probably have been fine, but I decided to make the change now, before I permanently installed the seat boxes. I had to dismantle the fridge cabinet enclosure, and the drawer frame below, and I was removing the seat boxes to get them ready for stain and finish anyhow. So once the floor was fully cleared, I installed some new floor vinyl overtop of the old. I picked a darker color to match the countertop better. I needed warmer weather to do this mod so the flooring would lay out more smoothly. Because I laid it on top of the other flooring it has taken longer for the glue to set up. Here's a before and after.

full

full


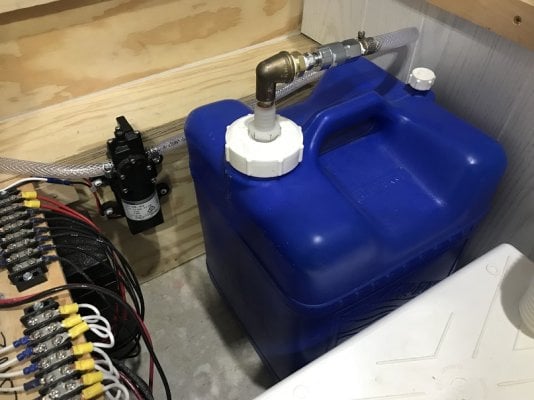
In addition, this weekend I worked on finishing the seat boxes and water tank enclosure. I had to install some covers for the turn buckle cutouts, and also put in some platforms to both cover the batteries in one box, and to separate an upper and lower compartment for the other. I also beefed up the water tank box to effectively hold the tank in place, given the weight it will have when full. I'm installing a 15 gallon tank, which should be plenty since I won't have a hot water heater. I'm installing an auto shut-off electric water pump as well, I have all the parts, and have tested the system for leaks and functioning and all is well and ready to go when I get to that point. The recent link on installing a metal drain valve is timely, as I will need to install a drain line as well.

Here are the boxes stained and ready for a finish coat, and then on to installing them again permanently, and then sewing up the cushions.


full

full

full

full


Well that's it, doesn't seem like much, but I put in a full day yesterday. Felt good to be back at it, as I enjoy the process. I've enjoyed using the camper several times already, but it will be nice when it's finished to my satisfaction. I fully intend to get some good outings in this summer, and summer is upon us, so I'm motivated. Thanks for checking it out!

Poky
 
Looks good Poky! Glad to see you are motivated! I just have some drawers and cabinet doors to make, but lost my motivation. Just had mine on a fishing trip last week and have to say it fit our needs perfectly. I probably spent as many hours sitting in the shell wondering how I wanted to build it, as I did doing the construction. Helped that I had 2 previous truck campers and knew what I didn't want. I ditched my FWC water tank and went with the Reliant 7 gallon camping jugs. I made up a draw tube and quick connect for my electric pump. When the tank empties, I just swap it out for another. With my 2 previous campers, it was a real pain trying to fill the inside tank either with a hose or a jug gravity filling.
 

Attachments

  • resize 2.jpg
    resize 2.jpg
    154.9 KB · Views: 176
Poky
What did you do to support roof in the up position when the canvas was not on yet?

Thx..

Bill
 
Hey Bill,

Once the roof was on,and the lift panels were attached to the roof and the camper body, I was only able to raise the front or the back, one at a time, not both at the same time, as it’s too unstable otherwise. If you go back to where I installed the sideliner material, you’ll see I installed it with the back end up first. Once I had it positioned where I wanted it, and 1 inch tucked under the roof shin, I stapled around the perimeter to hold it in place. I can’t remember if I put the roof trim on next before raising both ends at the same time, but I think I did. When you have the sideliner secured all around at the top, you can then raise both ends and it should hold itself there, it’s stable, as the sideliner keeps it in place even though the bottom is not attached yet. Then I began putting the trim ring half’s on the bottom, a few screws at a time, spaced a foot or so apart to try to get the sideliner to fit with as little bunching as possible. Hope that helps

Poky
 
PokyBro said:
Hey Bill,

Once the roof was on,and the lift panels were attached to the roof and the camper body, I was only able to raise the front or the back, one at a time, not both at the same time, as it’s too unstable otherwise. If you go back to where I installed the sideliner material, you’ll see I installed it with the back end up first. Once I had it positioned where I wanted it, and 1 inch tucked under the roof shin, I stapled around the perimeter to hold it in place. I can’t remember if I put the roof trim on next before raising both ends at the same time, but I think I did. When you have the sideliner secured all around at the top, you can then raise both ends and it should hold itself there, it’s stable, as the sideliner keeps it in place even though the bottom is not attached yet. Then I began putting the trim ring half’s on the bottom, a few screws at a time, spaced a foot or so apart to try to get the sideliner to fit with as little bunching as possible. Hope that helps

Poky
thanks very much
 
BBZ said:
thanks very much
When I did mine I fully popped my roof up (both sides) and used some bungees and a piece of wood clamped to the roof but extending to the edge of my garage for support. It was pretty jerry-rigged but surprisingly sturdy for the install.

You will be amazed at how stable the roof is once the sidelinear is installed. It stiffens the roof right up. Rightfully so since essentially a big wide strap between the roof and the camper.

Best of luck! You've got this.
 
Living The Dream said:
When I did mine I fully popped my roof up (both sides) and used some bungees and a piece of wood clamped to the roof but extending to the edge of my garage for support. It was pretty jerry-rigged but surprisingly sturdy for the install.

You will be amazed at how stable the roof is once the sidelinear is installed. It stiffens the roof right up. Rightfully so since essentially a big wide strap between the roof and the camper.

Best of luck! You've got this.
Thanks Tim.. appreciated.. trying to gain as much insight as I can.. appreciate all the help on this site..
 
With the Memorial Day weekend, extra time, and good weather, I was able to get a lot done toward my camper's
final completion, and closer to being fully useable, and looking like I want it to. I'm determined to get this done and go use it already. My focus has been on finishing the dinette seating, getting the table mounted, and and completing the second bed on the bottom.

So, this weekend I installed carpeting on the side beneath the window, attached hinges to the storage compartment doors, carpeting on the seat tops, and adding hinges for those storage compartments, Installing the seat back bracket, and installing the Lagun table base plate mount to the side wall, and constructing a raised foot platform between the dinette seating. So next, it will be sewing up the cushions for the dinette seats that will convert into the bed cushions as well. I'm looking forward to that project, as I can do it indoors in the evenings, one at a time. I really like how things turned out this weekend, it gave the camper a more finished feel, and even had the smell of a new camper.

Here's a few photos of the the projects progress.

full

The dinette seating with a center, raised foot platform and storage compartment, between the dinette seats. My side walls are 20 inches high, and it felt like my legs were dangling, so the platform raises your feet up 4 inches which is more comfortable, plus the added bonus of another storage location.


full

full


full

A couple other views, and a peak at the side compartment storage areas.


full

I had a table mount system that would utilize a center tube with a base that goes between your legs, and attaches to the bottom of the table top. I thought it a waste to mount that to the foot platform and loose that storage area, plus interference for foot placement. So I decided to bite the bullet and ordered a Lagun swivel table mount. It's not cheap at $174, but I think well worth it all things considered. It's nice to be able to swivel the table out of the way when not needed, and there's absolutely no interference with legs and feet, in a tight area. It's also very well constructed and should be very durable over time.


full

full

A couple views of the dinette seat bracket I constructed. It's not very sophisticated, but I think a practicable approach. Rather than folding over and forward like the fold over brackets FWC uses, mine lays down backwards. I have a wood back attached now, but this will soon included a foam cushion and cover over top of it.


full

full

And finally, the seat back laid down, and the table top in position for the full bed layout. The table top sticks out a little, but rather than it conform to the bed layout, I opted for a wider table top when eating.The bed is 31"x 82", so plenty of room for a full sized person to be very comfortable. The cushion will be 3 1/2" thick, and this will serve to be a comfortable stealth bed as well, if needed on some trips.

That's about it for now, but as I said, the seat cushions are next, as well as rounding the corners on the table top, applying the formica/ laminate top, and t-molding around the edge. Stay tuned!
 
Really nice PokyBro
If I may ask, as the storage area next to the dinette looks very narrow. How easy is it to access the turn buckles?
Also are you storing a specific item, wanting to know why giving up the isle space?
Thanks.
ps like the idea of how you flip the seat back away from the dinett, saves having to finde a place to put the table top.

pps I did see some of the photos where you enlarged the access to the turnbuckles, is that the trick?
 

New posts - WTW

Back
Top Bottom