Low cost DIY Lithium camper batteries.

rando said:
Sounds like maybe you have a relatively low impedance (ie resistance) meter. The meter itself is loading down the batteries and causing the voltage to drop. Otherwise you are right that it makes no sense that a battery that has sat for 4 - 5 years would suddenly start dropping voltage quickly.
It's not dropping while the meter is on it. It's dropping over the course of many days.

Of the cells I've tested so far, most of them have very little charge, even if their voltage is high. And the ones <2.8v I'd expect to have near zero charge. So maybe the change in voltage on a drained cell doesn't mean much?

I'm going to cycle as many as I can in the next few days and see what their capacity and efficiency is, and if they hold voltage as well as charge for at least several days after. And I sent Doug an email too.

So far it looks like the low voltage cells tend to have a little lower capacity and efficiency (though this varies quite a bit), but once charged the voltage is stable (~3.33v).
 
Doug got back to me right away and he is sending me 16 new cells without me even asking. He didn't know why voltage would be dropping either.
 
Vic Harder said:
Is it still price competitive?
The lowest priced big batteries I've seen are the GBS, which are ~$650 for 12.8v and 100ah. That's 0.507$/W-hr. When these Full River cells were available they were $90+$17 shipping (I think), for 60 5.5ah 3.2v cells. If they performed at spec that would be $0.101$/W-hr. If I only get 4.5ah, they'd be 0.124$/W-hr, or about 1/4th the price.

If you like having a little science and craft project, I think they are a very good deal.

He has some smaller cells still available. These are 3.3ah 3.2v, 80 for $94.45 shipped, or 0.112$/W-hr at spec.
https://www.ebay.com/itm/NEW-Box-of-80-Fullriver-LiFePO4-26650-3-2V-3300mAh-Rechargeable-Batteries-/191987482937
 
Okay... not too proud ... I have tried my skill at soldering...or I should say my lack of skill. After 3 attempt of an hour each (then restarting after cleanup) I believe I may need to reassess this part. By the time I burn through solder and wire screwing up I might actually come out equal if I cut my losses and punt...for a battery welder which hereafter I will not probably need but no doubt could sell on craig's list.
Or if there is anyone on this thread who has one they want to sell? I am assuming that the putting together of the packs would be more at my user ease level(?) ... hope so. My father in law has watched me Mig weld doing repairs on the tractor ... he an old steel worker and he smiles and shakes his head... I do work okay with wood but there is something missing in electrics or metal.

Anyone have a suggestion as to a cheap (but applicable to this application) power wise model that I should consider?
Again thanks for the help.
 
Buckland, I don't believe for a second that you cannot master the soldering! You have a master's in cabinetry! You work on period and antique furniture. I'll bet You can make a blind dovetail joint with a handsaw and a chisel. There must be something amiss with your soldering iron or the wrong flux.

Cwd
 
I agree. The few samples I tried were very forgiving.

Sand and clean (alcohol) the cells and wire. Let dry and do what photohc recommended: "Make sure the area of solder is clean. Apply a small amount of flux prior to solder. I used a Qtip. Apply solder to cell without the wire first. Then apply solder to wire, separately. Next touch the wire (with the pre-soldered area) and apply heat. It looks like you don't have enough heat applied. You shouldn't have to apply pressure. The solder needs to flow with just the heat. Good luck."
 
I appreciate your faith in me! There must be something indeed "wrong"... I have learnt in the past most times it is best to start with the "operator's fault" and after eliminating that narrow it down. I will say ..I think the tip is messed up on the iron. It has nearly melted into a new shape. I am not applying much if any pressure but the tip's two prongs that go into the gun seem to have softened to the point where they are all distorted. I will see if I can buy a new tip somewhere and try again. Man... it is embarrassing to look at the 'splashes' of solder rather than 'pools'... I hate looking at something I made I don't like! I shall give it a new try as soon as I find a new tip. Thanks for the encouragement.
 
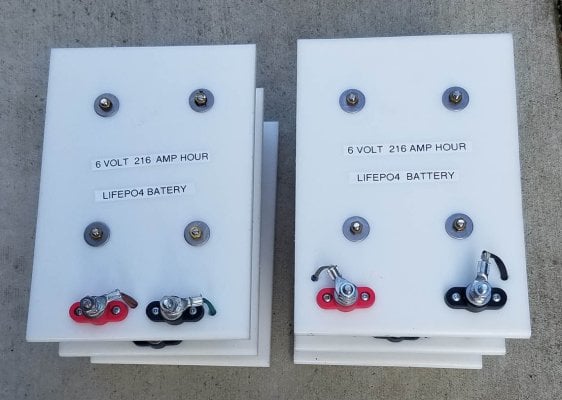
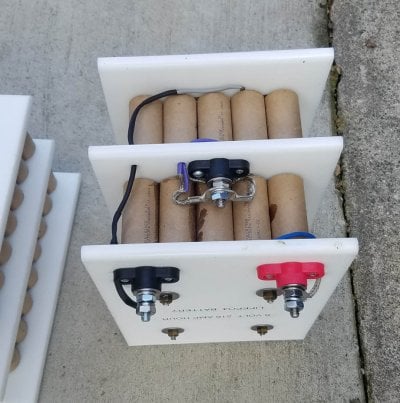
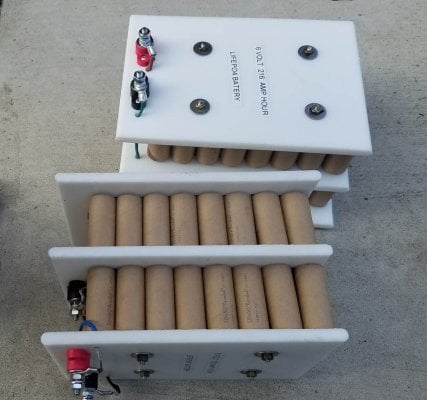
After Rando started this insanity, I figured I'd get off my duff and get a set of LIFEPO's built. It's been an on & off project for a while, but finally finished the batteries yesterday. While not pretty, they do the job. I decided to build them as 200AH rather than 100AH, so 40 cells per bank. They're a bit larger than planned, but will fit OK. Looking around how to mount the cells, I stumbled on some nice poly kitchen cutting boards. A trip through the table saw and they're done. Now to get them mounted in the camper.. Do the projects ever end??
 

Attachments

  • lifepo 1.jpg
    lifepo 1.jpg
    138.7 KB · Views: 59
  • lifepo 2.jpg
    lifepo 2.jpg
    151 KB · Views: 63
  • lifepo 3.jpg
    lifepo 3.jpg
    120.2 KB · Views: 55
Nice job!

Have you had a chance to capacity test these? After the discussion about cell aging and the like, I am curious what other folks are getting from their battery packs.

K6ON said:
After Rando started this insanity, I figured I'd get off my duff and get a set of LIFEPO's built. It's been an on & off project for a while, but finally finished the batteries yesterday. While not pretty, they do the job. I decided to build them as 200AH rather than 100AH, so 40 cells per bank. They're a bit larger than planned, but will fit OK. Looking around how to mount the cells, I stumbled on some nice poly kitchen cutting boards. A trip through the table saw and they're done. Now to get them mounted in the camper.. Do the projects ever end??
 
rando said:
Nice job!

Have you had a chance to capacity test these? After the discussion about cell aging and the like, I am curious what other folks are getting from their battery packs.
I've had three bad cells out of 180 tested. I have another unopened case I haven't tested yet.
 
Is the 216Ah label measured, or based on the spec for the individual cells? Mine measured to be about 90% of rated capacity (150Ah out of a nominal 165 Ah) without pushing them to their limits.
 
rando said:
Is the 216Ah label measured, or based on the spec for the individual cells? Mine measured to be about 90% of rated capacity (150Ah out of a nominal 165 Ah) without pushing them to their limits.
The label is based on the cell specs. I just finished them yesterday. Will do a full load test over this week, although quick testing yesterday they looked very good. I'm presently charging them to 14.6V and will test when done. Right now, only one tenth of a volt difference between packs.

My truck alternator puts out 15volts so plan on charging them to 14.4v and limiting charge current to 20 amps in the rig. Not sure what I'm going to do with the solar yet but thinking I can bump the controller output to over 14 volts with a couple component changes. Don't want to run a booster as they put out huge amounts of RF noise and render my HF radio useless. It took lots of filtering to quiet down the solar controller as it is.

Will keep you posted with test results.
 
K6ON said:
My truck alternator puts out 15volts so plan on charging them to 14.4v and limiting charge current to 20 amps in the rig.
How are you going to do that? Are you running a custom regulator in the truck, or putting a solar controller or something else in between?
 
[SIZE=14pt]The truck is a ’07 Dodge diesel with a heavy duty (250 amp) alternator which puts out 15 volts as it sits. I run high power HF radio from the truck so the heavy duty electrical system. To drop the 15 volts to 14.4 I’ll simply add a big diode before the BMS. Most diodes have a .6volt drop across them. The BMS I’m using is a cheap one from eBay rated at 100 amps. I bought a couple to play with, and with some modification they work great. At $8.00 each not a big loss if they didn’t work out. I do not plan on using it for the load function, although it would probably work OK. I’ll just be using it for charging and balancing. I had to change some components on the board to get a reasonable balance current, which is now 900ma instead of 36ma as they come from the factory. The MOSFET’s on the board are rated for 2.9 amps so switching 900ma just barley warms them up.[/SIZE]

[SIZE=14pt]I’ll be digging into the solar controller next week to see if I can increase the output from 13.8v to 15 volts. I’m quite sure that won’t be a big issue, worst case will be a couple component swaps, or as simple as an output voltage adjustment. With that output also set at 15 volts, I’ll diode isolate it dropping voltage to 14.4 and[/SIZE]
[SIZE=14pt]Connect to same BMS input as truck. In theory it should work OK….[/SIZE]
 
Another quick update - 7 months in. My camper has been sitting for the past couple of months (busy with work travel) but now I am getting ready for some spring road trips. My battery has been sitting in the camper on the solar charge for the past couple of months (13.4V absorb, 13.1V float, so not really charging, just not discharging). I did notice that the cells had drifted (slightly) out of balance. The first cell in the chain was about 50mV lower than the other three cells. I turned on my balancer, but as K6ON pointed out, its balance function is very slow, and it had to pull three cells down to meet the 4th cell. So I plugged in my TB6 balance charger, and in a few hours, all the cells were at the same voltage (13.3V). I just checked today, a week later, and they are all still within 10mV of each other.

What I think happened is that I left the balancer plugged in over the past months, and it seems that it may draw the power it needs to operate off just the 1st cell - leading to a slightly increased draw on that one cell, and pulling it down relative to the other cells. Moral of the story, if you are not planning on using it, unplug the battery balancer!

Otherwise all seems to be well with the batteries.
 
One other update - if you use a Victron solar charge controller with your batteries, you may be interested in this device:
https://www.victronenergy.com/accessories/smart-battery-sense

This gadget measures battery voltage and temperature, and when wirelessly paired with a victron solar controller, allows you to disable charging below a certain temperature, specifically for lithium batteries. Alternatively if you have a BMV-712, you should soon have a software update allowing it to pair with the controller and provide the same functionality without needing any new hardware.
 
rando said:
One other update - if you use a Victron solar charge controller with your batteries, you may be interested in this device:
https://www.victronenergy.com/accessories/smart-battery-sense

This gadget measures battery voltage and temperature, and when wirelessly paired with a victron solar controller, allows you to disable charging below a certain temperature, specifically for lithium batteries. Alternatively if you have a BMV-712, you should soon have a software update allowing it to pair with the controller and provide the same functionality without needing any new hardware.
Love Victron for pushing their capabilities all the time. Rando, will pairing with a controller also work with a BMV-702 + BT Dongle? Where are you reading/hearing about this stuff?
 
Well... lots of things have gotten in the way of this project but I have tried to sit down once a week over the last 3 months and try a different approach to soldering for an hour without success. The iron is hot, I lightly sand and then alcohol clean the tops, I apply a tad of rosin, then the wire over the top and apply heat and solder (rosin core). I have done this 10 times trying to vary each thing but the solder will not stick. I can pop it off with my fingernail.
Any suggestions appreciated.
 
buckland said:
Well... lots of things have gotten in the way of this project but I have tried to sit down once a week over the last 3 months and try a different approach to soldering for an hour without success. The iron is hot, I lightly sand and then alcohol clean the tops, I apply a tad of rosin, then the wire over the top and apply heat and solder (rosin core). I have done this 10 times trying to vary each thing but the solder will not stick. I can pop it off with my fingernail.
Any suggestions appreciated.
I am afraid I don't know what to advise - maybe use different solder? This process seemed to work for several other people as well as me, so there must be something subtly different about either your tools or technique.

You could go back to your idea of buying an inexpensive ebay spot welder, welding up the packs and then sell it again for close to what you paid for it. It maybe less frustrating at this point.
 
Back
Top Bottom