Mini Dinette for the Eagle

bobg,

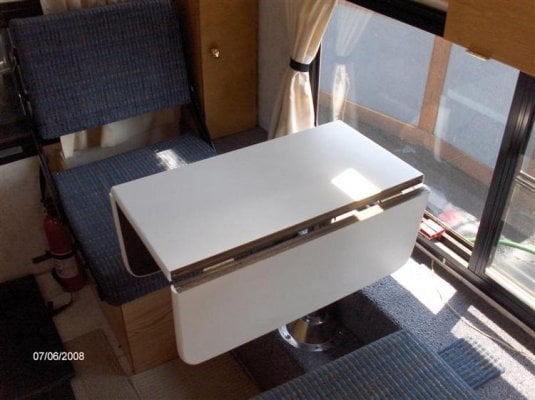
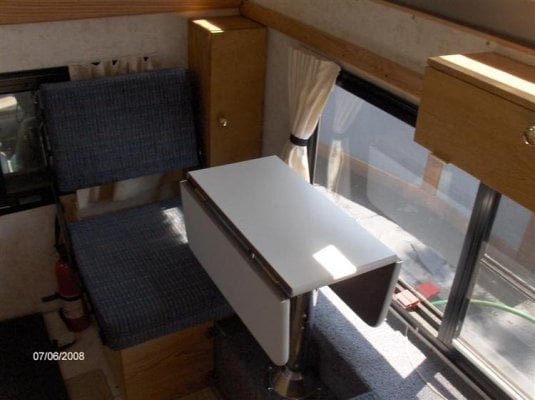
You're certainly welcome to the table design, no credit required. If I had it to do again I'd use a little better quality hardware. The drop leaf support hardware I used came from Woodworkers Supply for about $15.00 a pair and is adequate but has a bit of play at the hinge points. Also I used hinges I had on hand and they too have a little more play in them then I'd like. Keep us posted on your progress.
 
Added the Corner Cabinet

We finally decided a 7" deep cabinet was as deep as we could use without taking up too much elbow room. I'll be replacing the door down the road as the 1/2" birch I had left is too bent for a permanent door and the handle centered in the door is at perfect elbow height, ouch.

Also finished the edges of the drop leaf table, what a pain after the table is assembled. Anyone who decides to make one I highly recommend sanding and staining or painting the cut edges before hand.
 

Attachments

  • HPIM0633 (Medium).jpg
    HPIM0633 (Medium).jpg
    57.8 KB · Views: 1,064
  • HPIM0634 (Medium).jpg
    HPIM0634 (Medium).jpg
    61.8 KB · Views: 1,083
  • HPIM0636 (Medium).jpg
    HPIM0636 (Medium).jpg
    53.2 KB · Views: 1,061
  • HPIM0637 (Medium).jpg
    HPIM0637 (Medium).jpg
    45.1 KB · Views: 1,043
so clean so neat!

DLN i don"t get it how do you keep your camper looking so new!Every time you show a picture it looks like you just received a new camper,Any way great mod you will be ready for the cold winter days,it will get cold again or is global warming here to stay?
Drive slow and enjoy "its the journey"
Les,Lqhikers
 
Les,

The camper isn't that clean all the time, it gets a good cleaning every time I get in there and mess it up while working on it. We have tried to take good care of it along the way but if you were to look a little closer you'd see some damage and misc. funk from use. As to the cold of winter, after 30 years in snow country I wouldn't really mind a shorter winter season, say about 3 months for skiing and back to spring would be great. Warm days and no snow removal, dream on. Enjoy.
 
A few more interior additions

Here are some misc. pictures of interior changes/additions we've made along the way, they are generally minor and really don't justify a new thread.

We added 2" sticky velcro to the top of the rear lift panel for more hook and misc. hanging space. The paper towel holder worked out great on our last trip and we'll be making it a permanent addition to the camper.

A while back I notched out the outside edge of the lift panel to give the window vinyl more space to relax in the down position. As it was the panel was putting a serious wrinkle in the window and making it difficult to smooth out while closing it up.

We recently got to try out the drop leaf table and were very happy with the versatility it gave us while moving around the interior of the camper, now I'd hate to do without it.
 

Attachments

  • HPIM0640 (Medium).jpg
    HPIM0640 (Medium).jpg
    53.2 KB · Views: 953
  • HPIM0641 (Medium).jpg
    HPIM0641 (Medium).jpg
    44.7 KB · Views: 1,017
  • HPIM0642 (Medium).jpg
    HPIM0642 (Medium).jpg
    40.5 KB · Views: 926
Explain please

A while back I notched out the outside edge of the lift panel to give the window vinyl more space to relax in the down position. As it was the panel was putting a serious wrinkle in the window and making it difficult to smooth out while closing it up.


I don't understand the part about "notching out." Could you explain? Maybe a pix?
 
bobg,

Here's a picture showing the original shape of the top line of the lower rear lift panel. The problem with the Eagle and likely other shorter campers is that the window in too close to the rear and the edge of the lift panel extends into the window in the down position. It appears the the window section of the vinyl may be used on all campers regardless of the size but I can't say that for sure. I don't think the 8' campers would have the same issue.
 

Attachments

  • HPIM0641 (Medium).jpg
    HPIM0641 (Medium).jpg
    44.7 KB · Views: 795
More Details

Here a shots of a few additions or details of the Dinette Remodel.

1. I replaced the 1/2" birch plywood face of the rear seat with FWC photo vinyl I had shipped to me with the new table. While I like the birch on the doors I didn't like the contrast between it and the vinyl, it should be one or the other.

2. A shot of the table mount straps.

3. I added a safety strap to the table leg brackets under the lower cabinet.

4. Front two piece vertical opening turnbuckle access door. One piece wouldn't come out without removing the seat which unfortunately I didn't discover until the whole thing was put together. The battery has to be moved forward for to work on the turnbuckles.

5. Front vertical access door. That one worked right the first time though I did have to go back and sand the edges a bit to loosen both of them up.
 

Attachments

  • HPIM0666 (Medium).jpg
    HPIM0666 (Medium).jpg
    74.6 KB · Views: 775
  • HPIM0663 (Medium).jpg
    HPIM0663 (Medium).jpg
    69.4 KB · Views: 798
  • HPIM0665 (Medium).jpg
    HPIM0665 (Medium).jpg
    60.4 KB · Views: 837
  • HPIM0668 (Medium).jpg
    HPIM0668 (Medium).jpg
    61.4 KB · Views: 839
  • HPIM0667 (Medium).jpg
    HPIM0667 (Medium).jpg
    59.3 KB · Views: 818
Dinette

DLN,

Background: On our last trip, my wife and I sat at the dinette in my folk's 31' C class. Later, in our slightly smaller Panther, she proclaimed I would be installing a dinette in place of the settee, then went on to inquire if I'd finish anytime soon...

On to my questions:
  • How is the dinette working for you now?
  • What would you do different?
  • Any recommendations for future builders?
C class seating w/ "camper's hair":
3055252804_735b759e97_m.jpg


Thanks,
SB
 
Scott,

We've used the dinette on three trips now and absolutely love it. The convenience and versatility of the drop leaf table mounted out of the isle is working great for us. There's much more space for cooking and eating and generally moving around the camper than before. Not to mention playing cards etc, which did come up on our last trip. The added bonus was the openness created by removing the couch back and taking advantage of the window and ledge on that side of the camper.

With the space available in our Eagle I really couldn't do anything different. Now if I had an 8' long camper I would have added another seat back, a bit more seat width, and a larger table.

Before our last trip we did build an inside shower setup. The extra floor space between the dinette seating allowed us room to have a tub and curtain shower inside and still be able to move around the cabinet side to add hot water to the power shower while it was in use. I have some pictures of the shower that I'll post in the near future.
 
Great changes, I so enjoyed all the pics and am anxious to view the inside shower! Where did you get the birch plywood? I liked the idea of turning the access doors (to get to the turnbuckles) around so they slide up and down instead of sideways. Thanks for all the ideas! Terri
 
terri,
The birch plywood came from Home Depot at a reasonable price. I found I didn't like the birch on the lower seat boxes so I had Chicali at FWC service ship me 4- 2'x2' pieces of their photo vinyl plywood to match the existing boxes.
Shower pictures will be coming soon.
 
Inside Shower

Here are the pictures of the shower we were able to fit in the additional floor space created by the dinette set up.

1. We started with a hula hoop to hold up the curtain as was suggested by a couple of our members here but ended up changing to a heavy bungee and rope attached to the ceiling at the top lifting points. The bungee allows lets us leave the curtain attached for much tighter and faster storage.

2. Curtain attachment to bungee in entry/exit mode.

3. Tub and rubber floor mat.

4. & 5. Curtain in closed position
 

Attachments

  • HPIM0674 (Medium).jpg
    HPIM0674 (Medium).jpg
    49.5 KB · Views: 795
  • HPIM0675 (Medium).jpg
    HPIM0675 (Medium).jpg
    41.5 KB · Views: 840
  • HPIM0676 (Medium).jpg
    HPIM0676 (Medium).jpg
    41.9 KB · Views: 829
  • HPIM0677 (Medium).jpg
    HPIM0677 (Medium).jpg
    40.5 KB · Views: 828
  • HPIM0678 (Medium).jpg
    HPIM0678 (Medium).jpg
    51 KB · Views: 785
More of the Inside Shower

Here are the last of the shower shots.

1. Shower head hangs over the bungee during use.

2. Power shower bucket sits on the sink with room to heat additional water during the process.

3. Shower head and hose coil up inside the bucket for easy storage.

4. Power shower closed up for storage or transport.

5. The shower bucket, curtain and bungee, and floor mate pack into the tub for easy and clean storage.
 

Attachments

  • HPIM0680 (Medium).jpg
    HPIM0680 (Medium).jpg
    57 KB · Views: 692
  • HPIM0679 (Medium).jpg
    HPIM0679 (Medium).jpg
    43.9 KB · Views: 723
  • HPIM0683 (Medium).jpg
    HPIM0683 (Medium).jpg
    39.1 KB · Views: 708
  • HPIM0684 (Medium).jpg
    HPIM0684 (Medium).jpg
    32.5 KB · Views: 712
  • HPIM0685 (Medium).jpg
    HPIM0685 (Medium).jpg
    36.8 KB · Views: 680
Good mods!

DLN,

The more I look at your mini dinette mod, the more I like it.:thumb: 
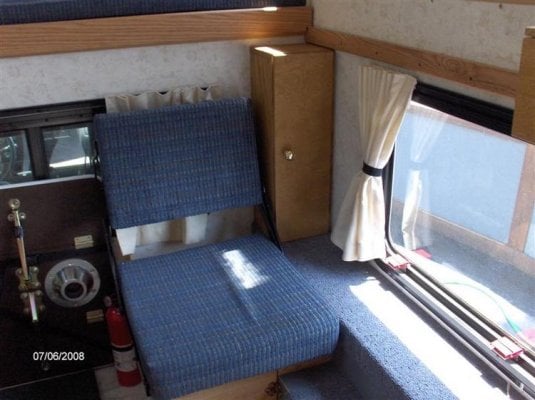
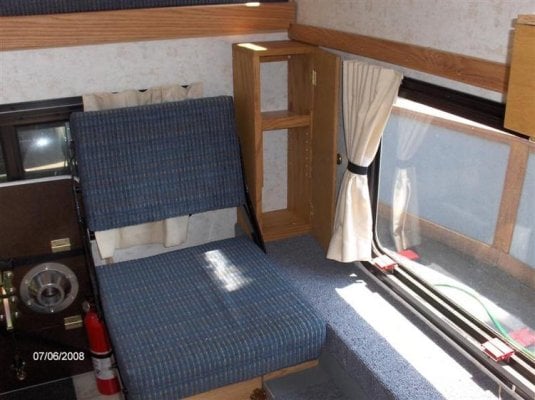
After spending 29 days in my Grandby on the recent "First trip west" I think that dinette would of been very nice to have. I sort of hate to chop up my '07 Grandby to do that, but I'm giving it serious thought. I wish that dinette would have been an option when I bought my Grandby. I also like the flip up lids on your upper storage cabinets. In fact, I already have the parts to change my "sliders" to flip up lids. I may have to talk to Chicali about doing this dinette mod.

I like bogd333's Grandby dinette mod too.
 
Power Shower

DLN,

Tell me about the "power shower" ..how well does it work, and where did you pick it up. Who makes it??

Thanks
Bob
 
buzz,

First I must thank you again for your great trip report, we really enjoyed it.

The overlay cabinet doors swing down to allow use of the upper with the camper top down and to have the lowers stay open while we're using them. We couldn't be happier with the dinette's look and especially the function. I also liked bobg's mod too. I cut into a new 2006 Eagle to do ours so if it's what you want it's well worth the cost/effort.
 
Deltarat,

The power shower is made by a small company named "Paha Que" that specializes in tents and enclosure for camping etc. I recently looked for it on their web site and they may not be producing it anymore. It consists of a 5 gallon bucket with a resealable lid, an immersible 12v pump under the inner lid that provides a pressure stream to the shower head, and a rechargeable battery. The pump puts out enough pressure to give you a good raise while showing, much better that just the gravity flow from typical sun showers. The shower head has a push button controller to activate the stream and the pump has an on/off switch at the bucket lid. The whole set up can be used like a sun shower or as we do just add a couple coffee pots of water for a great warm shower. The battery did quit after about a years so we are running it off the camper 12v system.
 

New posts - WTW

Back
Top Bottom