River_Rat
Advanced Member
When we ordered our second Hawk from FWC we knew what we wanted from our previous camper, and we decided to save a little money on the awning. Instead of paying over $1K from the company for the really nice Fiamma, we decided to go with the cheaper ARB 2500mm awning after our purchase.
We looked around the WTW forums and interwebs for quite some time looking for someone who mounted an ARB 2500 bag awning to the side of their FWC, and came up with only one option that I wasn't found of. There are several posts of folks who used brackets and such, but none from folks who bolted through their campers for a direct/flush mount. Here is one other option for mounting: https://performancegearresearch.wordpress.com/2015/09/09/install-how-to-arb-awning-on-a-four-wheel-camper/
Since we spent the time to do our mounting we documented the progress and post here in case anybody is thinking about doing it this way on their own to save some money. I would call this a moderate skill-level project only because of a few specialty tools needed, and of course I needed help from our son, who happened to be home from college for Christmas break. Here are the steps:
Step1) It helps when you order to make sure to tell the dealer that you are requesting the camper to be "Awning ready". This assures that they move the front latch forward so you can mount an 8' (2500mm) awning without having to relocate it yourself (leaving holes to fill)
Step2) Purchase the awning of your choice. There are several brands out there with equal quality, and many reviews are out on the internet. We chose the ARB brand because of the price and quality from multiple positive reviews. We purchased ours in September of 2018 from 4 Wheel Parts here in Sparks, NV. Total cost=$280 on a open house sale they were having. They have many stores nationwide to choose from, or you can get a similar deal on the internet (I found them to be very close and chose brick-n-mortar to support this business here locally)
Step3) Ditch the supplied bolts... Head down to Fastenall and pick up 6-ea M6 x 50mm stainless bolts (p/n 11545604), matching nylock nuts, and matching fender washers. Total cost=$18.95 retail. Although not square heads like the provided bolts, they will fit just fine inside the aluminum extrusion channel that comes on the ARB awning. The heads are similar dimensions.
Step4) Measure twice, cut once... As you can see from the pictures I drilled my holes so that the bolts fit up inside the metal extrusion about 6 to 8 inches to allow some adjustments prior to final fitting of the awning. For the center 2 holes I just measured one half way between the front and back holes. I started one inch down from the top trim of the FWC, and the holes are 1 7/8" apart. I recommend using a small center punch to dimple the metal skin of your camper so the drill bit won't walk on you. The area I chose was hollow at the top hole, and there was some insulation or other material on the bottom hole that I had to drill through. Luckily I found no wires with my drill bit in the areas the bolts would go through.
Rear, top hole marked by small yellow dot, lower hole exactly 1 7/8 below that one:

Measurements from top trim. Notice 1" down from top trim, and 1 7/8" between holes:

Final rear holes drilled:

View of rear holes from the inside:

Front, top hole marked with small yellow dot:

View of front holes from the inside:

Step5) Dry fit the awning to the side of the camper with care given to the sharp edges so as to not scratch the siding paint on your nice FWC. Once the awning is dry fitted you will notice the factory trim piece that needs dealt with (pic below).

We chose to use a pneumatic die grinder tool to cut away the aluminum material from the extrusion piece of the awning. Mark it with a paint pen during the dry fit, and begin to cut the material away with the die grinder:

After cutting the material away:

Another side view of the material we removed to clear the factory trim:


Step6) Dry fit the awning again to assure the trim will fit in the channel you created. Use care to not scratch the camper paint as there are some sharp edges on the extrusion piece of the awning.
Step7) Caulk inside of the hole you just cut, also run a couple of rows of caulking on the back face of the awning extrusion piece so it will seal and adhere to the side of your camper better.
Step8) Carefully fit the awning to the side of the camper by sliding the 6 bolts through the holes and assure the trim fits in the area you cut out. If things need adjusting, this is the step where you will move the awning fore or aft to assure it's in the exact place you want it to be. (warning: This step can get messy if you're not careful!)
Step9) Have your helper hold the awning while you attach the fender washers and nuts to the inside of the camper.
Step10) Use a hack-saw or die grinder to trim off any excess bolt after snugging down the awning. Don't forget to use a small file to catch any sharp edges from the cut you just made. You don't want your bed cushion, sleeping bag, bedding, etc to snag on any sharp edges.
Step11) Clean up any excess caulking that may have squished out when torquing down the bolts (don't over-tighten them, make them only snug so that there is no gap between the awning and camper. Some caulking should squish out). Vacuum up the millings from your drill bit.
Step12) I recommend running a bead of clear silicone on the top of your newly mounted awning to seal the gap. Also, I used some 303 on the awning bag at this point - "it's like SPF30 for your stuff."
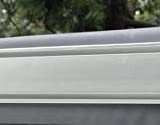
Here are a few pictures of the final product:


Overall, I'm very happy with the install. The only negative is that you have some bolt heads (much like the rear wall steps) showing on the inside of your camper. I know the awning isn't going anywhere while driving down the road, or when the wind blows. You will still have to use care when camping NOT to leave the awning deployed if you go on a walk-a-bout. I've seen folks leave them deployed on their RV's only to return from a walk and have the awning gone like a kite (torn off the side of their RV)
I hope this helps someone who is considering doing the same thing. Please let me know if I forgot something or if you need any more pictures of the install or camper.
Peace...
We looked around the WTW forums and interwebs for quite some time looking for someone who mounted an ARB 2500 bag awning to the side of their FWC, and came up with only one option that I wasn't found of. There are several posts of folks who used brackets and such, but none from folks who bolted through their campers for a direct/flush mount. Here is one other option for mounting: https://performancegearresearch.wordpress.com/2015/09/09/install-how-to-arb-awning-on-a-four-wheel-camper/
Since we spent the time to do our mounting we documented the progress and post here in case anybody is thinking about doing it this way on their own to save some money. I would call this a moderate skill-level project only because of a few specialty tools needed, and of course I needed help from our son, who happened to be home from college for Christmas break. Here are the steps:
Step1) It helps when you order to make sure to tell the dealer that you are requesting the camper to be "Awning ready". This assures that they move the front latch forward so you can mount an 8' (2500mm) awning without having to relocate it yourself (leaving holes to fill)
Step2) Purchase the awning of your choice. There are several brands out there with equal quality, and many reviews are out on the internet. We chose the ARB brand because of the price and quality from multiple positive reviews. We purchased ours in September of 2018 from 4 Wheel Parts here in Sparks, NV. Total cost=$280 on a open house sale they were having. They have many stores nationwide to choose from, or you can get a similar deal on the internet (I found them to be very close and chose brick-n-mortar to support this business here locally)
Step3) Ditch the supplied bolts... Head down to Fastenall and pick up 6-ea M6 x 50mm stainless bolts (p/n 11545604), matching nylock nuts, and matching fender washers. Total cost=$18.95 retail. Although not square heads like the provided bolts, they will fit just fine inside the aluminum extrusion channel that comes on the ARB awning. The heads are similar dimensions.
Step4) Measure twice, cut once... As you can see from the pictures I drilled my holes so that the bolts fit up inside the metal extrusion about 6 to 8 inches to allow some adjustments prior to final fitting of the awning. For the center 2 holes I just measured one half way between the front and back holes. I started one inch down from the top trim of the FWC, and the holes are 1 7/8" apart. I recommend using a small center punch to dimple the metal skin of your camper so the drill bit won't walk on you. The area I chose was hollow at the top hole, and there was some insulation or other material on the bottom hole that I had to drill through. Luckily I found no wires with my drill bit in the areas the bolts would go through.
Rear, top hole marked by small yellow dot, lower hole exactly 1 7/8 below that one:
Measurements from top trim. Notice 1" down from top trim, and 1 7/8" between holes:
Final rear holes drilled:
View of rear holes from the inside:
Front, top hole marked with small yellow dot:
View of front holes from the inside:
Step5) Dry fit the awning to the side of the camper with care given to the sharp edges so as to not scratch the siding paint on your nice FWC. Once the awning is dry fitted you will notice the factory trim piece that needs dealt with (pic below).
We chose to use a pneumatic die grinder tool to cut away the aluminum material from the extrusion piece of the awning. Mark it with a paint pen during the dry fit, and begin to cut the material away with the die grinder:
After cutting the material away:
Another side view of the material we removed to clear the factory trim:
Step6) Dry fit the awning again to assure the trim will fit in the channel you created. Use care to not scratch the camper paint as there are some sharp edges on the extrusion piece of the awning.
Step7) Caulk inside of the hole you just cut, also run a couple of rows of caulking on the back face of the awning extrusion piece so it will seal and adhere to the side of your camper better.
Step8) Carefully fit the awning to the side of the camper by sliding the 6 bolts through the holes and assure the trim fits in the area you cut out. If things need adjusting, this is the step where you will move the awning fore or aft to assure it's in the exact place you want it to be. (warning: This step can get messy if you're not careful!)
Step9) Have your helper hold the awning while you attach the fender washers and nuts to the inside of the camper.
Step10) Use a hack-saw or die grinder to trim off any excess bolt after snugging down the awning. Don't forget to use a small file to catch any sharp edges from the cut you just made. You don't want your bed cushion, sleeping bag, bedding, etc to snag on any sharp edges.
Step11) Clean up any excess caulking that may have squished out when torquing down the bolts (don't over-tighten them, make them only snug so that there is no gap between the awning and camper. Some caulking should squish out). Vacuum up the millings from your drill bit.
Step12) I recommend running a bead of clear silicone on the top of your newly mounted awning to seal the gap. Also, I used some 303 on the awning bag at this point - "it's like SPF30 for your stuff."
Here are a few pictures of the final product:
Overall, I'm very happy with the install. The only negative is that you have some bolt heads (much like the rear wall steps) showing on the inside of your camper. I know the awning isn't going anywhere while driving down the road, or when the wind blows. You will still have to use care when camping NOT to leave the awning deployed if you go on a walk-a-bout. I've seen folks leave them deployed on their RV's only to return from a walk and have the awning gone like a kite (torn off the side of their RV)
I hope this helps someone who is considering doing the same thing. Please let me know if I forgot something or if you need any more pictures of the install or camper.
Peace...