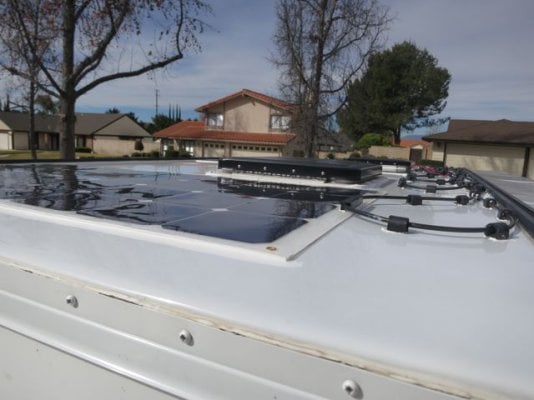
My Solar Project

It came from FWC with a fuse on both the positive and negative. Not sure why. Like I said, I did not know it was there until it blew. FWC may have a reason for doing it. I never thought or worried about asking. I have 15 amp fuses on both lines now to handle the upgrade to the 130 watt panel.

Steve
 
The wiring diagram I posted on p 6 needs to be updated, which I will do in a few days. What's there is correct, but there are two wires missing.

In my 2012 configuration with two batteries there was a solar panel wire (with fuse) and battery separator wire going to the negative terminal on one of the batteries. Both of these go to the G1/G2 side of the shunt - to the big bolt. So those are two additional wires I will add to the diagram when I get a chance.

Thanks to Jim (RC Pilot Jim) for taking my "call a friend" today and helping me through this. DrJ was also on stand by in case I needed Level 1 support - it was close, I almost purposefully laid my wrench between the positive and negative battery terminals to put myself out of my misery.

Trimetric is now working. Once I see it, it is not that complicated. I think I could walk someone through it now, and hopefully my updated diagram helps others.

Tomorrow I need to splice in a new fuse that Terry says needs to be added between the battery separator and the controller (I'll post a picture of this). Then wire-up and glue down the panels. All in time for an 8 day trip to Death Valley starting Thursday night.
 
Don...now I need a clarification.

In your last paragraph you report - Terry said, ..." there needs to be a fuse on the positive cable from the Sure-Power battery separator and the controller".

Which controller? ...The IOTA?....OR?
 
The usual reasons for a fuse in the negative wire/cable are lightning protection (as if) and reverse polarity protection. Be interesting to see if FWC has other reasons.
 
A fuse in the negative side would blow from a lightning strike, but I doubt that it would be much help.

[hijack]Not a Meyers Manx, far from it but still a fiberglass dune buggy. Better pic, middle of Odessa Cyn, Calico Mtns:
img_111264_0_efc18884f8c823bfe97604df9336f6eb.jpg


[/hijack]
 
Very nice Thom..We were thinking of a "buggy" except with my wife's knees and my lower back the Samurai was easier to get in and out of....Getting old sucks. You young folks stay young as long as you can.

Ok you'all....I'm going back on topic.
 
I was one connector short which I got in the mail today, just in time for my 8 days in Death Valley, leaving in a few hours. I'll do a write up when I return but here's a few pictures. Even on a winter hazy day, with fridge on max and all lights on, I have positive amps from the 300W. With this I should end each day with a full battery.

IMG_1513.jpg

IMG_1514.jpg
 

Attachments

  • IMG_1515.jpg
    IMG_1515.jpg
    48.2 KB · Views: 319
Wow Don!
Love your solar panel setup. Looks way cleaner than my mess with 3 panels. I think we had this whole consultation thing backwards! I should have been consulting you.
 
Good job Don.....especially the " bricks"....Yours are much more "robust" than the ones I used.
Your probably producing 9 amps (3 each) in January.
 
Just got back from 7 days in Death Valley. The results - wow! I was at 13.7v at 2 pm after 7 days. Very different from my 3 days of slow death to a non-working fridge on all previous trips.

Each morning at around 7 am I was never below 12.5v and sometimes at 12.6v or 12.7v depending on how cool it was and how much the fridge worked during the night.

By 10 am I was usually around 12.9v, and by mid day would often see 13.1v or 13.2v.

For the first time I did not set my fridge at max, but had it around 5.5, and temperatures held consistent at 34 - 36.

Mid day I would commonly see +5 to 7 amps on the Trimetric. I did a "test" and tilted the roof toward the sun by just raising the back and saw +9.2 amps. Not bad for mid winter low angle sun in the desert.

I had ice cream, never had to throw food out, used my furnace, charged my computer and camera batteries, and used my lights! The bigger test will be this summer when the fridge is working harder. But after 3 years, Feb of 2012 build/purchase, I think I finally have the camper I was looking for.

Over the last several years several electrical problems were found, a second frig vent was added, and I recently got new batteries - thanks to FWC for all of this. But bottom line, it would seem my primary issue over the years was that I was simply under powered. Something that I never considered (because I did not know enough), something that was never suggested to me, and I learned it from all of you on this forum last month, and then went to work to correct it.

Thanks! I will detail the parts and process of my install over the weekend in case others are interested.
 
That is fantastic Don. Very good results. Sounds like you can turn the fridge down to "4" or "4.5" on the dial to maintain a temp of 38-39*. Congratulations. Glad it is working for you.
 
Don,
You've got it running great.
Don't worry too much about the summers. You will find that the extra sunlight hours and angle make up the difference in power needs.
Once the solar and compressor system works, you never want to go back.
I'm amazed at how little propane I now use with needing it just for the heater and cooking.
The 3 way fridge takes more propane than people think.
 
Here is a summary of the parts and install process I used – a few pictures are upthread. If you piece the info together from other threads there probably isn’t anything new here, but maybe it puts much of it into one location. For many this is probably no big deal and you have already done a solar install and it was so obvious and simple. But this was a big deal for me and I had no knowledge of the technology, parts, or process before I started, so this is for all the noobs like me out there, hopefully this helps someone.

I was originally thinking of fabricating aluminum platforms for the bendable solar panels and attaching those to my Yakima tracks. But I didn’t realize how heavy the aluminum platforms would be, and Renogy confirmed that air circulation is not really needed under the panels - they said many of their customers glue them down. I’m really glad I went this route because it resulted in a very light, simple and clean install, and much more aerodynamic than if they were on raised panels.

My starting point
2012 Fleet with FWC installed 85W (?) panel (22 lbs) and Morningstar Sunsaver 6 solar controller. So all the in camper solar wiring was already done by FWC. I just needed to upgrade my controller to match the panels.

Here are the parts/supplies I used to install three 100W Renogy bendable panels wired in parallel

  • Three Renogy 100W panels (4 lbs each)
  • Two packages of MC4 connectors. One package is all you need as long as you don’t make any mistakes, which I did and needed to order another package
  • Four Renogy branch connectors (2 packages)
  • Renogy 9” adaptors
  • 20’ of Renogy 12 gauge cable
  • Three tubes of 3M Marine 4000UV adhesive to glue panels
  • SAE plug – received at no cost from FWC!
  • A few packs of large and small D Wings from Home Depot to hold solar wire off camper roof. Thanks to Sledawg for this suggestion.
  • Bricks from Home Depot (returned after install…)
  • I also had to upgrade my Morningstar Sunsaver 6 to a Sunsaver 20L to handle the increased load. This had the same footprint as the Sunsaver6 so nothing special was required to install.
  • In-line 25 amp blade fuse
  • Two 25 amp blade fuses

Installation on the roof - Although it took many hours of reading to figure this out, the install is actually quite simple:
  • Remove the original panel and fill the six holes with silicone
  • Wash the entire roof with soap and water
  • Clean the areas where the panels and wiring will be glued down with Acetone
  • Lay the panels in place and figure out the simplest pattern for all the wiring following really helpful Renogy videos for how to wire in parallel
  • Fine-tune the location of panels as needed so wiring plan works and wires don’t come out of the panels at tight angles – then put tape at the corner of each panel to aid in re-location when you glue them down
  • Apply glue to each panel– following Jim’s advice, I used about ½” bead, ½ inch from the edge around the perimeter , plus some in the middle.
  • Carefully lay the panel in place based on your tape markings. This is the only step that you need a second person to help. I used a towel to press the edges down and in the middle of the panel where there was also adhesive (plastic covering still on face of panels)
  • Lay the foam inserts that came with the panels on top of the panel and then put bricks on top of the foam. The bricks I used weighed 100 lbs per panel. Terry told me that the roof will hold 1000 lbs, so the 300 lbs total for 24 hours was not a problem.
  • Wire everything up as neatly as possible with the D wings and zip ties to keep the wiring from touching the roof.
  • Caulk around edge of each panel. Probably not needed, but it is a nice finishing touch.

Installation inside the camper - I’m sure this is different for every camper, depending on what you are starting with
  • Install Morningstar Sunsaver 20L – this was an easy swap-out since it was the same footprint as the Sunsaver 6.
  • For my install Terry told me I needed to add a new in-line fuse…(I'll get a picture of this over the weekend)
  • Upgrade the two battery cable fuses from 10 amps to 25 amps

Plug it in!
  • Remove the bricks, foam and clear plastic from each panel
  • Clear a perimeter of 100’ around your truck (haha)… close your eyes, and plug it in! It’s pretty anti climatic because nothing happens, it just starts quietly working. Amazing, 300W of solar machine.

The entire install process took about 4 hours with the help of my son, Paul.

Bottom line, given that you need to buy all the odds and ends whether you install 200W or 300W, it seems worth it to just go to 300W if you have a compressor fridge. This gives you a buffer for those winter days with low sun angle, or stormy summer days where you need to get as much solar input as quickly as possible when the sun does come out.

Thanks to RC Pilot Jim, DrJ, and others for threads about their installs. I had several emails and calls with Renogy and Morningstar – both very responsive companies providing personal support. A special thanks to Brenda at FWC – there was a week or two where I’m sure she was afraid to open her email knowing that there was probably another question from me – she is a saint! Terry helped with my last question about a new in-line fuse that needed to be added.
 
just got back from 5 mainly cloudy days in Moab/Arches but still arrived home with 100% charge and 13.0 v. Absolutely amazing after several years of not surviving sunny 3 day weekends. I'm glad I added the 3rd 100w panel, "just in case" to get little more power on those cloudy days. Only adds about $200 and a few more minutes to the overall job and gives a nice safety margin.

I guess I can finally stop looking at the Trimetric at every stop.
 
DonC said:
just got back from 5 mainly cloudy days in Moab/Arches but still arrived home with 100% charge and 13.0 v. Absolutely amazing after several years of not surviving sunny 3 day weekends. I'm glad I added the 3rd 100w panel, "just in case" to get little more power on those cloudy days. Only adds about $200 and a few more minutes to the overall job and gives a nice safety margin.

I guess I can finally stop looking at the Trimetric at every stop.
Very nice! Thanks again for posting and for emailing me the drawing you did earlier. I'm thinking that 3 of the renology panels, an mppt controller and a couple AGMs I should be set for 12v and not have to worry about power much when I'm out.
 
Back
Top Bottom