New batwing awning

cvant said:
Thanks! This was taken at the little pupfish pond near the campgrounds at Anza Borrego State Park. It's a Leaf-nosed Bat.
A few years back I had an opportunity to observe Michael Durham, an Oregon based photographer, photograph several species at a small water source in Central Oregon. He used a number of proximity sensors to trigger the camera and flashes, tethered to a MacBook. There was an audience of youngsters from the Sunriver area that were in awe (as was I) of nature at night.

Here's a link to one of his galleries... http://durmphoto.photoshelter.com/gallery/Most-Elusive-The-Spotted-Bat/G00006zdyaPf_DsA/

You two should meet...
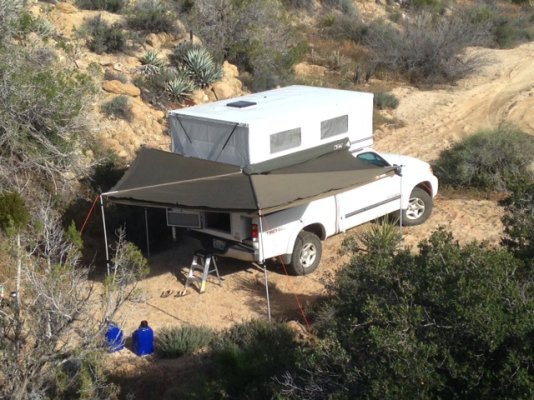
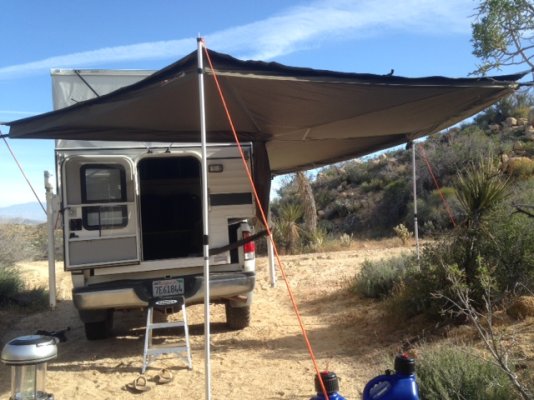
 
Pretty neat. I do something similar, but no computer. Thanks for showing me his work.
 
Actually, I was a little surprised at how big it is. It provides a lot of shade. I don't know if I would keep it up if there were high winds in the forecast though. Just not sure yet. I'll take some photos of it set up next time I have it out.
 
We just got back from 3 months in Baja where we had our Batwing Awning deployed almost the whole time while camped. We use long metal stakes to stake it down with nylon cords and "S" hooks. The manufacture tells you to fold it up if there is any wind, but we found it was not problem when properly staked down. The only times we folded it up were when very high winds were forcast.

We also used 4' x 8' nylon tarps hooked on to the ends of the Batwing rafters to control any undercutting of sunlight. The tarps have loops sewn on at 2' spacing and it turned out that it is exactly 6' between the ends of the rafters. The design of the Batwing has a metal rivet on the end of the rafter which worked out perfectly to hook the tarps to. I would let the tarps flap in the breeze, or stake down 1 corner loosely with a cord so it didn't flap too high. I could move the easily as necessary as the sun moved. The "S" hooks are left over from all those rotten rubber bungees I have used on previous trips.

We got lots of comments about out Batwing. Did I mention that it doesn't have plastic parts (hinges) to break like my Fiamma F45.
 
^^ I absolutely love the bat photo shot, and smile at the irony of the thread about a batwing awning. Terrible would describe my skills with a camera, the photography I see throughout this forum have few rivals, imho, thanks for that.
 
I did a quick trip out to Blair Valley last night. Here are a couple of shots with the awning set up.
 

Attachments

  • IMG_1688.JPG
    IMG_1688.JPG
    292.3 KB · Views: 880
  • IMG_1687.JPG
    IMG_1687.JPG
    140.6 KB · Views: 879
Geez, tough crowd.......Yeah, I know. I didn't really need any shade as the sun was going down. I just set it up to take the photos.
 
cvant, I just bought a Batwing and am replicating much of what you did here. I too don’t want to add holes to the camper. Have you made any changes to the design? Also wondering what you came up with for the tightening system at the end. They send what looks like a plastic boat cleat that you would hook to and pull the whole system taught at the end. I’m hesitant to use it and not sure where to mount it anyway. Did you come up with anything for the pop up latch? I’ll try and post pics of what I come up with as mine is being fabbed in steel. Thanks in advance, I know it’s been a while since the last post but there ain’t much out there in terms of a fabbed setup for a 270° awning on our rigs.
 
Hope these pics will help people out.
 

Attachments

  • IMG_0954.jpg
    IMG_0954.jpg
    196.8 KB · Views: 615
  • IMG_0955.jpg
    IMG_0955.jpg
    204.9 KB · Views: 616
This system is bolted to the support legs. No holes were drilled into the camper.
 
Nice! I haven’t changed my design as it seems to work okay. I only use it in the heat of the summer, so at the moment it is off of the camper and packed away. I do find that it is not a good thing to use when it is very windy, and the desert here can be very windy. I used the longer 1” square rod to get the awning height as high as possible. I still use the stock tie downs, and make sure to use them all in case of wind.
 
JEMiller said:
cvant, I just bought a Batwing and am replicating much of what you did here. I too don’t want to add holes to the camper. Have you made any changes to the design? Also wondering what you came up with for the tightening system at the end. They send what looks like a plastic boat cleat that you would hook to and pull the whole system taught at the end. I’m hesitant to use it and not sure where to mount it anyway. Did you come up with anything for the pop up latch? I’ll try and post pics of what I come up with as mine is being fabbed in steel. Thanks in advance, I know it’s been a while since the last post but there ain’t much out there in terms of a fabbed setup for a 270° awning on our rigs.
JEMiller,
Here are some pics of my install, different awning and camper but might give you ideas. I used 1x2 aluminum for the uprights to clear the roof so that it could be placed higher to clear the camper door. The rear is solid aluminum bar and the front upright is tube. Then, 1x aluminum angle for the awning attachment pieces at the top of the bars.

i-7HJN87r-M.jpg


i-qRhQbx6-L.jpg


i-NT6qZ5d-L.jpg


i-vb7qVQ3-L.jpg


20180930_171229-XL.jpg


20180803_163554-L.jpg
 
Looks good! For a second I was wondering why there were a bunch of pigeons sitting your roof though.
 
Aussiedor, nice work... is it still solid after use? Any updates/changes? Most importantly where did you source your mount materials?
If I could do the same I would be able to eliminate the install price. Thanks for your photos = 1000 words.
 

New posts - WTW

Back
Top Bottom