Newbie with 1981 c o

Yogabill

New Member
Joined
Jul 22, 2016
Messages
5
Greetings to all,
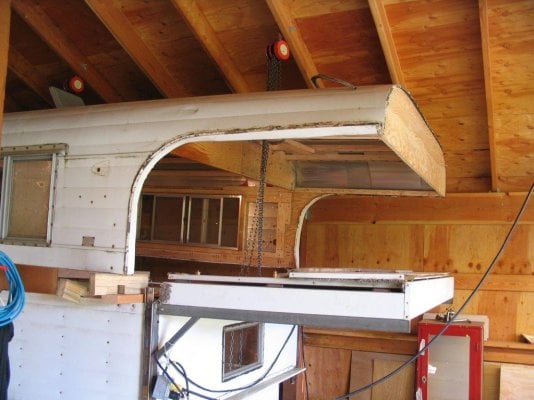
Before I begin the rebuild this winter I would like to use it some. It raises and lowers fairly well. When down the doors open and close. When up the doors become misaligned. I am thinking that the pistons may be set at different heights. Is this possible and if so how can they be adjusted?

Is there a step by step posting on the process of separating the upper from the lower boxes?

Is there a guide to rebuilding the pistons?

Electrically speaking, I was trying to get the 3 way fridge working but kept popping my house circuit. There is a post on grounding the camper to the truck but am unclear as to the process. Any advice?

Thanks for any advice
Yogabill

2001 Dodge Ram 2500
1981 cab over
 
Welcome Yogabill....

There will always be a little Splay on the top...the end guides will keep it fairly straight.....the question is always..."does the door close and latch"...check the angle iron at the base of the lower door...if it's fractured you may have a little welding project. Years of bending have broken many of them.

There are instructions on the sticky portion at the top of the board for replacing the o-rings in the hydraulic cylinders...easy....first thing is to cut a broom stick 22 5/8" long and mark it "brace"...it stays in the camper...it's for propping up the corners when you do the o-rings one at a time.

separating the top from the bottom is a chore...winter inside work....this is the one and only place where I've found the cable jacks come in handy...there is no set rule or procedure....4 guys can do it...two cable jacks can do it....disconnect the tubes....your 81 probably has the front guides on the face of the lower section and bolted on a welded plate through at the CO curve...bad design and it's been changed...the carriage bolts which go through the curved frame section and are a major source of water intrusion....there are a number of guys here who have done the CO removal...not as easy as a NCO but doable...I think Ripper and Archie both have good sets of pictures for the procedure...I'm sure they'll chime in....this is when I wish Wes (Caseboy) was still in his Alaskan......another CO rebuild from a few years ago...I'll see if I can find the pictures...Ripper has a rebuild thread going on Expedition portal....I'll locate that link for you

the refer can be a problem....tracking down circuits in the camper are fairly easy and there are diagrams for the electrical on the sticky section....but not the refer itself...something to keep in mind.....The 12v side of the 3 way is for transport only and needs a constantly charged battery....and needs to be turned off when you stop if you're using the truck battery for the transport....it will literally drain that battery while you're filling up your tank with fuel.

best of luck....and again..Welcome

a couple links to help

http://www.wanderthewest.com/forum/topic/12846-1971-alaskan-8-co-rebuild/

http://www.wanderthewest.com/forum/topic/11111-84-8-caobover-complete-rebuild/

http://www.expeditionportal.com/forum/threads/147114-Alaskan-Camper-84-14-Build-Thread
 
Yogabill- welcome aboard.
When I separated my top section, I already had the big windows out. I had vertical 2x4s on all four corners. The 2x4 went from floor to ceiling and were secured to the ceiling so the roof section wouldn't flop around. I screwed blocks of 2x4 inside the window cutout to the vertical 2x4 and lowered the roof onto the blocks. There are some pics on my build thread on expo portal that Rusty linked. It worked really well except I wacked my head about everyday that the lower section was not under the top
Good luck and post pics!
 
Thanks. I am looking forward to getting down to the bones. Just from a visual there is a patch of rot near the door on the floor and some rough patches around the ceiling vents. There was a family of mummified rats that collected insulation from somewhere. The furnace was taken out as I found a mummy in the vent hose and probably will not put it back in. In fact I am pretty sure we will not have a furnace or heat source in there.

The angle bracket under the door is cracked. It looks like it is aluminum. Could this be? The plan is to build a new floor as I saw in someones pics with P T 2x's to raise it some so the doors on the truck clear the cab over a bit more plus giving the truck bed rails a bit more clearance.

I will post pics when I begin in October. For now it is gathering wisdom and insights from all here. Be well
 
The angle iron under the door should not be aluminum....it's angle iron...and about a 2x2 heavy angle with a cutout for the threshold....it's bolted to the bottom of the lower frame with carriage bolts. if someone replaced the iron with aluminum...that may esplain the swoopy doopy in the lower door...
 
I would not use pressure treated lumber. The chemical in the wood will eat up any fastener you use. In the roofing industry, it has been removed from specs, due to corroding of the metal deck, sheet metal, and fasteners, contributing to major wind blow offs and roof failure. Use nominal and paint it on all sides before installing. My 2 cents worth. jd


Sent from my SM-G900V using Wander The West mobile app
 
longhorn1 said:
I would not use pressure treated lumber. The chemical in the wood will eat up any fastener you use. In the roofing industry, it has been removed from specs, due to corroding of the metal deck, sheet metal, and fasteners, contributing to major wind blow offs and roof failure. Use nominal and paint it on all sides before installing. My 2 cents worth. jd
Good advice......I've seen it bleed chemicals through lumber adjacent to it...and through things like drywall in a heartbeat...not nice stuff

redwood or cedar.....

depending on the truck you have....you may have to raise it 4" to clear the cab and the bedrails
 
Fantastic! Great attitude. Have you done anything else to it? I noticed you did not insulate. Any reasoning to that? Are you planning on hooking up 110v?
 
Hi Folks, On ours I took a little different approach. I had to separate them to do what ended up being a mostly rebuilt top inside the sheet metal. I could not support the bottom of the top on jacks of any kind as there was no material there just mushy, rotten wood. Any attempt to lift there would have just crushed the sheet metal as it as just a hollow metal box at that point. I ran chain hoists down through the roof vents, spanned the vent with a 2x4 underneath and lifted up using the rafters in the barn. Really nice in that you can take it up down as you need to, fine adjustment the with the chain fall and so forth. I took it up and down many times that way as I checked for square, made mistakes I had to undo-stuff like that. It was left floating that way for months at a time I can see doing the same thing by running 2x stock through the window holes too if they were empty. In these pics you can sort of see the idea. Not perfect by any means but it worked for me.
 

Attachments

  • IMG_7522.jpg
    IMG_7522.jpg
    63.1 KB · Views: 80
  • IMG_7535.jpg
    IMG_7535.jpg
    67.1 KB · Views: 77
  • IMG_7536.jpg
    IMG_7536.jpg
    53.2 KB · Views: 88
Better pics of what one might charitably refer to as the "technique". Crude but effective.
 

Attachments

  • IMG_0967.jpg
    IMG_0967.jpg
    114.1 KB · Views: 92
  • IMG_0974.jpg
    IMG_0974.jpg
    110.5 KB · Views: 89
Yogabill, you mean you are tripping a 12v breaker with the fridge? Or are you talking about when feeding it 110V from an external source? If on 12v I can tell you the brand new Dometic 3way in ours draws more then 20a on 12v so it has a 30a breaker on it. and #6 wire. As Rusty mentioned that is only for feeding it when underway. 22a of constant draw will flatten batteries in no time. Running on propane much better of course but lots of different opinions about doing that underway. We leave it on 12v as the venting I have for the fridge is a bit improvised. On 12v, big breaker and wire. On grounding we just have all the negative sides tied together between truck and camper. Solenoid closes with 12v switched by ignition but the negative sides are tied together all the time. Good luck with your rebuild. Post some pictures soon! Archie
 
You can have a look at my Gallery,I left the hydraulic cylinders connected and dropped the top did the sides and then the front and rear disconnecting and supporting the end I worked on. I now have it up and supported while I do the inside, its a NCO but should be the same For your Fridge I pulled it out cleaned everything including the chimney then bench tested all systems and used a Kenworth resetable fuse for the 12 volt circuit, Hope this somewhat helps as well.
John
 

New posts - WTW

Back
Top Bottom