Partial floor pack replacement (thru bolt rot)

demundus

Member
Joined
Aug 28, 2018
Messages
15
Haven't found much via search but if someone can point me to a similar thread I'd be much appreciated

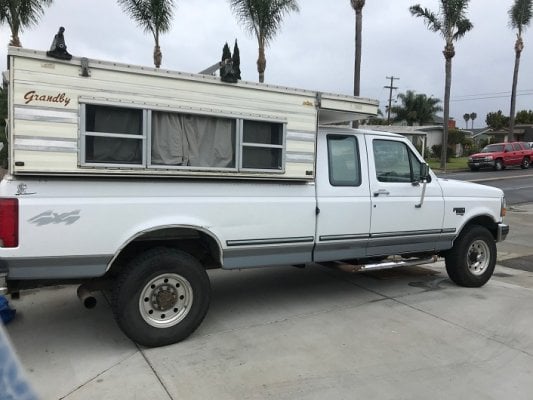
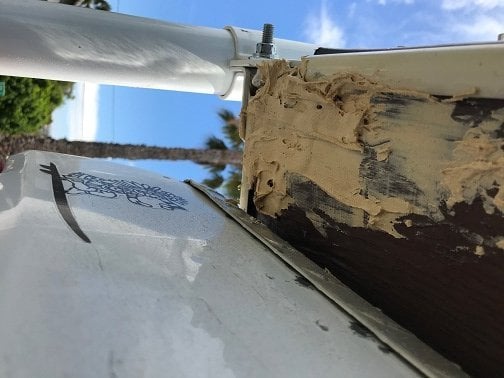
I recently bought a 92 Granby, well taken care of for its age with basically 0 rebuild/work done on it. I have master plans for a complete overhaul or perhaps a FWC trip to have them do it... but for now I'd just like to enjoy it for a few seasons. Besides redoing the electrical in the interim (its a horrible mess of jerry rigging) for new solar setup, I've installed 4 jacks and was going to reseal the roof with #10 and rubbery paint.

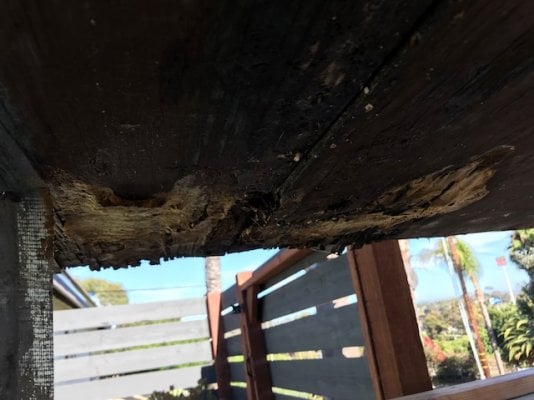
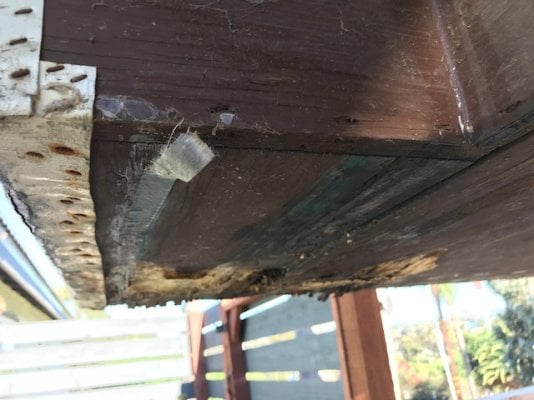
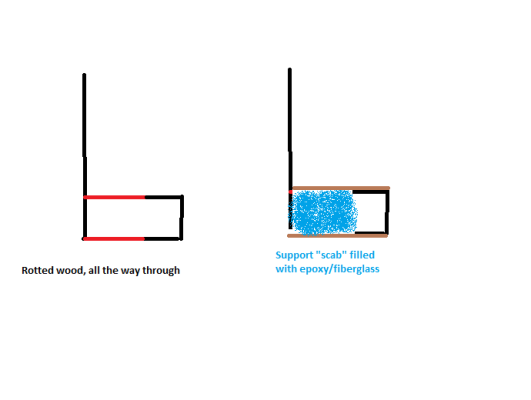
I was going to take the camper off the truck and saw that theres a fair amount of rot where the through bolts are. Obviously because there is a hole through the camper, its natural this happens. I don't want to drop the entire floor pack yet, I will later when I am ready, but for now I'd like to solicit some suggestions for patch solutions. The rot seems to be contained to the rear two thru bolts. I'm an amateur when it comes to wood work and will likely need to buy tools/things to complete this, so if you have suggestions please help me by phrasing them like I was 12 y/o :D

Lastly, should I ditch the thru bolts and go with turnbuckles? Can I use turnbuckles on my mounting plates or do I need to make an entirely new mounting point? I'm trying not to drill any more holes in the camper if I don't have to

Thanks all! :)
 

Attachments

  • IMG_0096.jpg
    IMG_0096.jpg
    130.9 KB · Views: 107
Welcome demundus !

Well this idea will depend on where the bolt holes are in relation to cabinetry etc. But my first thought, for quick and easy, would be to cut out the rot and screw a new, coated, second floor layer to the underside. It's just a full sheet of plywood now, with a small piece added to each rear side, for the wider part, aft of the wheel housings.

Depending on where the rear bolts are, I'd maybe use a 1/2 sheet of ply for the forward portion of the floor and cut a full sheet to follow the shape of the rear, so the wider, rear part isn't compromised by a joint. Seal (exterior paint, deck paint, urethane ?) all sides of the the new wood prior to assembly and screw together from both sides (inside down, outside upsides) if possible (might depend on interior layout, floor covering etc)

You may then be able to continue using the same bolt thru system (seal up the cut edges and replace the cut out wood with new pieces if desired. Am assuming you are currently using the thru bolts for securing camper to truck, otherwise maybe time to redesign.

Could be off base, just a thought.

I think there are some threads out there. I'll look if no one posts any.
 
Depending on how bad the rot is you might be able to stabilize what's still there, if it's minor, you could use a product called git rot, It is used for small areas of dry rot on boats, and is avail, at West Marine or online. If the rot is more extensive and you can break it apart, you'll need to cut out the bad and scarf if new pieces or completely replace the floor section. What ever you decide. I would recommend you use wood workers epoxy for bonding all the repairs and seal with a good quality exterior paint. I repainted with exterior porch paint and it is holding up quite well.
 
Thanks for the ideas. I'll get some pictures of the rot as it is probably a little worse than I'm making it sound. I actually did Git-Rot for the under corner where it was basically just the linen-woven type fabric that is above the wood? That probably makes no sense and its sealed up now so I can't show it. I'll snap some pictures tomorrow. In this case, I only have a dry goods cabinet to deal with so it might not be too bad to "scab" it with better plywood on top/bottom

I can re-thru bolt with a bigger "washer/plate" this time to prevent the pressure from pulling and tearing the wood, I just didnt know if there was a better option. I rather like the clean look of the through bolts, but i understand their deficiencies over time.
 
Also consider All Terrian Campers in Sacramento who can work on the older FWC. They could possible replace the floor pack with the current floor material used and do a rebuild on the other work you want done.
 
See attached pictures. I replaced the outside underside of the rot where it was evident, only now am I finding it inside as I go to remove this bolt (which is seized, yay!)
 

Attachments

  • IMG_0383.jpg
    IMG_0383.jpg
    49.4 KB · Views: 294
  • IMG_0384.jpg
    IMG_0384.jpg
    36.4 KB · Views: 293
^ I have little experience with this type of repair so can only offer ideas...

First I'd suggest running a garden hose on the outside corner up to the the jack mount to confirm there is no leak coming from above.

Second, in case it helps, the bolt head or nut can prob be cut off with a dremel (slow) or angle grinder (cheap and very useful tool) and be then driven out with a punch. Naturally, working in that cupboard space will be a bugger.

Third, I missed the part in the op about the front mounts being ok. Had suggested a new full layer added to the underside to help all over but still think it could be a solution. The rear bolt shown is close to the floor joint (which runs at about half the depth of the cupboard if yours is the same as our '97) so for sure I'd make the rear part of the new floor layer cut without a joint there.

Also for additional security, and if willing to drill into the truck box, you could possibly add a 5th bolt, say just inside the main door. Could cut out a circle of existing top layer to recess the fastener head. Cupboard bolt would also recessed and be flush to the inside floor height (or close), with the removed wood section being replaced with and insert, if desired.

Have no experience with repair products for wood rot so can't comment.

btw do you have a pic showing the truck box underside, showing the bolt location ? I had slide in fibreglass shell before that was thru bolted to the bed and am not against the method but am curious how your looks. And what diameter size bolt it is.
 
I do have those pictures, i JUST finished taking it off the truck. Rot seems worse than before. I might hire a woodworking professional to help me with a safe/sturdy patch for now.
 

Attachments

  • IMG_0386.jpg
    IMG_0386.jpg
    81.8 KB · Views: 225
  • IMG_0387.jpg
    IMG_0387.jpg
    85.8 KB · Views: 238
I would call Marty at ATC for a quote for the whole replacement of the floor and walls with modern marine grade plywood. cost may be cheaper then you think .... or not.

https://www.allterraincampers.com/


The Office

  • All Terrain Campers, Inc.
  • 4391 Pell Dr., Suite E
  • Sacramento, CA 95838


Business Hours

  • Mon-Fri - 8:00am to 5:00pm PST
  • Sat-Sun - Closed
 
I want to do that, at some point. My fear is two fold. a.) the cost b.) the time, as i have to drive up there for X days. It involves basically gutting the darn thing and starting over.
 
If the rest of the floor pack is good with exception to the floor itself, I'd bite the bullet and replace the floor itself. Build yourself a good frame to support the camper under the wings. Put some cross bracing inside to keep the sidewalls straight, and get er done. I'd bet you could do it in one day. I think I would splice the floor half way back so I could have the back section one piece rather than one long piece with 2 small pieces behind the wheel wells.
 
As I mentioned earlier, found a few threads, I'm sure there are others. Goole searched, this site + "floor rebuilds"

http://www.wanderthewest.com/forum/topic/10322-keystone-rebuild-narrow-floor-pack-redo-interior-paint-exterior/

http://www.wanderthewest.com/forum/topic/8078-building-our-new-camper/

Seeing more of what you are facing and if you choose to repair vs replace, you might want to revisit the idea of switching to tie downs. Maybe only for the rear, if the wood is good there - and you might to go to tie downs at a later time anyway. I'm referring to OEM style but some use the jack mount plates as you asked in OP.

http://www.wanderthewest.com/forum/topic/16086-tie-down-question/
 
shellback said:
If the rest of the floor pack is good with exception to the floor itself, I'd bite the bullet and replace the floor itself. Build yourself a good frame to support the camper under the wings. Put some cross bracing inside to keep the sidewalls straight, and get er done. I'd bet you could do it in one day. I think I would splice the floor half way back so I could have the back section one piece rather than one long piece with 2 small pieces behind the wheel wells.
I just dont have that kind of faith in my ability to wood work, when lacking a table saw and other essential tools for LONG precise cuts, as well as clamps and stuff for glue and nail work. I dunno... its something I've seriously thought about, would be fun to learn, but over time and safely in my garage. Right now I don't have that kind of room/time. A seasoned carpenter can probably do better for less than my tool investment/screwups/time. So I may go that route, problem is I have to tear everything out. I don't know if I want to do that as I have some cool trips coming up and while I want to rebuild in the future with lots of cool ideas, I'm just not sure I have the funds/time to do it right now. For instance I want to replace all the siding with FRP, move things around inside (water tank etc), build an area for my cats to travel with me, etc;
 
klahanie said:
As I mentioned earlier, found a few threads, I'm sure there are others. Goole searched, this site + "floor rebuilds"

http://www.wanderthewest.com/forum/topic/10322-keystone-rebuild-narrow-floor-pack-redo-interior-paint-exterior/

http://www.wanderthewest.com/forum/topic/8078-building-our-new-camper/

Seeing more of what you are facing and if you choose to repair vs replace, you might want to revisit the idea of switching to tie downs. Maybe only for the rear, if the wood is good there - and you might to go to tie downs at a later time anyway. I'm referring to OEM style but some use the jack mount plates as you asked in OP.

http://www.wanderthewest.com/forum/topic/16086-tie-down-question/
Saw the first two, those guys are SKILLED!

Last link was exactly what I was looking for. I'm going to do that. Looks perfect :)
 
I had an idea this morning, like I used to do on boats. Could I cut out the rot, and then create a "scab" board screwed to the base of the good wood (like you do with drywall patches) to use as a "bowl", for which i could pour/layer fiberglass epoxy resin in as a fill. Then screw another topside floor scab over the resin so I've created a sort of fiberglass sandwhich between two patch boards.

Crude paint drawing for fun!
 

Attachments

  • Untitled.png
    Untitled.png
    9 KB · Views: 92
@demundus do you have a link where you got the jacks from? Did you take any photos of the install (in particular the drivers rear corner where the propane tank is)?

I am debating ordering jacks and doing it myself or dropping off my new to me 83' grandby off at ATC.
 
Back
Top Bottom