Portable Solar vs Roof solar

Sedro

The front sprinkler pipe install.: I just laid used 4 "dobbles of 3M 4000 glue equally spread over the pipe. Set it down and temporary taped it with blue painters tape overnight. Then removed the tape. Been stuck up there ever since.

I used the pipe because I was concererned about the "airfoil" possibelity.

Restating I bolted the top of the "Z" brackets to the panel...Then glued the bottom to the roof of the camper.
 
Is it possible to use the roof rails to mount the panels? It would be nice to not have to glue or screw into the roof.
 
i managed to removed the FWC-installed 100w Zamp solar panel. the panel weights 16 pounds. They used some kind of black glue beneath the six screw holes bolted to the roof. The glue is so damn hard and sticky that i have a hard time lifting the panel even after the screw removed, and i ended up damaging the roof aluminum and poked three big holes. i am going to put three 100w flexible panels, each weighs 4 pounds on the roof later.

I notice that the six screws were nailed into the longitudinal ribs of the roof. Judging from the way FWC installs the Zamp panel, you dont need to worry about the wind-lifting or shaking of the fixed panel.
 
Removing glued panel

Many manufactures recommend a chemical that will dissolve the glue. 3 M does and I checked it out before using the VHB tape.

"Four wheel drive" on page 4 - reply # 33 recommended "Dicor" to plug the hole(s) .
 
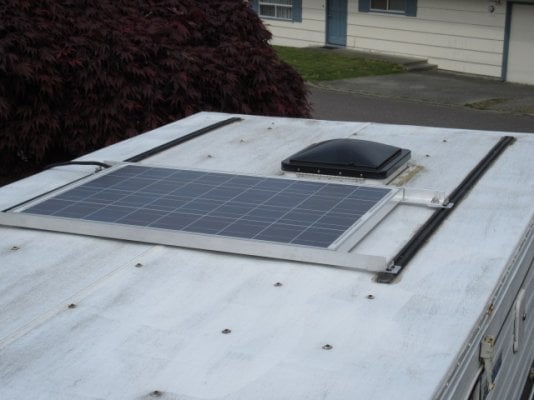
Vinsty - Yes, it is possible to mount a solar panel to the Yakama rails. I bought some aluminum, angle iron from Home Depot. You can get a large nut to slide into the angle rail, or if you want to go all out, get the Yakama mount that goes into the rails and just use the nuts. See photo.
 

Attachments

  • SolarPanel.JPG
    SolarPanel.JPG
    107.8 KB · Views: 126
Latest plan: bolt front and rear of panel to lengths of 1" x 1" x 1" x 3/16" aluminum "Z" bar and attach "Z" bar to roof using combination of VHB 4950 plus self tapping screws into 3 centermost roof frame members. With front edge blocked, wind uplift shouldn't be a problem. Also ordered 90 degree adaptor MC4 connector to SAE roof connector from FourWH so I can position panel over SAE connector (std SAE plug sticks up too high). That will also allow me to "straddle" the roof lift board as per Jim's Eagle/Fleet Build post. Probably would be better to take SAE roof connector off and go with Jim's little Bud box, but instead I will put a little dielectric grease on SAE plug conductors and use some of that extra high powered duct tape to help hold it on tight. Or not. One way or the other, I'm gonna end up with a pile of giblets to try to return for credit.
 
Update: Make that 1"x1"x1/8" "Z" bar. 3/16" would have been overkill, if i could even have found it. The 1"x1"x1/8" "Z" bar was harder to find than I expected. Finally located it online at Orange Aluminum. Gonna cost me more than the piece itself to ship it up here from CA. Oh well.... Decided to buy just one 6' piece, cut it in half for front and rear mount rails. That'll leave a couple inches of panel hanging out on either side. Don't think that will generate enough lift to pull the thing off the roof. 1/8" stock seems pretty herky.

Latest quandary: Finally realized that, duh, the loose red and black 12 ga. wires coiled up and duct taped to the top of the water tank must be the leads from the ZAMP/SAE connector on the roof! Problem is, it looks like they go from the roof connector clear up to the front of the roof, down behind the front lift panels, through the outside wall all the way back to the furnace cabinet, and then back inside the cabinet to the H2O tank/battery compartment. I'm thinking that's 25' or more, which would give me a loss greater than 3% of rated panel output of 17.9 V/8.38 A. Not sure why FourWH uses such a long, convoluted run. I'd love to run 10 ga. wire instead, but have no idea what that would entail.

Questions:

How much does the output loss really matter?

Would it be possible to 1) remove the roof connector 2) use the existing 12 ga leads to pull the 10 ga wires from the hole in the roof to where they enter the camper behind the front lift panels 3) feed the 10 ga wires through the black plastic flex conduit behind the lift panels 4) open up the outside wall at the back of the sink/storage cabinet, intercept the 12 ga. wires from the roof connector, and use them to pull the 10 ga. wires into the back of the cabinet 5) run the 10 ga. the rest of the way to the SC2030 controller installed in the battery compartment (i think there's actually enough room there underneath where I put the TM2030 shunt on the front wall)?

Has anyone used an alternate wire routing from the roof connector to their solar charge controller?

Would it help if I put the SC2030 in back of the furnace cabinet instead, tapped into the 12 ga. leads there (shorter run from panel on roof) and then ran 10 ga. from the SC2030 back to the shunt and battery (plus the phone cable to connect with the TM 2030 where the old battery monitor used to be)?

Yeah, I'm kind of a nervous nellie when it comes to this kind of stuff. Thanks to all for your patience!
 
There is lots of info on the (non) issue of the longer wire run in this thread:
http://www.wanderthewest.com/forum/topic/14559-2016-fleet-pre-wired-for-solar/

To summarize - there is really no need to limit your voltage drop to 3%, particularly since you are using a simple PWM charge controller. Your charge controller is essentially discarding any voltage between 13.7V and the Vmp of your panels (usually ~ 16V) anyway so it doesn't really matter if you loose it in the wires or not. However you do want to limit the voltage drop between your charge controller and battery, so keep your charge controller close to your battery.
 
Sedro F. Woolley said:
Update: Make that 1"x1"x1/8" "Z" bar. 3/16" would have been overkill, if i could even have found it. The 1"x1"x1/8" "Z" bar was harder to find than I expected. Finally located it online at Orange Aluminum.

Thanks for the info on Orange Aluminum and the "Z" bar Sedro..I'll probably use the same hardware, but with VHB and Sikaflex, only. If you see my panel on the highway, send it home, OK?
 
Captm said:
There is lots of info on the (non) issue of the longer wire run in this thread:
Lol

???

I put some effort in that thread explaining exactly why the factory wire gauge does not cause any problems. I take it you disagree (although I am not sure why), but there is no need to be snarky.
 
Rondo,
My funny bone was tickled by the statement, nothing more. :D
I had to look up "snarky" as I have not been called that before and now realize my sense of humor has offended you.
My apologies and I hope we can share a campfire down the road.
Cheers,
Tim
 
Great post and thanks Jim for the great overview and getting this discussion started. This is good timing, because if I don't find a used Fleet soon I am going to order a shiny new one, and am planning to order with Yakima tracks for the sole purpose of being able to easily add my own solar panel. Sounds like I need to also make sure there is a portable plug in, unless that comes standard now.

For my VW Syncro build I mounted Yak tracks and then a 160 panel and it worked great keeping the beer cold in the Truckfridge.

Questions for those exploring new tech:

A couple of you mentioned flexible panels and the weight savings. Are you planning to mount on roof, and does the flexibility create any problems or mounting challenges because of wind while driving?

Have any of you designed or purchased a mounting and wiring system that allows you to easily remove the panel from the roof to set up as a portable when parked in shade? The height of the roof might be a problem, but it would solve the problem hauling and storing a portable and depending upon where you are traveling, you might not have to remove the panel that often.
 
EnviroProf said:
-----
Questions for those exploring new tech:

A couple of you mentioned flexible panels and the weight savings. Are you planning to mount on roof, and does the flexibility create any problems or mounting challenges because of wind while driving?

Have any of you designed or purchased a mounting and wiring system that allows you to easily remove the panel from the roof to set up as a portable when parked in shade? The height of the roof might be a problem, but it would solve the problem hauling and storing a portable and depending upon where you are traveling, you might not have to remove the panel that often.
I installed four 100w panels (each weigh 4 pounds) on the roof. I tied them to the Yakima tracks with metal wires and taped the panels edges to the roof with Eternabond tapes. I dont intent to remove them from the roof for portable use. so far so good.
 
EnviroProf, I had a Syncro also with a 100 Watt panel mounted on the luggage rack and an ARB Fridge. On my 2011 Fleet I have a 160 Watt Zamp portable mounted to my 1 inch aluminum factory luggage rack. It comes right off and and then can attach to an extension to be used as a portable which works great for me because I like to park in the shade to camp and 160 is all I need for long term camping with a three way fridge. Because it is a suitcase portable it already comes with the folding feet needed to set on the ground facing the sun. I take it off before I pop the roof when camping. It is 45 lbs so a little heavy to lift for the stock roof struts although I can do it if I have to. It puts out way more than I need in the sun, but I learned from the Syncro it was better to have too much capacity than too little.
 
Moveinon, sounds like your system works well. When I bought my 160 watt panel about five years ago there wasn't a lot to choose from with the light flexible panels. Four-pound, 100 watt panels seem to be a game changer if they hold up. Sure would be a lot easier to move on and off the roof.
 
A quick word of warning - the light flexible panels are not known for their reliability. The first one I bought failed within 6 months. I now have two 120w solar cynergy panels on my Fleet (I couldn't resist the weight savings) but I made a mounting solution that attached the panels with studs/nuts so they are easy to replace when they fail. Avoid the temptation to bond them to the roof - it makes it a MAJOR pain to replace them when they fail.
 
rando said:
A quick word of warning - the light flexible panels are not known for their reliability. The first one I bought failed within 6 months. I now have two 120w solar cynergy panels on my Fleet (I couldn't resist the weight savings) but I made a mounting solution that attached the panels with studs/nuts so they are easy to replace when they fail. Avoid the temptation to bond them to the roof - it makes it a MAJOR pain to replace them when they fail.
There are new kind of flexible solar panel made with different material (ETFE and fiberglass) supposedly to be more durable than the old PET-made panel. I installed two of them out of four panels. They are a little more expensive than the PET type. Will see how it last.
the following are from the manufacturer (Lenson)'s statement:

7f733145-18eb-4094-9637-413174a2a799.jpg


[SIZE=10pt]1. Made of [/SIZE]fiberglass back sheet[SIZE=10pt], this solar panel is lighter and softer than aluminum. This material also combines better with ETFE film than aluminum or plastic back sheet, which other panels frequently contain. This mix of technology and craftsmanship makes this one of best quality solar panels available today.[/SIZE]

[SIZE=10pt]2. The first layer of the solar panel is made of ETFE(see link). Imported from Japan, this material has a very high sunlight absorption to reflection ratio. Other branded flexible solar panels often use PET, a cheaper alternative, which reflects significantly more sunlight than ETFE and thus reduces the solar panel's energy output. ETFE is a much more expensive and higher quality material than the PET. Almost all flexible solar panels on the market today now utilize cheap PET.[/SIZE]
 

Try RV LIFE Pro Free for 7 Days

  • New Ad-Free experience on this RV LIFE Community.
  • Plan the best RV Safe travel with RV LIFE Trip Wizard.
  • Navigate with our RV Safe GPS mobile app.
  • and much more...
Try RV Life Pro Today
Back
Top Bottom