Rear seat removal

Here is the approach I took. Since I use my rear seat to store larger items I made a simply floor mount. I used the bolts for my seat and a piece of wood I had in my garage. I painted the wood black and added some tie down points. Works great for me so far. This is in a 2019 Tundra Crew Cab.


78196367_2796200083763980_7196946079361794048_o.jpg
 
Roughed this in in about 4 hours. Still have some finish work to do but worked well on our 3400 mile road trip. IMG_6445.JPG
 
Nice work... I have less pretty concept ... multi layers and access is proven in the field... I love mods as they are always tweakable
 
I am just starting to research and design my own version of a rear cargo system to replace my rear seat. I thought I would share some of the more interesting pictures I found on the net:
16169ad4716cb37b05975253397c9365.jpg
1dd70399cdf694b2a7406b2d5b0b4d08.jpg


63023827098251e87e28fcf1abbb56a0.jpg
6bc1e5fba24d25bb2457a7938ce29649.jpg

5dee48f003f41796e27ddb313440d4c4.jpg
 
Thanks to Missing Link, who gave me some ideas about what to do. His post is on page 2 of this thread.

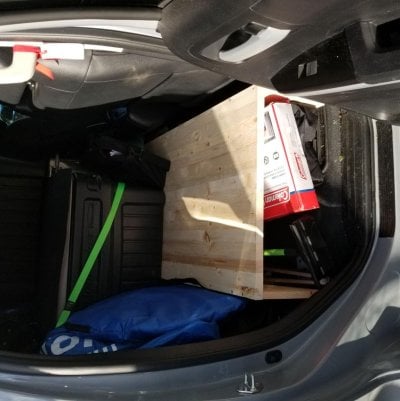
I pulled the rear seats of our 2019 Tundra doublecab. It was a straightforward task to locate a 2 foot wide five foot long, 1" thick, board at Lowe's. 8" risers along the front and back, with a center brace running fore & aft. The trick with the center brace, to avoid the center hump in the truck floor is to offset it, so it is two feet in from the driver's side and three feet in from the passenger side. A little work with a multi-tool in the center of the front riser to straddle the center hump in the floor. Also, to level the platform, I attached a couple of 1" thick pieces of scrap stair tread under the front riser, one behind each of the front seats. That's it.

We can still reach under the front seats. There are lots of attachment points for straps and such on the rear wall of the cab. We put a camp table, and stove under the 3' deep side of the platform. And a couple of other longish tools. In the 2' deep side we put a couple of camp chairs and a slim tool box case. Behind the platform is room for an air compressor, a larger tool bag and a bunch of other stuff. Tuffboxes and a cooler fit on the platform very well.

Seems to work well. In a couple of days will take it on a long maiden voyage. Will report back with any problems, needed changes, etc.

The project took about 4 hours total, including going to Lowe's to find the wood.
 

Attachments

  • 20200216_160851.jpg
    20200216_160851.jpg
    130.9 KB · Views: 232
Design Goals:
One of my goals for my cargo platform is to be able to keep all heavy tools and recover gear in the truck at all times, but in a location where they are out of sight, accessible without removing any cargo/camping gear/etc and where they are secure from flying about in the event of an accident. To this end the tools will be located under a heavy duty platform that is bolted down using the stock seat attachment points.

Step One:
This aluminum frame will get bolted to the stock seat brackets, the platform will then be bolted to the frame. This frame was built in 2004 for a different setup that included a cargo platform and a single rear seat on the drivers side:
DSCF4375.jpg


Step Two:
The old 2/3 width platform will get modified and reused. A new platform extension will be added to the former single seat location behind the driver (where the unfinished sheet of plywood is in the following picture).
DSCF4373.jpg


Step Three:
DSCF4383.jpg

Step Four:
DSCF4404.jpg

DSCF4403.jpg

DSCF4408.jpg


Step 5:
Loading all of this:
DSCF4422.jpg


into here... (all the above items are installed in, on, under or behind the cargo platform in this pic):

DSCF4418.jpg

DSCF4419.jpg

DSCF4415.jpg
 
I started out with an Engel fridge in my 2011 eagle. After a few years I installed an Isotherm 65 Cruise. Love this fridge ... super quiet, low energy use(we got DC only) and does a great job. Have logged 20,000 miles with it no problem.
 
I threw this platform together quickly and low cost as parts were available in the shop. We will give it a go and adjust if we find a better design for us. But it is a start.

Top surface is 24" x 60" , bottom inside dimension is 22.5" x 12" x 60". I'm going to add a cargo net mounted to the back side and hooks on the front to keep captive the items on the top surface.
.
.
20200915_205516_resized.jpg
20200915_205547_resized.jpg
 

New posts - WTW

Back
Top Bottom