Rear turnbuckle mount failure on Hallmark Guanella

DoGMAtix

Senior Member
Joined
Jun 10, 2015
Messages
178
Location
Albuquerque, NM
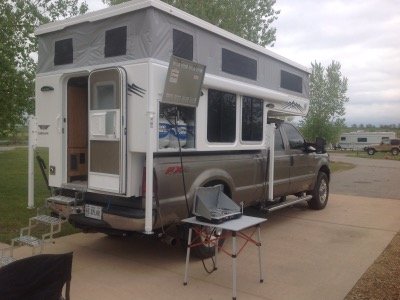
We have an 08 Hallmark Guanella mounted on an 06 Dodge Ram 2500 CTD short bed (6 1/3 foot bed). We’ve been working on the camper mounting system with the intent of taking it regularly on rugged 4WD roads in Utah’s canyon country and the southern Colorado Rockies. We’ve got Hallmark-installed Happijac tie downs (http://happijac.com/tie-downs.html) and Torklift Anchor Guard turnbuckles, as described in a previous post (http://www.wanderthewest.com/forum/topic/11134-mounting-hallmark-guanella-on-dodge-ram-2500-short-bed-project/ ).

We went on our first trip involving extensive driving on rough/rocky dirt roads in the Maze District of Canyonlands last week, and seemed to be doing really well after a couple of long driving days. However, on a relatively smooth stretch we failed to notice a shallow erosion channel across the road and hit it at maybe 10-15 MPH. There was a WUMP and a jolt, not that much bigger than some we’d experienced previously, well within what I’d expect the rig to stand up to, but big enough to make us check the rear views to make sure everything was OK… and it wasn’t.

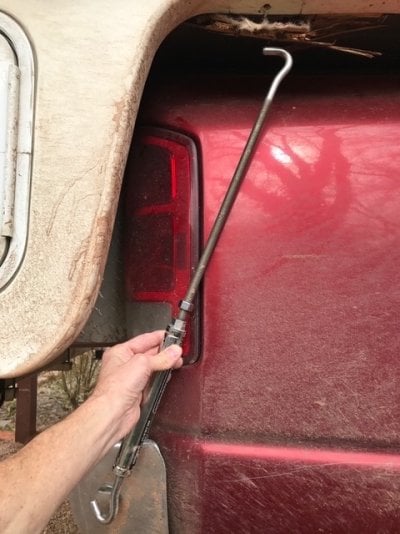
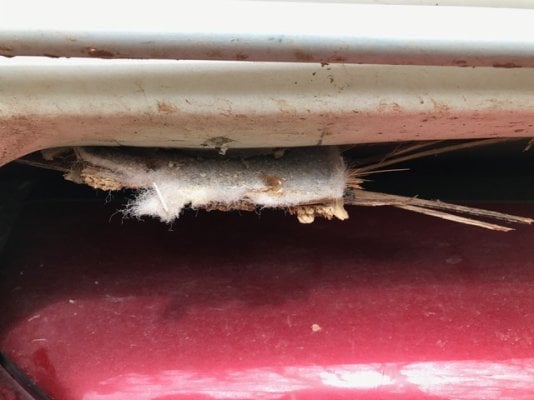
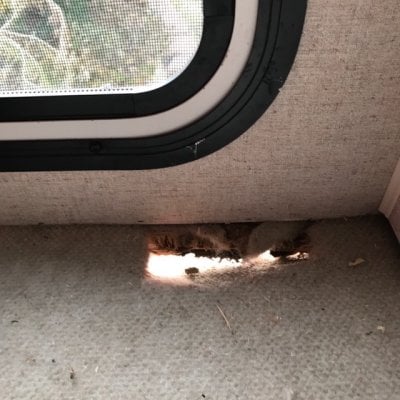
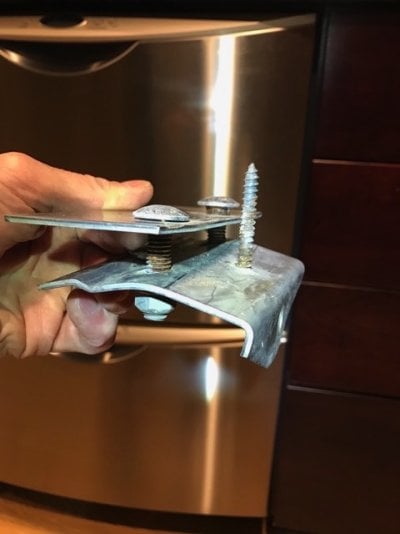
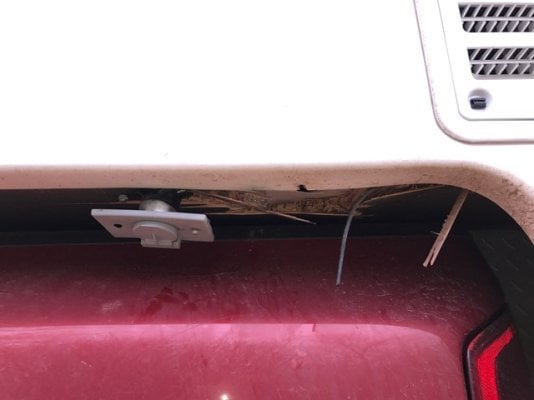
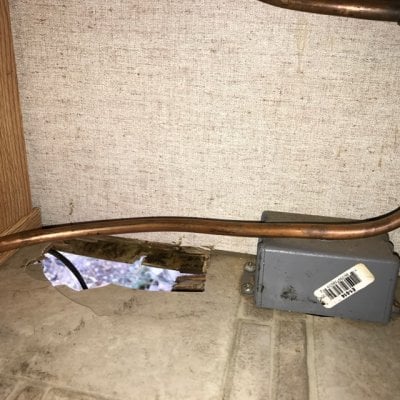
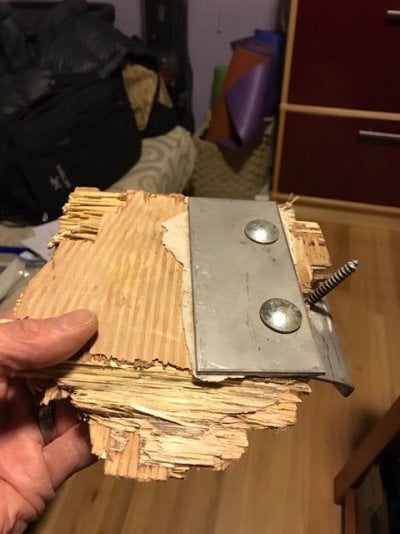
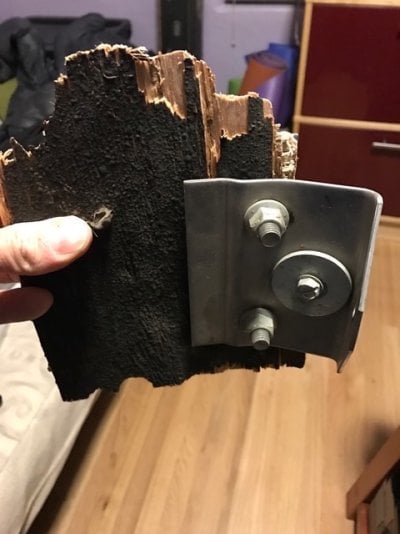
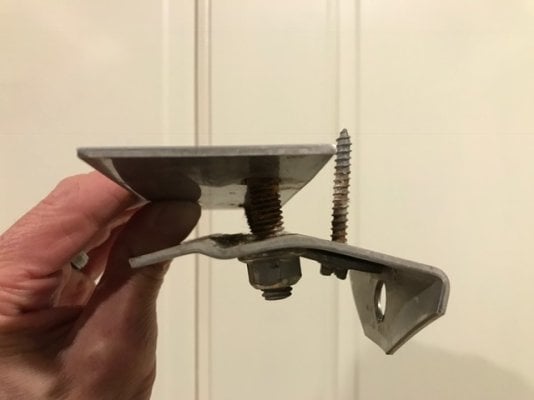
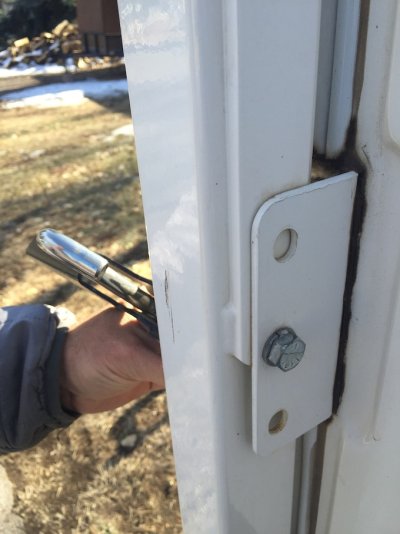
The rear turnbuckle mounts on the camper had failed catastrophically. The metal mounting plates on the overhangs on both sides had torn clean out (along with a chunk of plywood each) and were lying in the dirt. Photos show where the plates tore through, with closeups of the gaping holes where they’d been (under the carpeting in the back of the dinette seating area and under the linoleum in the cabinet under the cooktop). One pair of photos shows a set of plates with the torn-out plywood chunk still wedged in-between, from top and bottom views. The plywood does not appear to have rotted, but after 8 yrs on the underside of a camper (coated with black “weatherproofing” stuff that may or may not be a good idea per posts I’ve read) I suppose it had lost some degree of integrity.

Anyhow, the main point of this thread is that we’re left with 2 gaping holes to fix and at the same time create new rear turnbuckle mounting points on the camper in roughly the same location that will hold up to further (ab)use. In order to avoid ripping the new mounting points out like we did the old ones, we need to satisfy either or both of the following conditions:
1) Create stronger mounting points,
2) Decrease the forces generated by turnbuckle pull.

For stronger mounting points, the plan is to create plates much larger than the originals to sit on top of the plywood around the holes and disperse the forces over a greater area (the old plates were just 2 1/4" by 5", the new ones will probably be about 12" x 12"). The plates that clamp onto the underside will also have to be larger to hold the sandwich together tightly, but will be limited by the width of the overhang (about 10 inches). Although the plywood bordering the holes is probably compromised, if we make the upper plates quite large we should be OK. 1/8” aluminum should suffice on top, 1/16” probably adequate on bottom. It would be ideal to replace the plywood boards that were damaged in the process as well, but that would require a massive camper rebuild, which Bill (Ward, of Hallmark) said would be expensive, time consuming, and most likely unnecessary. In order to get the most strength out of a compromised overhang structure, we plan to make 90 degree bends in the plates to fasten them to the vertical structures coming up just behind the holes (the fridge cabinet on the driver’s side and the closet on the passenger’s side). Should be able to fit carriage bolts in there without much problem – I figure the flat heads on the passenger side can go behind the dinette cushion, and on the driver’s side they can go inside the fridge cabinet (we’ll probably have to take the fridge out to do that). There will be space for the nuts and bolt ends in the closet and in the under-stove cabinet. We may try to put a 90 degree bend upward along the camper sidewall as well, but not sure we’d want to drill into or through that wall... we'll see.

We’ve got a metal fabricator in town who works on off-road vehicles, has a great reputation and seems like a stand up guy who knows his stuff. We’d been planning to have him make skid plates for the gas tank and transfer case on our truck, so now we’ll just have a little bit bigger job for him.

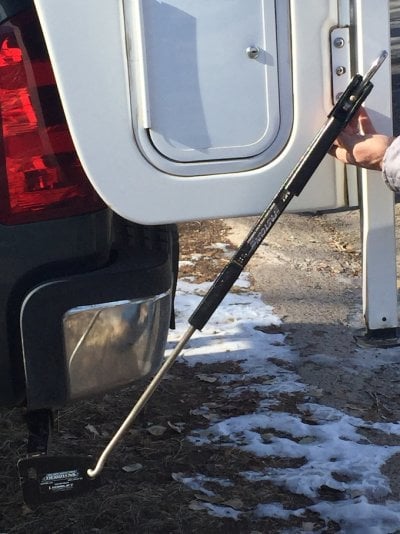
Regarding limiting maximal forces generated by the turnbuckles against the mounting points, I’ve been talking to the folks at Torklift. It seems intuitive to me that the rear turnbuckles should be spring-loaded to deliver force in as gradual a tug as possible, and the fronts shouldn’t need to give much since the goal is to keep the camper snugged up to the front of the bed at all times (in fact, we found that our front turnbuckles worked their way loose occasionally on bumpy downhills, which may well have been due to greater turnbuckle expansion/contraction with springs). However, both Torklift and Happijac recommend sprung turnbuckles up front and damped turnbuckles in the rear. Bill at Hallmark has an aerospace engineering background and he feels the same way I do; in fact, he routinely swaps the barrels of the front and rear turnbuckles out. Torklift’s response to this is that the majority of the camper’s weight and therefore forces generated are up front, so springs are needed there.

For now I’m just going to focus on putting in plates with as much structural strength as possible so whatever we do with the turnbuckles will be less likely to result in mounting point damage.

If anyone has advice based on experience or expertise, I’d appreciate it.
I’ll update with photos as the project progresses.

- Dave
 

Attachments

  • Rear turnbuckle angle.jpg
    Rear turnbuckle angle.jpg
    104.7 KB · Views: 358
  • Hole from turnbuckle pull-through rear passenger side.jpg
    Hole from turnbuckle pull-through rear passenger side.jpg
    100.4 KB · Views: 375
  • Interior view of rear turnbuckle hole passenger side.jpg
    Interior view of rear turnbuckle hole passenger side.jpg
    123 KB · Views: 453
  • Turnbuckle mounting plate.jpg
    Turnbuckle mounting plate.jpg
    59 KB · Views: 327
More pics (previous pics of the camper were from passenger's side, these are from driver's side):
 

Attachments

  • Turnbuckle hole exterior driver's side.jpg
    Turnbuckle hole exterior driver's side.jpg
    51.3 KB · Views: 373
  • Turnbuckle hole interior close up driver's side.jpg
    Turnbuckle hole interior close up driver's side.jpg
    159.6 KB · Views: 303
  • Turnbuckle mounting plate from above.jpg
    Turnbuckle mounting plate from above.jpg
    76.3 KB · Views: 330
  • Turnbuckle mounting plate from below.jpg
    Turnbuckle mounting plate from below.jpg
    77.4 KB · Views: 335
I just spent some time inspecting the camper structure further and discovered that the dinette bench surface is continuous with the floor in the back of the passenger-side closet and the and floor of the under-stove cabinet is continuous with the floor of the refrigerator cabinet (in the back, accessed through the mechanical door/vent). The wall that seems to separate each is just a flimsy divider that is not even fastened at the base to the plywood/carpet/linoleum. With minimal trimming of these "walls" we should be able to get 1/8 inch aluminum plates to slide in. We have space for a 1x4 ft plate on the driver's side interior and a 1x3 foot on the passenger's side interior. We'll probably put a 90 degree bend on the edge of each plate where it butts up against the camper wall and bring it up about an inch for extra rigidity (nothing really to fasten it to, but the bend alone should keep the plate from sagging where the force is generated). We'll be able to fit 10" wide plates of equal length below (on the bottom of the overhang) to create a solid, weather-proof sandwich around the compromised plywood. We'll replace the crappy steel mounting plate (see photo demonstrating where the plate bent down under the pull of the turnbuckles) with a piece of 3 1/2 or 4-inch steel channel (oriented cross-wise), trimmed and bent, with turnbuckle mounting hole drilled to end up in the same location as the prior hole so the turnbuckles can be reattached with no more than minimal tension readjustment. This type of mount should be able to withstand much more force without bending down like the old plate did.

After what happened to us and what I've seen looking into the structure around the rear turnbuckle mount, I'm wondering if everyone who wants to take a Hallmark offload shouldn't be making a similar modification so as not to risk a catastrophic failure like ours.
 

Attachments

  • Bent mounting plate.JPG
    Bent mounting plate.JPG
    40.3 KB · Views: 187
Interesting situation. I'm wondering if it has something to do with the way the units that hang off the back of trucks are mounted.
Here is a picture of mine with the Torklift that are mounted to the bracket that the jack's are attached to. This set up seems pretty strong..
 

Attachments

  • IMG_0444.JPG
    IMG_0444.JPG
    45.6 KB · Views: 398
Jack brackets would be much stronger rear mounting points than our plate system (which is on plenty of Guanellas and other campers). Unfortunately, the boxy rear construction of our camper with exterior storage cabinets and camper tail lights (made to fit the Guanella onto short bed trucks) won't allow us to attach to the rear jack brackets.
 
smlobx said:
Interesting situation. I'm wondering if it has something to do with the way the units that hang off the back of trucks are mounted.
Here is a picture of mine with the Torklift that are mounted to the bracket that the jack's are attached to. This set up seems pretty strong..
Our Guanella is also an in-bed model with the tiedowns attached to the jack brackets. We have been on many rough roads with no mounting problems. From DoGMAtix's photos it certainly looks like his rear mounts are of weak construction. I hope that Hallmark's more recent models are better built. So far we have been able to hit highway potholes at speed as well as negotiate slow jeep tracks without any damage to the camper (well, there was one problem with a drawer but that was unrelated to the mounts).
 
My K2 has the rear storage containers and those same turnbuckle mounts. I've always wondered what the actual structure was for them and how the mount was actually attached. The little bit of poking around I have done never really cleared it up for me. Was that top plate sandwiched between layers? I haven't seen the carriage bolt heads. I will say, it must have been quite a bump to cleanly tear through plywood like that, especially both sides.

As to the location of the sprung tie downs, my thought is that having the rear of the camper being more directly attached to the rear of the truck, as Torklift recommends would be a better choice. Keeping the two moving as one unit at that point would limit the potential out of phase oscillations. If the camper and truck get going in opposite directions, when you hit that limit, all of that momentum and energy has to go somewhere. That pretty much describes what I felt when we hit our bump (sounds like very similar conditions, nice smooth road, didn't see a larger rut crossing it). With the sprung anchors in the back, it allowed the camper to oscillate quite a few times and, while not pulling out the attachment points, I did lose 3 of the 4 tie downs and the camper shifted.

I any case, definitely going to look closer at those points. It may also be possible to fab up a bracket that could attach to the rear jack bracket, although I'm not 100% that they are attached any better but it would rely more on shear strength rather than pull through.
 
Bad Habit,
The passenger-side mounting plate was under the carpeting in the back of the dinette seating (under the window along the side wall about 6 inches in front of the "wall" between the dinette seat and the rear cabinet - may be a toilet in that cabinet in some campers). The heads of the carriage bolts were on the upper side, I suspect if you feel around there you'll notice two slight rounded bumps. The driver's side plate appeared to be mounted on top of the linoleum inside the cabinet under the cooktop (since it's totally out now I can't say for sure but in the photo above you can see the edge of the linoleum sandwiched beneath the upper plate at the edge where it fractured). I suppose if you have an oven under the cooktop you won't have easy access to that location.
Knowing what i know now I'd actually get in and reinforce both plates even if they were both in original condition, at least from above, and I'd probably make a new turnbuckle mount as well. The mounting points were just not engineered to take the kind of stress truck/campers routinely deliver off the beaten path.
I do agree that keeping the rear firmly secured to the bed so it doesn't move at all would be ideal, and would presumably limit the sudden high-impact jerks when damped or even sprung turnbuckles reach the end of their travel. Just seems like from what I've heard that would be wishful thinking, and some movement is necessary. Also, I'm not sure how much stress on the wood the continuous pull of tight turnbuckles exerts on rear mounts. We did have ours adjusted tightly when we hit the bump that was the final straw (I'd imagine the plywood sandwiched between the plates was about done before we hit that bump).
By the way, the plywood may actually be 1/4 inch. Definitely not enough to withstand such large forces over such a small area.
Hopefully I'll get down to the metal fabricator's today and will start working on the fix. Shouldn't be long before I start posting on that.
 
Curious how you re-attached the camper to limp home?

Also looked at Hallmark's FB last night. Saw that almost every new camper that sits flush with the rear of the truck is attached to the rear jacks. Interesting. Also observed that many using bracket mounts under the camper have the turnbuckles running vertically up the side of the truck. Wonder if this is the preferred orientation?

My outside brackets look good but I'm going out to look at my interior bracket attachment area right now. I've decided to do something to reinforce. May follow your lead but would rather fab something to rear jack if practical.

Following with interest. Thanks for the info and please keep us posted.
 
Open Space: We had remarkably little trouble getting home - if you've got two good turnbuckles up front you can get through most anything driving slowly, and freeway speeds on pavement were no problem.
I couldn't enlarge your truck/camper photo to see what you've got, but looks like a Guanella on a short bed Chevy. You'd have the same problem trying to attach to the jack bracket as us. If you have a long bed truck (or a camper designed for a short bed truck) the camper doesn't need the boxy back end with tail lights etc, and the jack brackets can be used.
I can pretty well guarantee the inside plates will look good until they rip through the plywood they're sitting on. Unless you find that your interior plates are much bigger than ours, you may want to make a larger plate (1/8" aluminum sheet should be plenty strong enough, particularly if you give it a right angle bend along the wall of the camper) and drill it out so the existing metal plate clamps down right on top of it, so the forces are distributed across the larger surface area. You'd have to tear up the carpet to actually remove the plate on the passenger's side, but given the alternative it seems worth doing. We'll probably just trim the carpet to fit around our new plate. It'll be hidden by the seat cushion anyway so no big deal. And on the driver's side the whole setup will be hidden inside cabinets.
I doubt it matters much which angle the rear turnbuckles pull, as long as it's a mostly downward vector (to keep the rear of the camper down on the bed). With good front turnbuckles and some friction between the camper and bed you shouldn't need the turnbuckles pulling the camper toward front or rear. I could talk myself into either answer from a physics perspective, for what it's worth Torklift shows the rear turnbuckles pulling rearward in their product display poster (http://www.torklift.com/index.php/products/displays/product-displays). We considered going with Torklift frame-mounted tie downs in the rear, which would be stronger than the bumper-mounted Happijacs, but we've got an aftermarket exhaust pipe that would probably get in the way. None of the bumps torqued our bumper, though, and we're not expecting to stress the rig significantly more than we've already done, so we'll probably stick with our current setup with reinforcement of the rear turnbuckle mounts on the camper.
 
Yep, it's a 2011 Guanella on a short bed Chevy with frame-mounted fast guns

The rear jack mount will work on my truck without interfering with anything. Might make a few calls to see what the "experts" think (Hallmark, Torklift), but my plan is this.

Fabricate a beefy L-shaped piece of steel and bolt it onto the lower jack bracket using the already present bolt/hole (pic 1). Bracket will extend around the jack leg for the turnbuckle to clip into. That's it. Simple, should be strong, clears exterior storage boxes easily. Does create some potentially funky angles, though.

Edit: Can't bolt into one hole only. If I move forward, I'll remove the jack bracket and fabricate an entirely new one with a clip-in point. That way I'll be tied into 7 bolts.
 

Attachments

  • IMG_2085.JPG
    IMG_2085.JPG
    168.8 KB · Views: 211
  • IMG_2089.JPG
    IMG_2089.JPG
    230.2 KB · Views: 221
I didn't realize how far the frame mounts stick out to the side. Seems like you could do something like that, but creating a lever arm to torque the jack may not be the best idea.
Did you get a chance to look for the interior plates? Seems like a pretty easy modification, with minimal time, expense, and reinvention of the wheel.

Speaking of which, I just got back from the auto metal fabricator's shop. We're incredibly fortunate to have a guy in Albuquerque who specializes in bomb-proofing jeeps and SUVs for crazy off-road applications. He drives a fully modified forerunner that could cruise through armageddon without spilling what's in the drink holder. We did a few laps around, inside, and under the camper, and with a few modifications we'll be going ahead with the plan I outlined above. The biggest differences are that the plates will not be as long as I'd planned (after a point the metal won't spread the force), and the interior plates will be bent upward not only on the edge along the lateral wall, but slightly on the edge toward the center of the camper (only a small fraction of an inch on that side since it'll be right under the seat cushion), which will give a lot of additional strength. We're going to gorilla glue plywood back into the holes to try to keep the structure from splintering more and to seal it. And (this I gotta see), he plans to put short adjustable springs (I believe designed for engine mounting) onto the lower mounting plates so big shocks won't be fully transmitted to the camper (that part is still in beta phase, and could be left out or reworked).
He's even got a test dirt track to take the thing out and make sure it works in simulated real-life conditions.
It'll be a few weeks before we've got a finished product, but I can sleep better now. Actually only a little better, because I'm pretty excited about seeing how this all turns out.
 
Sounds like a good plan.

Can't remember if you said, but did the failed wood look rotted or compromised?

I did look in my camper and the plates are fine. Leaning toward the interior/exterior larger plate mod now as I think it'll be more aesthetically pleasing and work fine. Bending the interior plate edge is interesting - wouldn't have known to try that.

I'll look forward to some pics when you're done. Thanks.
 
The wood seemed to be in good condition (my neighbor who's a contractor and the guy at the shop both agreed); I'd expect it to fail again over a reasonably short period of time if we were to have the camper rebuilt with the same type of plywood, brand new. It's just too thin to do what's asked of it - withstand repeated massive forces over a small area (2 1/4 x 5 inches), right at the edge of the board.
As I previously mentioned, we plan to make a beefier exterior mounting piece that'll hold its shape under stress, but the original, relatively flimsy stainless plate had nothing to do with the inner plates coming through and out. That was all about the size of the upper plates in relation to the strength of the material they were sitting on.
It's possible to go crazy on this stuff, and everything can be overbuilt to the point you're basically driving a panzer tank into the wilderness. We appreciate the light/nimble nature of our rig, and are trying to find a happy medium where we're beefed up in the places we need to be, and aero-light elsewhere. After all, Bill came at this from an aero-engineering background, and the elements of that that came through in the camper design are what we love about it.
 
Just spoke with one of the senior engineers at Torklift. He understands our limitations and thinks our plan is reasonable (though obviously he's not very happy about the fact that we can't mount to a structurally robust frame component on the camper).
He did recommend getting "StableLoads," which are little wedge-like things that mount on rear leaf springs to reduce bumps and sway. They also raise the rear end a couple of inches, and apparently allow you to run less pressure in air bags if you have them (we do), which can help limit sudden strong bounces on bumpy roads.

http://www.torklift.com/index.php/products/suspension/stableload

Anybody have experience with this product?
 
Basically they are there to engage contact with the overload spring sooner and/or all the time. The wedge style fits between the main spring pack and the lower overload spring. It can pivot out of the way so you can disengage if you aren't carrying a load to help minimize the harsh ride. The other style replaces the upper overload spring contact pads to also engage sooner. I have these on my Ford. With the upper ones, the spring isn't in contact when empty, but in normal driving you do contact it quite a bit, some people don't like the added hashness of the ride.

This is a picture of the upper one to give you an idea. The frame bracket is actually bent from when I hit my bump. Withe the loaded fast guns in the rear, it allowed the camper and truck to oscillate at different rates and bottomed out the overload I presume which bent the bracket. In any case, you get the idea, pretty simple idea

 
Bad Habit, do you have the lower StableLoads too, or just the uppers? Do you think they work to decrease forces transmitted to the camper? There's precious little out there on the internet about StableLoads for rugged 4WD travel with truck/campers. The Torklift tech/engineer I spoke with suggested we just get the lowers, and although he initially seemed to feel like we should get rid of the air bags, in the end he said it would be reasonable to keep the air bags but drop their pressure to no more than 30 lb. By the way, I think I failed to mention previously that we also drop the pressure in our tires when we drive rough roads, we were at 35lb front and 45lb rear when we had our event.
 
I only have the uppers. I did also end up adding airbags but that was mainly so I could level the tow bar when we tow the jeep along (also can help with minor leveling at camp sites).

I don't think they necessarily increase or decrease the load to the camper, it's just that they engage the helper springs sooner. I guess that would effectively change the spring rate which would probably harshen impacts. It's all a trade off, for rough roads, you want nice pliable springs. Of course any appreciable weight then compresses them and you lose the softness and/or they flatten. With softer springs you get more compression and extension which is great for wheel articulation but not so good for dealing with weight. Stronger and more refined shocks would help mitigate the bouncyness. Stiffer springs deal with the weight better but limit travel and impart those hard blows direct to the truck/camper.

As many of us, like myself, don't leave the camper on full time, it's not reasonable to have custom made springs for carrying the camper and gear weight along with tuned shocks. The StableLoads (and Timbrens) seem to be decent stop gaps to add more spring rate into the system without having to go custom. They, in my mind, are a better option than airbags for rough roads. They may or may not offset any sag, but do utilize the springs fuller to their capacity.

I would think once you are offroad, you would probably be better off with zero or what ever the lowest level of pressure in the bags can be. In my mind it doesn't matter if the rear sags off road. Much like lower tire pressure helps absorb impacts, taking the airbags out of the equation as much as possible will help. Having them there for on-road travel (which tends to be most of what we have to do) is good for safety aspects.

This is helping me think through my set up. For me I think better shocks at least in the rear would be beneficial. Something adjustable that I could dial in more extension dampening. The heavy 1 ton springs limit compression a lot on their own, I want to limit the upward extension a bit so the springboard effect is taken down a notch.
 
Hmm. As long as drilling holes in the lower overload springs won't cause any problems (can't see that it would) I think it's worth trying the lower StableLoads. They're $325 with free shipping (Amazon Prime) and seem pretty easy to install if you follow drilling instructions carefully, so not a whole lot sacrificed if we don't end up using them. We may eventually do more to the suspension, particularly if we find we need more clearance for getting where we want to go, but that would be a lot more expensive and may be overkill.
The plan would be to engage the StableLoads and drop the air bag pressure down to minimum (5-10lb), where they presumably won't be doing anything at all. We could compare that with disengaged StableLoads and varying amounts of pressure in the air bags.
 
Wow, they sure are proud of them aren't they!

I think you have a good plan, depending on your springs you may not need to drill (which I'm sure is lot more fun than they make it look like)
 

New posts - WTW

Back
Top Bottom