Roofing material for old Granby? mine may not be salvageable..

BBZ

Senior Member
Joined
Dec 1, 2017
Messages
679
Location
Golden, CO
Hi
Any suggestions for the roof material.. mine has many holes, cracks and while I may be able to fix it, I think maybe new might be a better option..

Thx in advance.
 
More information is required to answer your question. What year is your camper? Is it the older roof with screws? When you say holes what do you mean, missing screws or punctures? Photos would be a big help. Thanks, jd
 
longhorn1 said:
More information is required to answer your question. What year is your camper? Is it the older roof with screws? When you say holes what do you mean, missing screws or punctures? Photos would be a big help. Thanks, jd
80's Granby.. has screws.. where the screws are many have pulled through the aluminum creating bigger holes. Its also hail damaged and generally in poor shape at best.
 
Pics attached
 

Attachments

  • IMG_20180406_094249.jpg
    IMG_20180406_094249.jpg
    344.6 KB · Views: 138
2 courses of action. #1 replace be all the screws with larger screws and caulk and live with hail dings and other cosmetic issues. 2nd contact both FWC and ATC for pricing a new roof, and maybe your soft sides since the roof will be off. You can get a new one-piece aluminum roof from FWC or one with screws from ATC. In the end price and their schedule availability will dictate what direction go. Good Luck. jd
 
I have purchased siding from both ATC and FWC, but I'm only a couple hours drive from them.

This is all standard RV stuff, known as "Mesa". The roof might be slightly tougher to source, as it is factory assembled and sealed into the widths needed for a roof, or in the current FWC one-piece roof it is produced in the width required without seams.

Check out PokyBro's Grandby build thread, specifically post 28, as he found new siding in Denver. I suspect you could get roof material at the same place.

Poky did not replace his roof, but rehabbed it, starting here.
 
My roof had some screw holes spider cracking. I just made up small aluminum plates that overlapped the cracked areas, then epoxied them over the cracked portion. I replaced all the screws with the next size up, then used Dicor self leveling caulk on all the screws and the patches. It ain't pretty, but you never see the top of the roof, so no big deal. I wouldn't doubt a new roof costing 1k to 2k.
 
Thanks Shellback..

I pulled the rest of the caulk off today and fortunately found that only a few have the cracks and after looking at other options for roofing, I am going to keep it and make it work, agree, no one see it. As a roofing contractor, I have access to some pretty good products for flat roofs that I am positive will keep this roof leak free for many decades if done right..
 
BBZ,

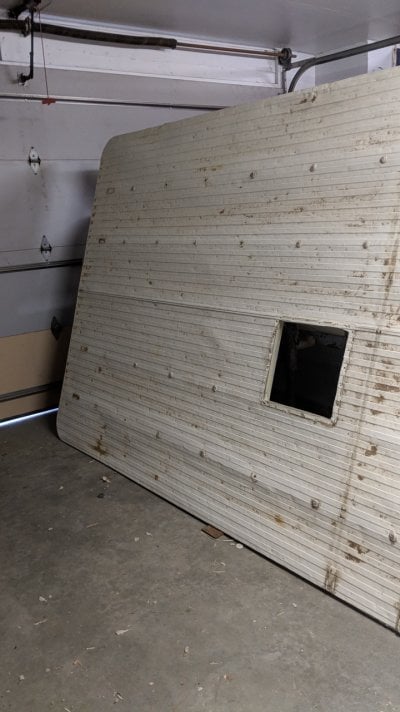
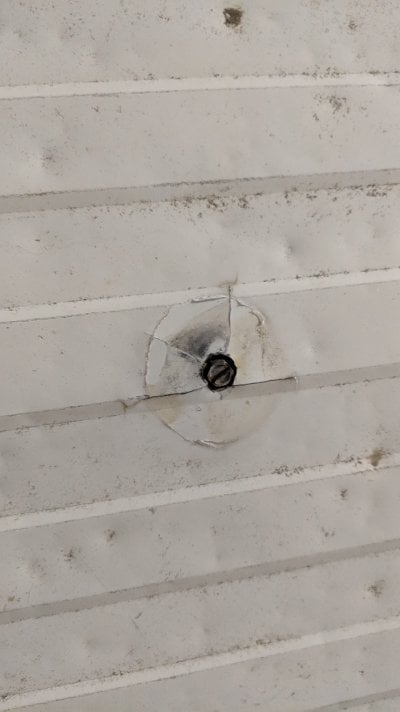
As Wuck suggested, the place I got my siding from (The Metal Company -Arvada, CO) has the ability to seam two pieces of their aluminum material together like the original FWC. I couldn’t tell you if they would guarantee it to be watertight, but my guess is yes. The aluminum material is on a big role and is, I think, 48” wide, so even with a Mesa design, they can get 82” width plus, and can make it whatever length you need. Cost is the limiting factor, at least for me. I decided I would try to use what I had, and just cleaned it off good, primed it and put a good coat of Rustolium White on it, and live with the hail pock marks. I had one spider crack that got covered up, and as Shellback did, I used larger size #10 screws with neoprene washers. Then sealed with RV sealant. It’s been good for two years now.

Poky
 
BBZ - I'm like to start a second build soon and would love to know which way you go.

On mine now, I had my roof off and felt like there were a lot of options, or a ton of effective ways to skin this cat (new aluminum, aluminum tape repair, increasing screw size, dicor, other bond tapes, etc)

I ended up peeling off the existing aluminum and going EPDM over plywood wood. Probably added up to 35 LBS of weight, but now I can walk down the rafters - just for fun or when reinstalling the new fan!

Install was super easy with an "all-in" cost of $250 (EPDM, DICOR, Adhesive, screws, washers, wood). Got me a new flat rubber roof that ultimately works and is easily repairable.

I'm pleased with the way it turned out, but would just as easily try aluminum on my next one.

HughDog -
 

Attachments

  • fffv.jpg
    fffv.jpg
    96.4 KB · Views: 107
  • fdfg.jpg
    fdfg.jpg
    81.8 KB · Views: 115
  • aff.jpg
    aff.jpg
    112.1 KB · Views: 102
craig333 said:
Couldn' t you have done epdm over the original roof?
Pretty sure it can be done, But wasn't convinced that I could contour the EPDM into the ridges and into some of the dented areas... Horrid thoughts about bubbling that I may end up with, having not used EPDM in the past.
 
I decided to keep mine and make it work . It's not pretty but super confident it won't leak .. I used rubber gasket metal roof screws in all the existing holes .. had to add some bigger rubber gaskets to a few holes that were spidering .. I added 3 layers of gaco s20 silicone roofing material (I am a roofing contractor and this is what we use on flat roofs) . You roll it in like paint .. adds some woeght bit not much
 

New posts - WTW

Back
Top Bottom