solar panel mount on yakima racks

williak

Advanced Member
Joined
Apr 17, 2011
Messages
35
Location
Utah, Inc.
Hey all,

After much time spent on this forum, and talking with Steve at 4WC, I've placed an order for a fleet. It's going on my trusty 96 T100 (210K and counting) with a 2nd gen tacoma the planned successor, should the day come.

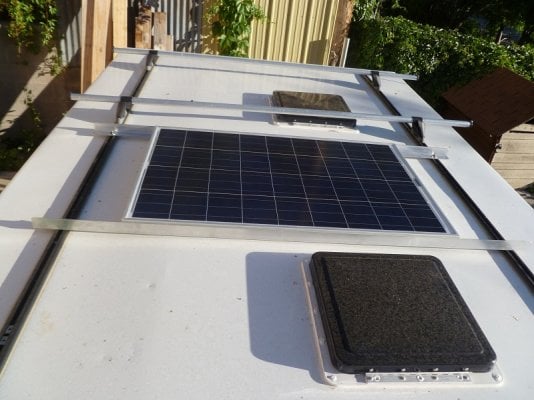
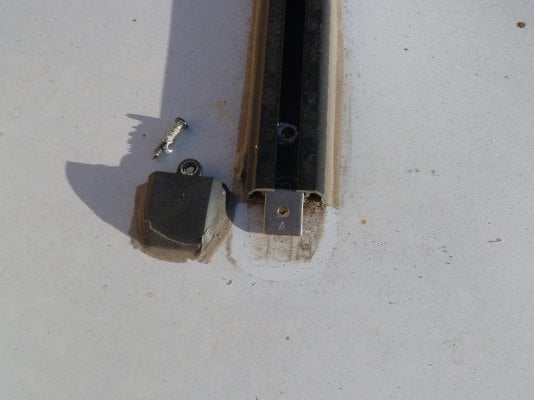
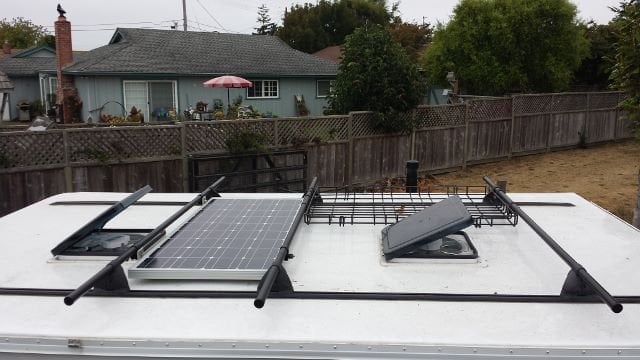
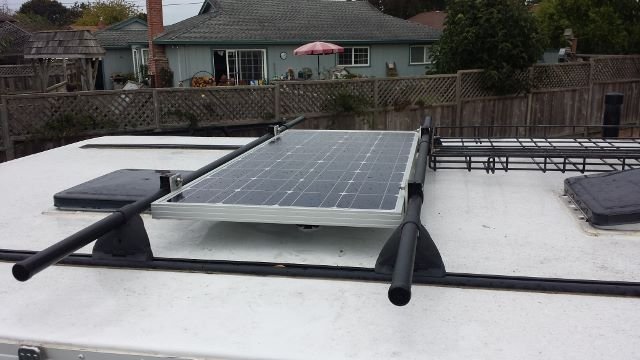
I've got many of the camper options, and may post in the options thread after I've spent some time in the camper. Very much looking forward to that, as you may expect. But right now I'm looking at alternatives for mounting solar panels. That's plural because after working up my expected power usage, I'm looking at 220 watts. Lot's of great information and ideas here on that particular topic. What I have'nt seen here though, is if anyone has tried mounting solar panels to yakima rack cross bars. With the cross bar placement adjustable along the factory installed tracks, which I've ordered, it would seem possible to place and rig up some way to secure, just about any size panel to the cross bars, maybe with the plastic clamps yakima uses to attach bike racks to cross bars,etc.

Maybe airflow at 70+ mph under a flat expensive surface is too much of a bad thing, don't know. Maybe I'm up in the night. Wait, I am up in the night. I do know I should just wait until I get the damn camper, and see first hand what I've got to work with. But that's 2 months out, and I already have a year's worth of trips planned. Have to put the spare thought cycles to something.

Any experience and/or comments would be appreciated.

Williak
 
Here ya go:

http://www.wanderthewest.com/forum/index.php?/topic/4014/page__p__43436__fromsearch__1&#entry43436

solar14.JPG
 
I have an 80 watt panel that was wide enough (about 45 inches) to span the distance between the yakima tracks on my roof. Rather than hanging the panel from the yakima towers and cross bars, I made some brackets using aluminum angle. I pop-riveted them to the panel frame. Then bolted the brackets to the tracks using the yakima bolts and the metal part that goes into the t track.
 
Wow, 220 watts? Seems high to me but then I don't know your intended usage. As for the racks, I dont see why not. Easier on my square tubes but with a bit of ingenuity it shouldnt be a problem.
solpanelroof2.jpg
 
I'm sorry I can't find it at the moment but somebody might supply the link. I thought it was a great idea in that you can simply prop up the solar panel on a pivoting arm that will get more sun in lower sun conditions like winter time. The panel was N - S on camper roof and would pivot up to W or E. I can't explain it well but someone will know what I'm talking about, I think it's brilliant. A little off the Yakima question but something you might want to plan for in you setup.
 
Very nice solutions! Thanks for the info!

Based on your responses, I changed my order from 5' yakima tracks, to 10' and will work out placement of the panels on the forward part of the camper roof, leaving room at the back for other stuff, TBD. The Yakima tracks seem to present lots of options, and I like options.

The positioning arms sound good, as I plan on camping year round. Thanks for the tip James.

Here's my estimated usage over 24 hour cycle:


CPAP w/humidfier: 3amps, 8 hours
Waeco 65L 12v fridge: 1.9 amps, 24 hours
Furnace fan: 1.8 amps, 3 hours
vent Fan: 1.2 amps, 1 hour
Ceiling Light LED: 1.2 amps, 2 hours
water pump: 1.2 amps, .5 hours
total amp hours: 79.4

FWC will install 2 AGM batteries that are rated at 80ah, I think. At a 60% discharge rate, the batts will provide approx 96 amps over 24 hours. 220 watt panels should provide approx 80 amps/24 hour cycle, keeping up with usage, assuming 70% of rated panel efficiency and 6 hours of sunlight.

Comments on my math/assupmtions would be most welcome, as I'm new at this, and could definately be off on something.


williak
 
From what I have read, I "think" some solar panel controllers can charge a 12 volt system from a 24 or 36 volt solar array. So look into this, if you have more than one panel. I think you "might" get more power from your panels if they are wired in series. Just something to look into. I need to research this better as well.

Steve
 
Thought I would post an update, since I picked up two 100W panels from Grape Solar through Costco. Also installed a trimetric 2025 battery meter with Steelhead's help, but that's another topic.

I went with Zoie's idea and secured the panel directly to the factory installed Yakima tracks. To do this I bolted two 1.5" x 1.5" x 1/8" x 60" angle pieces of aluminum to a panel (Can't be angle iron if it's aluminum, can it?). Then I drilled through each end of the angle aluminum pieces and secured to the Yakima tracks using the steel plate that fits in the track channel and the matching set screw with plastic lock ring. FWC puts some of the plates in the channel in their install. The screws and plates are intended to secure Yakima rack towers using their "Landing Pad 1", several of which I happened to have on hand. Pretty sure you can buy just the screws and plates from Yakima. I had to shim the screws a bit with washers so they wouldn't bottom out in the track.

It seems very secure, but I will definitely be checking the screws and bolts often on the next trip. The bolt heads securing the aluminum angle to the panel are only about 1/2 inch above the camper roof, so may need to cover them with something soft in case there is flex when driving on wash board roads, etc. Wouldn't want the bolt heads to hammer the camper roof. The set up seems rigid enough, but definitely can't be sure at this point.

I'm going to mount the other panel under the camper cab-over. Lucky for me, there are some good threads on that topic. This is such a great forum..

Here are some photos of my install..


Williak
 

Attachments

  • top.jpg
    top.jpg
    181.8 KB · Views: 3,905
  • racks.jpg
    racks.jpg
    137.2 KB · Views: 2,540
  • channel.jpg
    channel.jpg
    136.7 KB · Views: 1,746
Serious thanks for the description of the install and the pictures. After observing electrical consumption/recharge for a few weeks with the 2025rv, I am nearly certain that solar needs to be my next project. I had thought about installing the panel on the Yakima cross bars but your soluton looks like an excellent method too and keeps the bars clear for their real purpose. Your photos really help to understand the installation too. Nice work and thanks again.
 
williak said:
Thought I would post an update, since I picked up two 100W panels from Grape Solar through Costco. Also installed a trimetric 2025 battery meter with Steelhead's help, but that's another topic.

I went with Zoie's idea and secured the panel directly to the factory installed Yakima tracks. To do this I bolted two 1.5" x 1.5" x 1/8" x 60" angle pieces of aluminum to a panel (Can't be angle iron if it's aluminum, can it?). Then I drilled through each end of the angle aluminum pieces and secured to the Yakima tracks using the steel plate that fits in the track channel and the matching set screw with plastic lock ring. FWC puts some of the plates in the channel in their install. The screws and plates are intended to secure Yakima rack towers using their "Landing Pad 1", several of which I happened to have on hand. Pretty sure you can buy just the screws and plates from Yakima. I had to shim the screws a bit with washers so they wouldn't bottom out in the track.

It seems very secure, but I will definitely be checking the screws and bolts often on the next trip. The bolt heads securing the aluminum angle to the panel are only about 1/2 inch above the camper roof, so may need to cover them with something soft in case there is flex when driving on wash board roads, etc. Wouldn't want the bolt heads to hammer the camper roof. The set up seems rigid enough, but definitely can't be sure at this point.

I'm going to mount the other panel under the camper cab-over. Lucky for me, there are some good threads on that topic. This is such a great forum..

Here are some photos of my install..


Williak
Williak,

Like you I mounted my panel to the Yakima rails. I had read that panel heat was a problem and air circulation under the panel was needed. I ended up putting 1 inch aluminum spacers between the angle and the rails to lift the panel off the roof.
 
Nice idea with the spacers on the YAK tracks below the aluminum bracket Camelracer. What did you use for the spacers? -cut the aluminum down from another piece, or did you find something stock?

I've got a flat 1/8" x 1 1/2" piece that I could cut into 1" sections or so and stack. Think I'll only go up 1/2"-3/4" up from the tracks as I want to use the little plastic 1/4" lock washer that came with The Yakima screws, at least they came with the YAK Landing Pads. That should be enough to provide clearance between bolt heads and the aluminum angle bracket. I may attach a strip of 3/8" weather strip along the brackets, covering the bolt heads, just to be safe.

Williak
 
Williak,

Thanks for posting the info on mounting your Solar panel. I also bought two of the Grape Solar units from Costco. We have 10' tracks on the Keystone and what you have done is very close to what I was planning to do.

I got latched up trying to devise a pivoting mount (described earlier in the post) and have mostly decided to just hard mount flat due to reliability concerns about a pivoting mount. I like your use of the Aluminum "L" material to keep the top of the panel below the bottom of the Yakima towers so we can still carry our Kayaks (or other items).

I also planned to mount the second solar panel in a slide out tray on the bottom of the cabover bed compartment. I look forward to seeing those details since I have not yet come up with a mount design there. Also I am still trying to decide on an MPT controller.

I do not know what diameter fasteners you used but you want to be sure they are large enough to handle the dynamic loads (particularly in high winds and during any off pavement travel). You also want to be sure the thickness of the Aluminum "L" allows for adequate thread engagement.

The following is based on assumption that nuts are not used and that the fasteners are threaded in to the Aluminum "L" material to minimize chance of nuts backng off the fasteners as well as fastener end (and nut) impacting the roof on bumpy roads.

Comment on fasteners I found on the web:

"As a general rule, a bolt should engage a distance greater than or equal to its outer diameter. The number of threads engaged can then be calculated from the number of threads per inch on the bolt. So if you are using a 1/4-20 bolt, meaning it has 1/4" diameter and 20 threads per inch, you should engage the bolt 1/4" into the hole, or 5 threads. (20 threads/inch x 1/4 inches). Alternatively a #10 fastener has 24 threads per inch and you would need about 3/16" thread engagement.

Why: The shear stress on the threads will be equal to the tensile stress in the shank of the bolt. This means that once you thread the bolt in a distance greater than its diameter, the shank itself will fail before the threads shear off the bolt under tensile load.

Sources: Design of Machinery class at Purdue University, page 10 of the following MIT article: http://web.mit.edu/2.75/resources/FUNdaMENTALs%20Book%20pdf/FUNdaMENTALs%20Topic%206.PDF"

I work in Aerospace (Optical Systems Engineer for Spaceborne Weather Sensors) and I checked with a Mechanical Engineer colleague. He confirmed the rule of thumb of engaging the fastener into material at least as thick as the fastener outer diameter. He said that 1/4-20 fasteners are far stronger than needed but since the operational environment will have unknown dynamic loads he advised sticking with #10 or 1/4" fasteners.

The bottom line is that if the fasteners are threaded into the Aluminum "L" material the thickness of the Aluminum "L" probably should be at least 3/16" thick. Another consideration for making the "L" material thicker is that you want the mounting to be stiff and not flex or allow twisting. Flexing and/or twisting can result in damage to the Solar Panel as well as the camper roof (from impacts). I have not yet looked into the minimum "L" thickness relative to twisting and flexing over the span between the Yakima tracks.

In any event (nuts or not) all fasteners probably should be #10 or larger. (if you are not already using lock washers or equivalent I strongly recommend adding them).

BTW: A technique we use on our instruments for Space is to "stake bond" fasteners. We apply a thin line of epoxy across the head of the fasteners to keep them from backing out during the dynamic loads from launch (we almost always use internal threads and don't use nuts unless they are captured).

Regards,

Craig
 
Well, maybe it is rocket science after all.

Really excellent information Craig, thanks for posting. I guess I always knew there were sound mechanical guidelines behind bolt size, thread count, etc. but never felt compelled to check it out. But yeah, the possibility of a 20lb object flying off the top of my camper at highway speed is pretty compelling.

To secure the panel I'm using 4 1"x 1/4" steel hex bolts, soon to be stainless, if and when I can find them. I'm coming up through the aluminum L bracket into the panel bracket and fastening with nylon lock nuts. I'm willing to give my Ace Hardware fastening method a shot, and have a perfect stretch of road in mind to test things out - exquisite washboard. You know, the kind where you either have to go 50 mph or 5. Between stops to check the fasteners, and turnbuckles BTW, I can look for the drain hose that bounced out of my rig last time I was down there.

I think I will go with 1/4" aluminum L brackets though. That's an easy replacement: $15.94/ 5' length on onlinemetals.com
Much flex at all with the brackets could do some serious tattoo work on the camper roof, padding or not. Had not considered the possibility of damage to the panel.

williak
 
williak said:
Nice idea with the spacers on the YAK tracks below the aluminum bracket Camelracer. What did you use for the spacers? -cut the aluminum down from another piece, or did you find something stock?

I've got a flat 1/8" x 1 1/2" piece that I could cut into 1" sections or so and stack. Think I'll only go up 1/2"-3/4" up from the tracks as I want to use the little plastic 1/4" lock washer that came with The Yakima screws, at least they came with the YAK Landing Pads. That should be enough to provide clearance between bolt heads and the aluminum angle bracket. I may attach a strip of 3/8" weather strip along the brackets, covering the bolt heads, just to be safe.

Williak
Williak,

You could just use square aluminum tubing from your local hardware store.
 
This is some great information! I just ordered a Hawk with one factory panel, but not delivered yet. I also ordered the Yakima 10 foot tracks thinking that could use them for a second panel. I know solar panels are way more efficient (greater output) if they ventilate from underneath to stay as cool as possible. Thanks again!
 
Hello,
I just finished installing my solar onto my Yakima racks, thanks for your impute Leadsled9. I read that even the slightest shadow on a panel can compromise the charging capabilities of the panel. Attachment 1, shows how the bars could cast a shadow along the edge of the panel under the right conditions. So I am trying this, Attachment 2, the panel is almost flush with the bars, but the panel is mounted high, 3" above roof, cables exposed somewhat and what about wind resistance. Don't want to drill any holes into the roof.
I would appreciate your impute.
 

Attachments

  • 177 (640x360).jpg
    177 (640x360).jpg
    97.4 KB · Views: 1,044
  • 244 (640x360).jpg
    244 (640x360).jpg
    89.5 KB · Views: 1,150
I have my panel mounted using a system sold by AM Solar out of Oregon. I've had it mounted for over a year now and it hasn't flown off yet. The 3M VHB tape is pretty much permanent. It can be removed by using some 100% alcohol and I've done it before to change from a 100 w panel to a 150 w panel. These mounts will fit the Grape solar panels as I have. This mount also eliminates having to drill into my roof. It does require you to have a smooth roof top surface. They also sell a bracket to allow tilting the panels once stationary. Here some images.

full

full

full


Once stuck on the roof, I then used the Dicor sealant to keep the water out. No affiliation with AM Solar but they sell all that you need to do this mount.
 

New posts - WTW

Back
Top Bottom