Mini Dinette for the Eagle

DLN

Senior Member
Joined
Jun 6, 2007
Messages
1,114
Location
Grass Valley Area, CA
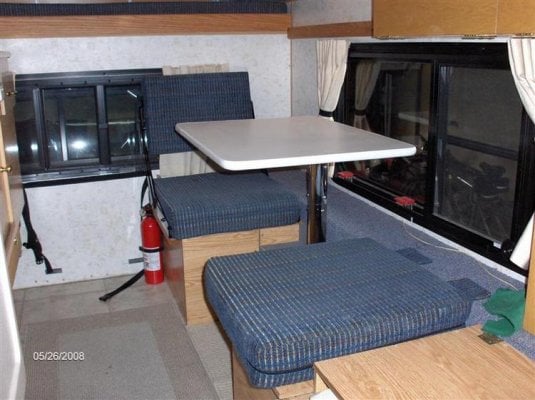
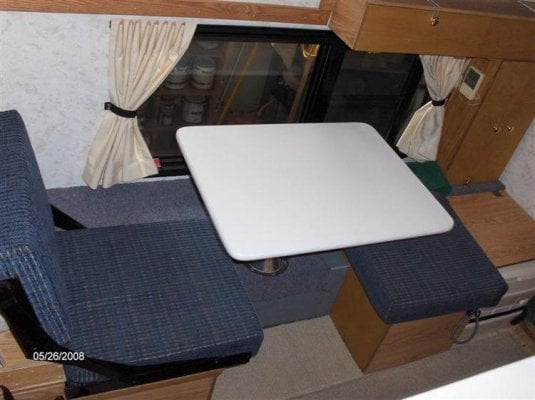
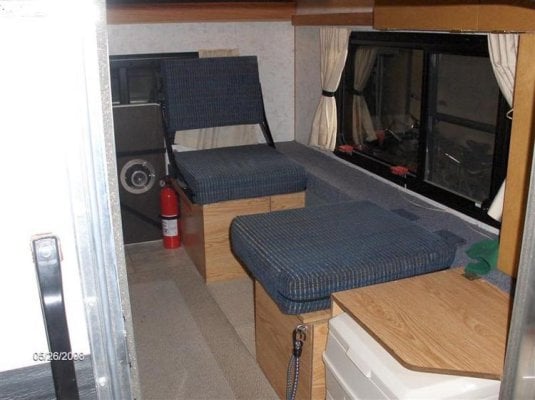
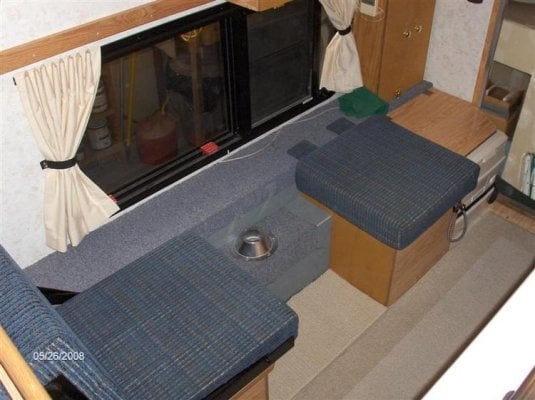
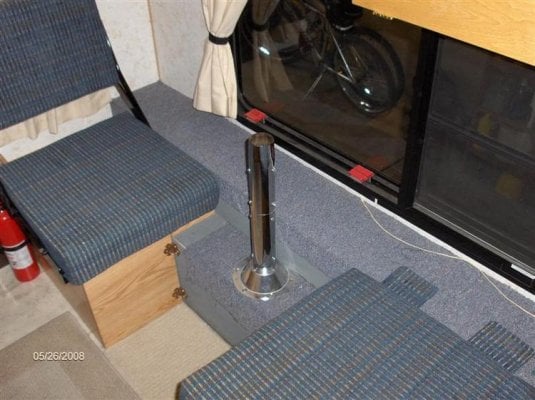
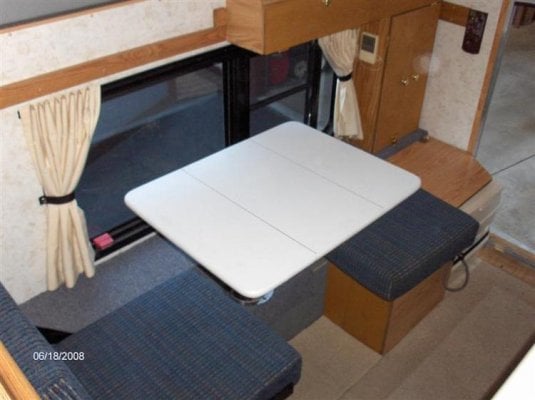
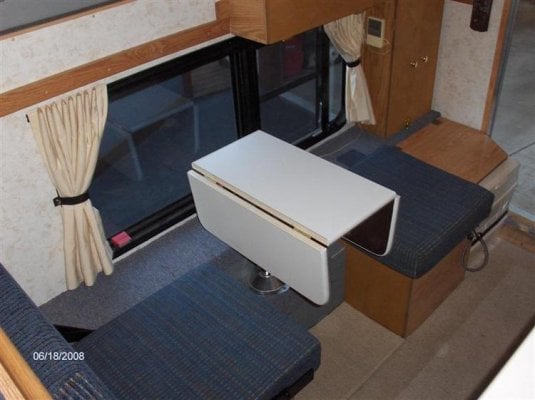
After seeing the picture of a mini dinette posted by Stan in what appeared to be a shell camper I started taking a good look at the possibility of creating one in our Eagle. Turned out it was doable though with a few drawbacks. The trade off for opening up the camper window and having seating with the main isle open, not to mention a very sturdy table, is the loss of storage space. We decided we could just carry more portable containers and use the cab of the truck if we need the space. This set up is workable in the smaller camper but would work great in the larger 8' plus campers.

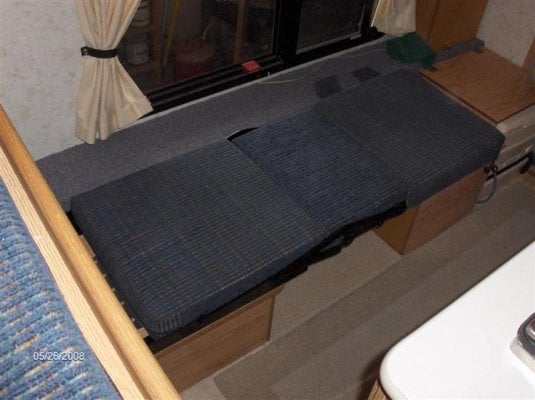
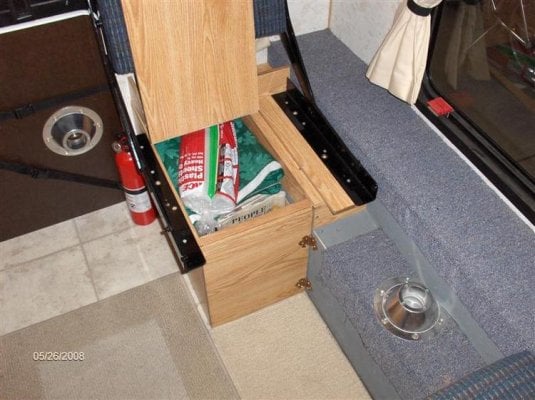
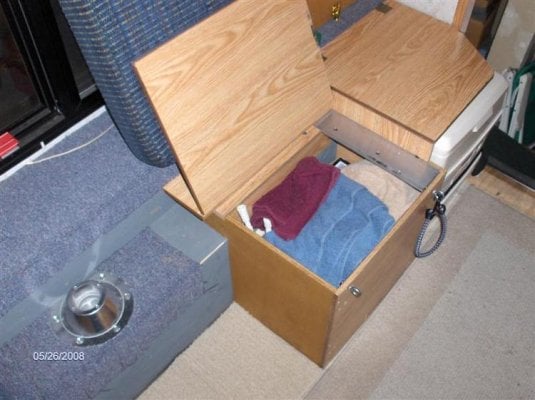
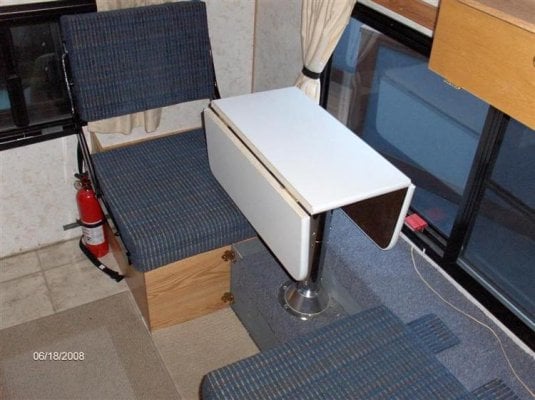
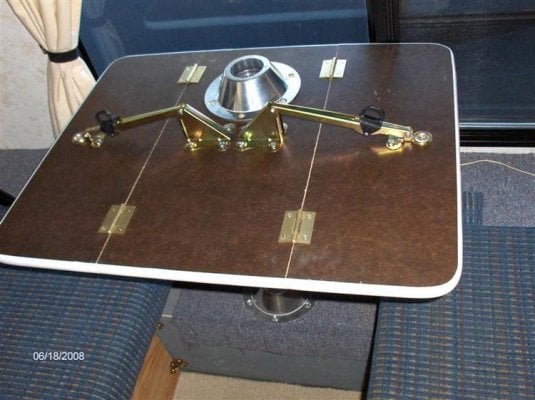
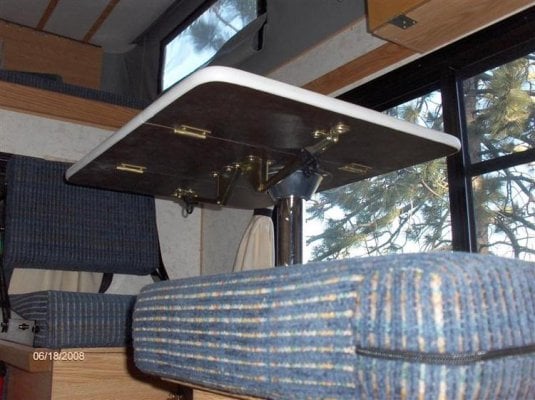
I cut the couch cabinet down to allow for 23" of foot space and two approximately 18" x 19" seats, just about the size of a typical dining room chair. The rear seat has a back formed by the existing couch back hardware and will fold over to form a bench in the table opening. Unfortunately the other seat can't have a fixed back as it would always have to move to get in and out of the camper. I'm working on a portable/easy solution for that one but for the time being that's my seat and my wife gets the good one, there's always compromise with that limited space. Cutting down the couch cabinet forced me to change the access ports to vertical slides from the existing horizontal set up. The biggest issue with the table was resizing the table support. Since I don't weld, and I'm not sure that material would weld that well anyway, I cut a piece out of the middle of the tube with a sawzall and added 3- 3/4" x 3/4" pieces of oak inside and screwed the two pieces together. A rather brutal approach but effective. The table top was made by FWC (thanks again Chicali) and shipped here in two days. I couldn't get matching carpet as FWC has changed their color but will be doing that eventually. I'll also be adding a wall cabinet next the rear seat back after we field test the set up and can see how much elbow room I can steal from that corner. Here are some shots of the new Mini Dinette.
 

Attachments

  • HPIM0556 (Medium).jpg
    HPIM0556 (Medium).jpg
    66.7 KB · Views: 3,335
  • HPIM0558 (Medium).jpg
    HPIM0558 (Medium).jpg
    50.6 KB · Views: 3,328
  • HPIM0546 (Medium).jpg
    HPIM0546 (Medium).jpg
    53.3 KB · Views: 3,279
  • HPIM0548 (Medium).jpg
    HPIM0548 (Medium).jpg
    59.5 KB · Views: 3,268
  • HPIM0555 (Medium).jpg
    HPIM0555 (Medium).jpg
    67.3 KB · Views: 3,125
More Mini Dinette Pictures

Here are a few more shots. The house battery is still under the rear seat and will slide out through the hinged front panel on the seat for access to the turnbuckle ports. Also, we made the seat cushions from the existing couch cushion and the seat back from 3/4" plywood, 3" foam and some matching material we had gotten from FWC when we bought the camper.
 

Attachments

  • HPIM0553 (Medium).jpg
    HPIM0553 (Medium).jpg
    51.3 KB · Views: 2,650
  • HPIM0552 (Medium).jpg
    HPIM0552 (Medium).jpg
    70.7 KB · Views: 2,658
  • HPIM0550 (Medium).jpg
    HPIM0550 (Medium).jpg
    60.8 KB · Views: 2,555
great desigh!

Really a good thought out mod.!:thumb: As some one who welds i think your way is better as the chrome would rust where you welded.
Make sure fwc pays you for your layout when they start putting it in new units!!(just kidding Stan)
Drive slow and enjoy "its the journey"
Les Lqhikers:
 
TT,

The bed folded out is only 5', I'd cut the factory couch down to that size right after we got the camper to accommodate the porti-potti upgrade. Since we never have a third person camping with us we didn't need an extra bed. In the 8' campers it would be possible to set up two roll over backs in the dinette and have a 5'-6" plus bench or bed in that space. No such luck in the Eagle.
 
Dinette for Grandby too

DLN,
Very nice job! I too was inspired by Stan's dinette pix and am working on converting my Grandby's couch into one. I have been puzzling over how to support the table and was very excited to see how you did it. However, no luck for me. It seems that the lower ledge in my camper is narrower than the one in your Eagle and the table base wont fit on it, even cut down. Back to the drawing board. I will post pix of my dinette when it is finished.
 
bobg,

Too bad the table mount won't work the same way for you, maybe consider adding a little width to the ledge for the table base. I only wish I had the extra space to work with that you have in the Grandby, you could have two roll over seat backs to form a bed/couch in the table opening. I'm looking forward to seeing your finished product. Best of Luck.
 
Top notch job DLN. I note the hinged, fold down door on the upper cabinet as well as the custom cabinet in the rear too. Very nice.
 
Thanks to all for the positive comments. We got to try out the new set up on a two nighter this past weekend and loved it. The camper feels larger and is brighter with the window not being blocked by the couch back. Having a solid table set up full time was great for food prep., washing up etc., and especially for morning coffee.

SunMan,
I changed the stock upper and lower cabinet doors to the fold downs last year to gain depth (about 1 1/8") and to allow us to open both doors at the same time. Much better use of the space. The safety latches (light bungees for the upper and barrel bolts for the lower) aren't the cleanest solution but have worked out well so far. There are some better pictures of the cabinets posted in the thread "FWC Interior Photos".
 
mini dinette

DLN,

Great job.

I have a new Hawk ordered, and want to do the same modification.

How hard was it to cut down the couch? Are the cushions hard to cut down?

I was thinking of buying another set of folding hardware, and have a back on both seats.
 
leadsled,

The seat cushions weren't that tough to resize. I had asked Chicali at FWC service about making them for us and he thought the custom sizes would get fairly pricey. The stock back cushion is very tough to cut down. It's made of a welded aluminum frame covered with 1/8" paneling and 2" of foam glued to that. The end aluminum tubes are filled with oak lumber to provide backing for connection to the roll over hardware. I remodeled the back once when we first got the camper but didn't use it this time. A piece of 3/4" plywood with 3" of foam glued to it and covered with fabric is plenty strong.

I looked into using two roll over backs in our Eagle and found that the rear seat would always have to move to get in and out of the camper. In order to roll the back enough for access the table would have to be removed or it would require some complicated swivel/tilting hardware. The double roll over seat backs will work great in the 8' campers but I couldn't get to fit in the 6 1/2' I had to work with.

I'll look forward to seeing how your's comes out. Best of Luck.
 
leadsled,

I just checked the FWC site for Hawk dimensions and it appears you'll have about 10" more width to work with than I had in our Eagle. I measured our dinette and with that 10" the second seat back may be flush or close to flush with the right hand side of the door. If that's case you will be able add the second roll over seat back to your dinette.
 
very impressive mod...i would love to do something like that to my rig! tons of room and great point about opening that window space up...awesome!
 
erod,

Jump in and do it, it really wasn't that much work and the result is well worth it. I'm going to be working on a prototype drop leaf table for a bit more versatility in the near future and will post pix when it's done. If I can provide any info/advice along the way let me know.
 
Drop Leaf Table

I decided a drop leaf table might create a bit more versatility in the limited space we have in the Eagle Dinette. With the full table we had to remove or spin it for access to the seat storage and remove it when the bed was in use so we didn't step on it getting out of bed. Now we can drop the leaves for storage access and spin it 90 degrees when the bed is pulled out. Also, with one leaf down I think I'll have enough room to add a fold down seat back to the seat closest to the door.

Here are a few pix. Sorry for the poor quality of the first shot, I deleted the good shot instead that one and the image is no longer on the camera, oops.
 

Attachments

  • HPIM0597 (Medium).jpg
    HPIM0597 (Medium).jpg
    44.7 KB · Views: 1,020
  • HPIM0598 (Medium).jpg
    HPIM0598 (Medium).jpg
    48.9 KB · Views: 1,075
  • HPIM0599 (Medium).jpg
    HPIM0599 (Medium).jpg
    61.6 KB · Views: 1,049
  • HPIM0601 (Medium).jpg
    HPIM0601 (Medium).jpg
    62.9 KB · Views: 1,037
  • HPIM0602 (Medium).jpg
    HPIM0602 (Medium).jpg
    70.1 KB · Views: 988

New posts

Try RV LIFE Pro Free for 7 Days

  • New Ad-Free experience on this RV LIFE Community.
  • Plan the best RV Safe travel with RV LIFE Trip Wizard.
  • Navigate with our RV Safe GPS mobile app.
  • and much more...
Try RV LIFE Pro Today
Back
Top Bottom