BluesideUp Alaskan Project

BluesideUp

Senior Member
Joined
Oct 27, 2013
Messages
132
Location
Miami Springs Fl.
Hey Guys,
New to the site and a newbie to truck camping, headed for GA next week to pickup 3500HD 4x4 with flatbed then on to KY for a 2010 11' CO Alaskan and back to Miami to begin the process of outfitting. I will post my progress with pics as it proceeds and would be appreciative of suggestions. The way I see it is that I know enough to get my self in a lot of trouble real quick.
 
BluesideUp said:
Hey Guys,
New to the site and a newbie to truck camping, headed for GA next week to pickup 3500HD 4x4 with flatbed then on to KY for a 2010 11' CO Alaskan and back to Miami to begin the process of outfitting. I will post my progress with pics as it proceeds and would be appreciative of suggestions. The way I see it is that I know enough to get my self in a lot of trouble real quick.
There are alot here to help bail you out...or dig you in deeper....which may be the same thing ;)

best of luck with the 11'...looking forward to the pics
 
Thanks Rusty. Made it back to Miami with no issues from KY. I had picked up some stainless chain, turnbuckles and shackles from a rigging store before I left so the Alaskan was secured from the jack plates to the flat bed grab rail and for the most part stayed true.
I will post some pics as soon as I resize them, what software works best for you?
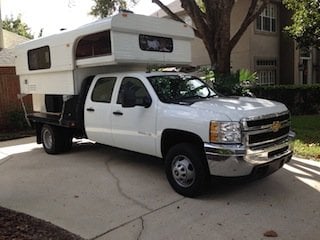
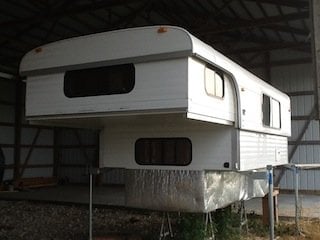
My Alaskan was delivered to the first owner 3/15/2010. Interesting guy and had some very definite ideas on what he wanted based on living in Colorado. It had sat in a three sided barn for a least a year in KY. Very clean interior and a wash took care of exterior
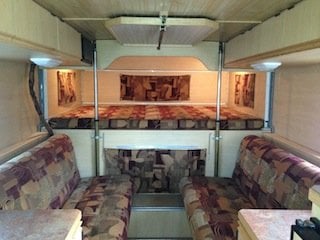
Its an 11' slide in cab over which Bryan says is the only one he's made to date. 7" longer front dinette and wider bed 55 x 81.
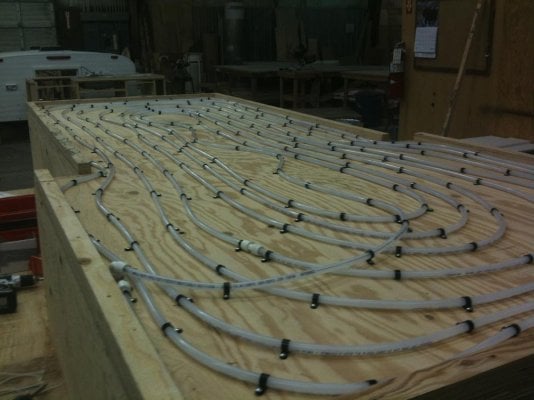
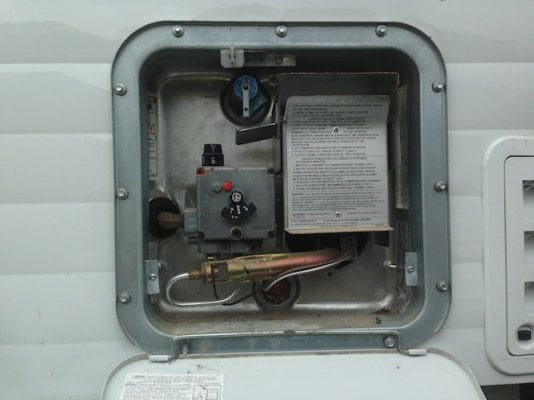
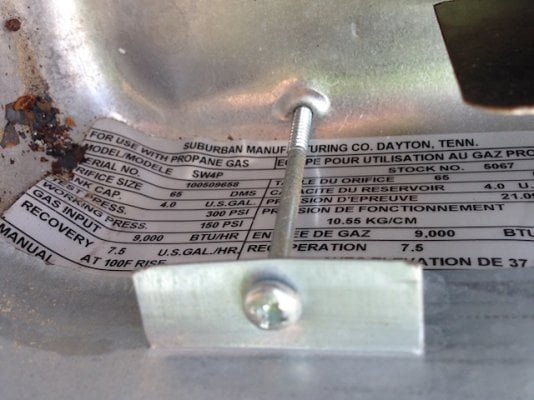
He opted for floor heating with built in pex tubing for anti freeze in lieu of furnace, The anti freeze is heated by a small propane fired heat exchanger. He stated while it worked well there were mixed results. it was plumbed so as to heat the exterior sections of the floor under the cabinets first then the exposed interior floor. I will reverse that to see if I can get better results
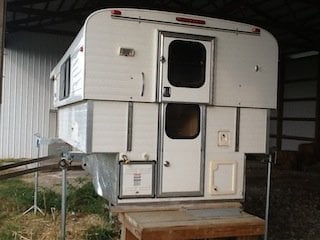
The extra space by eliminating the furnace was converted into shelving for storage
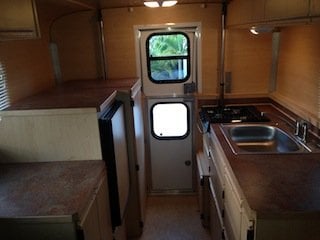
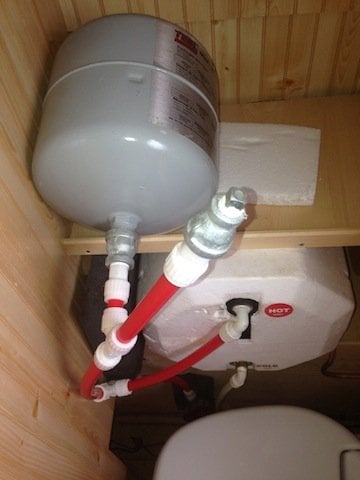
The hot water heater was eliminated and replaced by an external 115 VAC electric instant hot plumbed into the sink and powered by generator. Dual fans, 3 burner cook top no oven, NovoKool 4500 and of course a thetford.
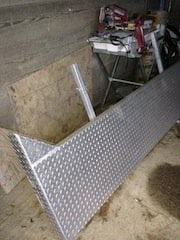
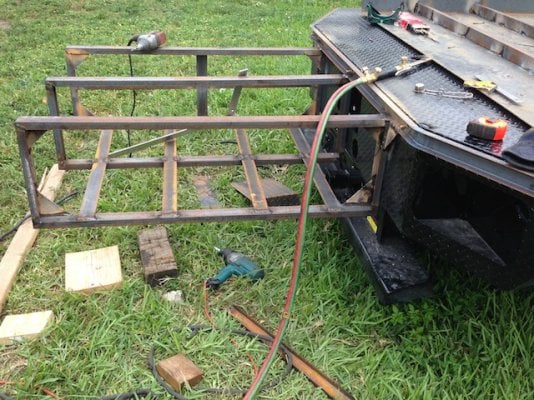
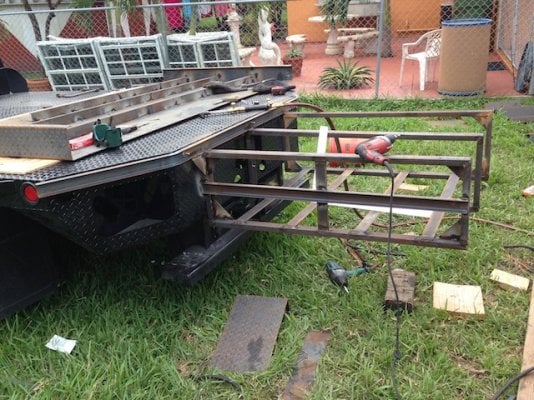
My first work scope is a platform extension for the flat bed not only to support the camper but to put some steel between the camper and my back up skills.
After that comes a semi permanent securing of the camper to the flatbed.
I want to secure directly from the camper to the flat bed, eliminating the jack pads etc and would be interested in ANY feedback on that and dunnage under the camper. I want air movement under the camper so the transfer of heat or cold soaking of the metal flatbed is minimized plus to allow any moisture to escape
For the trip back I had purchased 1" x 4" placed along the exterior footprint of the camper to keep it off the flatbed diamond. The cab over clearance is 7 1/2".
Interesting side note was that while driving 65-70 I could place my hand on the cabover and feel the popup vibrate up and down 1-2" which is what has caused some chaffing marks on the exterior of the front hatch.
Once the mounting and securing is complete I will have some aluminum storage boxes made for above and under the flatbed
 
This will be quite the camper....a few others on expedition portal have done something similar but to find an 11' one off with pex heating is a real score...sounds like you're going to do it justice too....aluminum boxes.....man o man

a few have installed locking pins for that top movement issue...sounds like there may be room for a little something like that.

depending on how the floor is built...you may want a little rigid insulation and a removable hard facing of some sort to isolate the floor heating system from the truck bed but still be accessible for repairs...nothing lasts forever...

1/2-1" is usually enough air for circulation...Bryan used to use flat 2x4's for the mount (1 1/2")...bolted front and back only...I'de go stainless...I used to have mine mounted semi-permanently and thought if I could find some aircraft camlocks big enough they would be sufficient to hold her in place...depending on what kind of use you intend

I use windows viewer for most photo work....and adobe photoshop when needed

can't wait to see the pics...
 
Headed up to Ft. Pierce, FL to Turner Machine shop Friday to talk about modifying my Southern Coach (Redding) standard steel 9.4' Rodeo goose neck flat bed that came with truck.
On a mission to lower weight so I will look at reducing the head ache rack to headboard then fabricating a 4' extension to support the 11' Alaskan and hang a spare tire.
The first owner started with a long box but upgraded his truck to an aluminum goose neck flat bed. But he still had a 3-4' overhang so his fabricator welded larger extrusions under the existing bed allowing the platform frame extrusions to be inserted inside and pinned.
Simple solution but mine is a little more complex since I want to hang a spare and need more meat
 

Attachments

  • IMG_1963.JPG
    IMG_1963.JPG
    34.1 KB · Views: 542
  • IMG_1948.jpg
    IMG_1948.jpg
    24.3 KB · Views: 534
I'm jealous....nice rig

I'm looking at upgrading from our 10' NCO....and that 11' would have been perfect....6'3" on the benches....ugh

I'll be watching the progress closely

part of the problem with ours is....it's a family antique...purchased new in 1970...tough to release....lots of memories
 
Interior pretty standard except bed is 55" wide and couches are 7" wider.
Furnace space converted for storage.
Has awning rails on rear and under windows each side.
No oven or hot water heater.
Both Comfort Air Fans are intermittent and Alaskan now installs MaxAir. I would be interested in feed back on what you guys use.
I am going to convert existing interior & the exterior light assemblies to LED after all the exterior mods are done.
Basically Camper appears to be in good shape except for some light water staining on interior wood each side under couches by sliding access doors. Once the camper is mounted and before the boxes are installed I will seal sliding doors and insulate opening to prevent heat loss.
Always open to suggestions
 

Attachments

  • IMG_1991.JPG
    IMG_1991.JPG
    34.8 KB · Views: 681
  • IMG_1992.JPG
    IMG_1992.JPG
    26.9 KB · Views: 677
That is really amazing, 44 years and still going. I consider myself extremely fortunate, there were 4 other buyers knocking but mine was a reasonable offer.
 
nice score....

7" on the bench would have done it for me...I had seen this earlier and thought that someone didn't know what they were talking about....11 feet, right...and the covering on the bottom looked like...well I'll tell you honestly....a diaper....so I passed on it...not to mention it was in Kentucky.....

You're one lucky guy....be kind to it and you'll have a blast...nice heavy hydraulics too
 
Yeah I asked about the diaper, I was discrete and asked if it was a factory mod. The owner had her on a open flatbed so it was some sort off bubble aluminum foil wrap that he thought might help with insulating the camper. I asked him to pull it but there are a lot staples still leftover. The Alaskan website has been the best source for me, there were two others but in the NW
The certificate of origin signed by Bryan states 11' COFD 2160 lb. which is a little heavier than I thought since a 10' is listed at 1640 on TCM.
Found a local fabricator who is going to quote the flat bed work so I have put Turner Machine Shop in Ft. Pierce on hold.
Working through a tie down set up. I am leery of blind drilling through the floor to through bolt on 2 x 4's because I have no idea where the pex tubing runs.
So I am thinking about some form on angle iron frame, secured to the bed to sit her in then separate tie downs to hold her in it. Even thought about securing the frame with 6-8 heavy duty 2 part Lord mounts to provide come cushion.
Any feed back is always appreciated. I like to say that my mind is sometimes like a dangerous neighborhood, not a good place to go alone.
 
Alaskan may have a pex pattern they use for the tubing which may give you some clearances...they've been a great help with a few guys here. Bryan is registered on WTW as well....I think he is Mr. Alaskan if I'm not mistaken.

I can relate with the mind issue....left alone in a small room we can be dangerous...I use that as an excuse for fishing...keeps me focused.... ;)
 
Bryan has been very helpful. Since its my day car for the moment I have been getting a lot of questions.
Next week I will get the platform / steps / spare storage extension fabricated and the headache rack cut down from 36" to 16". That will allow the camper to come forward 2 - 3"and permit rear window access to the Alaskan.
Will just build a simple aluminum 2 x 2 1/4 frame to fit Alaskan then bolt it every16" to the flatbed diamond plate, insert the Alaskan & tie her down to the bed.
We have a lot of Parks here in Fl. so I am itching to start visiting during the week and spend the weekends at home as I get acclimated to my rig
 
Bryan, as always came though with a picture of the pex tubing. Blind drilling would be asking for it
 

Attachments

  • Pex tubing.jpg
    Pex tubing.jpg
    108.8 KB · Views: 350
Ugh.....asking for it is right....

maybe next time they'll leave a 3-5" border for just what you're going to do......that amount of missed coverage won't make any difference in a small space like that.

I'm hoping there is a removable bottom??...

could you provide the specs on the heating unit?...and where they put it?
 
You are looking at the bottom of the Alaskan upside down. No removable bottom. I believe it was spray insulated then the bottom 4 x 8's installed.
The LH side of the Thetford picture is where the supply and return lines enter into the Thetford cabinet area.
Note that the outside of the camper floor which is actually under the cabinets is heated first and the center last, which is why the first owner said that while he could feel the effect of the pex it was not heating as well as he expected in Colorado and Yellowstone. My plumber agrees with how Bryan installed it but I disagree. Seems like a waste of energy to heat the inside of cabinets before the inside of the camper. Keep the core warm first
The propane heater is mounted in the Thetford area and is accessed from the outside just after of the refrigerator access area on the rear RH side.
The white insulated casing for the heater and a pre charged bottle can be seen on the inside pic. It is unsecured as is the wiring run for the pump which has an inline switch.
As a aviation guy I do not like loose stuff that can beat itself to death and or electrical runs that can get snagged up in something that is stowed and pulled out so I will secure and clean it up
The Thermostat is located on the LH forward settee bulkhead. I will look at the heater data plate for specs when it quits raining.
My fabricator purchased about $600 in materials for the 4' flat bed extension so hopefully the 10 x 5' diamond plate will be bent to the same specs as the existing bed tomorrow and we will start that process. I will try to document
 

Attachments

  • IMG_2005.JPG
    IMG_2005.JPG
    74.3 KB · Views: 225
  • IMG_2006.jpg
    IMG_2006.jpg
    45.4 KB · Views: 227
After thinking about it...forced air heating systems throw heat to the perimeter of the building to heat the areas closest to the cold walls, even as to place registers under windows. By first heating the outside walls of the camper you're fighting the cold at a point nearest the source. If you were to heat the center of the camper first, the water would be cool by the time it got to the coldest portion of the camper......the outside walls.

I don't like loose things either...loose things rub and wear holes and fray wires.....tight wiring, tight ship...plumbing as well
 
Good point. Bryan got back to me about the insulation. They put in a couple layers of foil bubble wrap, probably like the "diaper" then the plywood.
 
The heater is a SW4P made by Suburban manufacturing, tank capacity 4 USG, working press 150 psi, 9000 BTU, Recovery 7.5 USG/HR at 100F rise. Just a dedicated hot water heater and pump to push heated anti-freeze around
 

Attachments

  • IMG_2012.jpg
    IMG_2012.jpg
    99.5 KB · Views: 194
The second pic is of the curb side of the spare tire box which will sit under the 4' flatbed extension. The tire box will have a locking access panel curbside.
The first pic is street side and you can see the 4' flatbed extension upside down on the bed and if you look at the left hand side of the pic you will see where the structural support members that are welded to the diamond plate do not go the full width. That is for the 2 step cut out.
Rear departure angle is already an issue due to the commercial grade hitch assembly. The hitch assembly mounting flanges bolts to the frame and also serve to secure the flat bed.
There is a"flying bar" that runs under the hitch parallel to the rear bumper and the departure angle is 18 degrees from the bar. I am not sure of its purpose, prevent a rotation that drags the second fuel tank which is 40 gallons and or addition hitch plate support.
I will revisit this after the camper is married up to the flatbed and the SRW conversion is done because I don't want to be going off hardstand or flat ground on dually's
 

Attachments

  • IMG_2042.JPG
    IMG_2042.JPG
    176.3 KB · Views: 247
  • IMG_2044.JPG
    IMG_2044.JPG
    169.8 KB · Views: 237
Back
Top Bottom