BluesideUp Alaskan Project

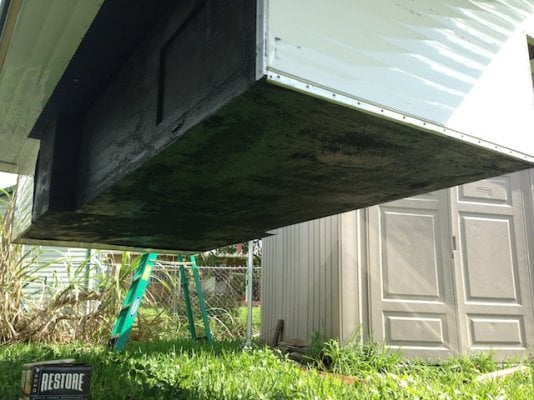
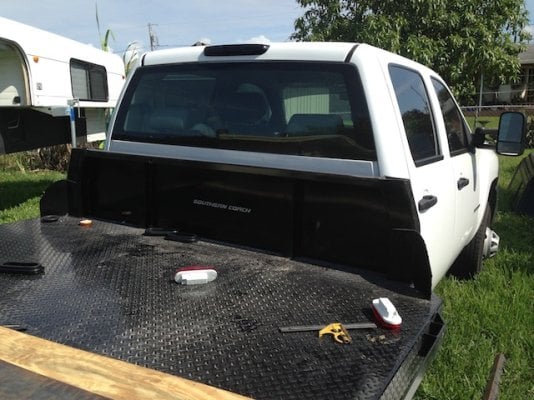
This pic explains my rationale, if that's possible. I really did not want to buy new and had my eye on two used 8.5 's, one in Montana and the other in Idaho which would have worked on the 9'.4" flatbed with a swing rear spare tire mount. But then there were ladder issues
The 11' was in Kentucky and a day away from Georgia, a lot more convenient so I made an offer which the owner accepted. Original March 2010 invoice from Alaskan was $28,422
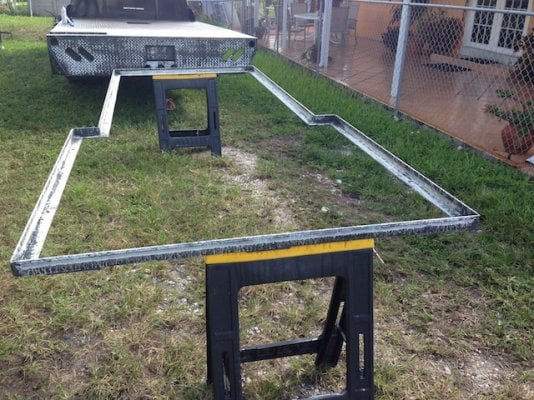
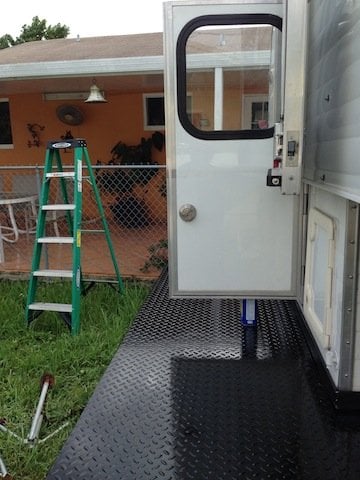
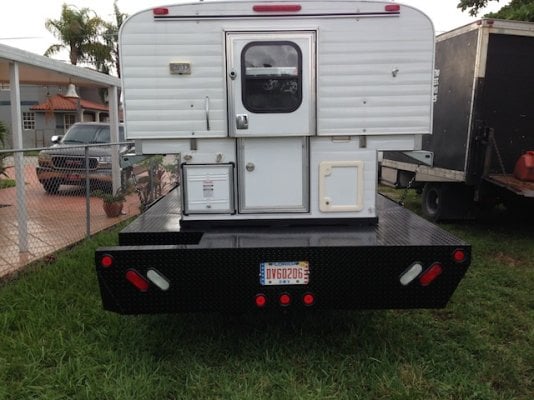
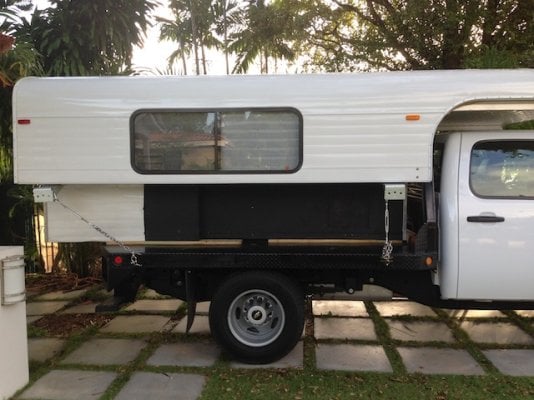
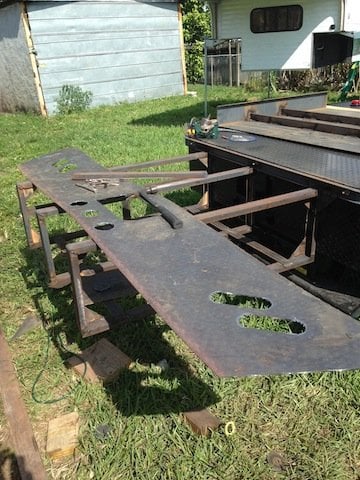
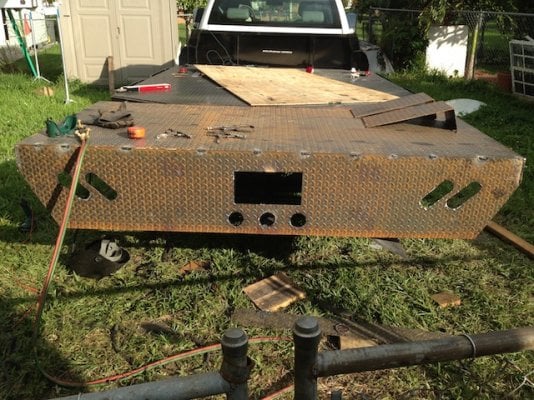
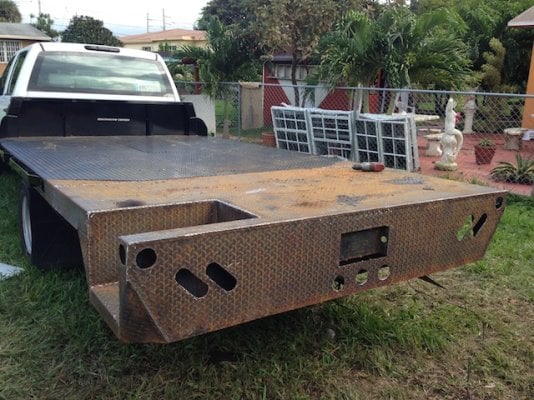
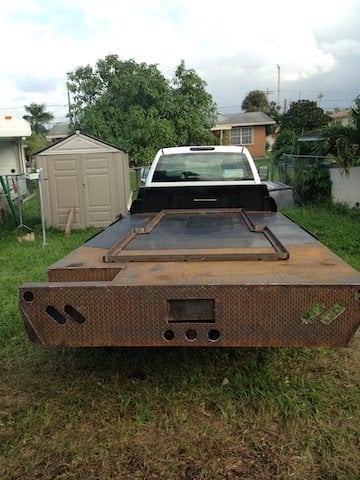
That meant I had to build a 2 ' extension and with a tire rack I would be close to 3' and still needed to hang a couple of bikes so I just decided to go 4', the tire goes underneath, a13" inch deck to get in or out of the Camper with 2 steps street side etc.
A little Rube Goldberg but….
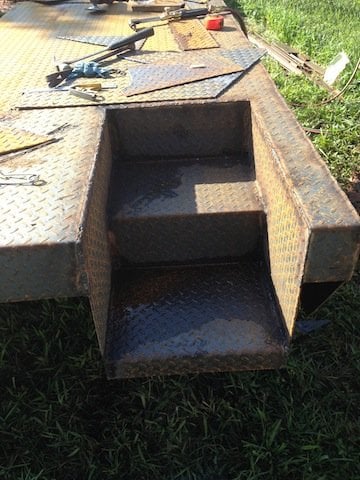
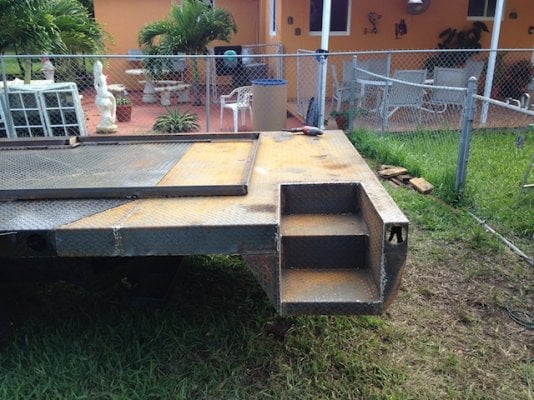
 

Attachments

  • IMG_1979.JPG
    IMG_1979.JPG
    108.8 KB · Views: 399
Aluminum vs Steel Rationale. Aluminum is 3 times lighter than steel but steel is 3 times stronger. I was not particularly happy about going with a steel flatbed but I no longer had my aircraft salvage business leasehold and equipment at Opa-Locka airport so not only was money an issue but so was logistics. If I had started with just a chassis cab and my scrap yard I could have had a custom aluminum flatbed fabricated, shipped and installed for under $5k but I did not due to time constraints. I just wanted to get on the road this winter in the south and head more northerly come spring, so I elected to buy a stock commercial 3500 HD 4 X 4 with a gooseneck flatbed that weighs 1,250 lb., + - 400 for the extention add the chassis cab and I am at 8,550 plus 2,200 camper dry weight to be a gross dry of 10,750 lb. or wet at 11,750. 13,300 is the max so while I am within weight limits by 1550 but we will see what the scales say. I am still carrying an extra 1,000 lb. of steel which will cost me in gas BUT under my current scenario I am saving $5,000 which is worth 1,500 USG in gas
 
Slowly but surely.

1.Headache rack reduced to a headboard which open up the rear cab window for a slider and access to the camper.

2. The rear panel for lights and license plate holder under construction.

3. The rear panel and deck tack welded.

4. The steps installed. (needs some drain holes)

.
 

Attachments

  • IMG_2049.JPG
    IMG_2049.JPG
    123.9 KB · Views: 223
  • IMG_2048.jpg
    IMG_2048.jpg
    93.7 KB · Views: 218
  • IMG_2053.JPG
    IMG_2053.JPG
    173.2 KB · Views: 220
  • IMG_2056.jpg
    IMG_2056.jpg
    82.1 KB · Views: 205
put a 2" receiver on the front of the truck and fit a bike rack there...works like a silver dollar...and they're out of the way for access to the camper. I've got a 4 bike Master lock bike rack that I modified a bit for clearances. Had it to Canada on the ferries and across the plains to Utah/Wyoming...no problems
 
Thanks, I will remember that. I am starting to think about batteries and charging by solar power vs a small generator and some extra propane and have started reading up on a thread posted here about solar to see if I can get a better education. Despite being a former pilot/mechanic I know just about enough to start an electrical fire
 
Well all the fabrication is finished. Just need it to stop raining and the humidity to lessen so the paint shop can acid wash the steel, prime and apply an undercoat then matching finish which appears to be an industrial imron.
We fabricated a frame using 2 x 2 x 1/4 angle iron for the camper to sit in. The frame has 13 pieces of 6 " x 1/4" flat bar welded at each attach point where a counter sunk stainless 3/8 x 1.5" bolt will secure the frame through the flat bed with fiber locknuts.
This frame raises the camper 1/2" off of the steel flat bed so that air can circulate and any water can drain. I will lay a couple of beads of what is basically roof tar on each inside of the angle iron so the weight of the camper will push it out making for a watertight seal to prevent any wood rot from water seeping in between camper and frame which has 1/4" horizontal clearance
 

Attachments

  • IMG_2085.JPG
    IMG_2085.JPG
    151.7 KB · Views: 205
  • IMG_2082.JPG
    IMG_2082.JPG
    153.8 KB · Views: 240
  • IMG_2086.jpg
    IMG_2086.jpg
    77.3 KB · Views: 217
Nice job....a little white picket fence across the back and you're home ;) ...I like the stairs...always an issue and so many solutions...a good one there

Might be a good idea to coat the underside of the camper with some sort of sealer to avoid any condensation issues off the steel....not sure if it would become an issue but it looks like a fairly permanent mounting...one shot of something may be worth while protection for that 11' beauty.

Well done, I like the way you think....BTW....2000 hours in KC130F's here...along time ago
 
I must be reading your mind. Looked all over for a good sealer and settled on a product called Restore for wood decks.
Pricey but you get 2 gallons and I used close to one on 2 coats of bottom & side paint. Almost thicker than Molasses in winter but definitely the right product for this sort of application.
I did not like the roller that came with it because the finish looked like knock down so I got a short nap that I used after brush stroking the angles.
I was able to cover joints that got missed during manufacturing and some pretty good gouges just forward of the bottom tin.
Also noticed some joint separation on the left hand rear area 6" inches in from the side running forward from the tin for about 8-10 inches.
Sort of validates my impression that the bottom structural strength of the camper runs along the outer area 3" on the side and bottom and my logic behind creating a 2" x 2" angle frame to sit the camper in.
Yup it is a semi permanent mount and right before its mounted I have 5 tubes of "leak stopper" to go on the angle frame. It will be messy and squirt out everywhere but thats what I want.
The bed and frame got an acid wash yesterday afternoon, then it rained last night and why it looks white but I think we are good to go for paint and undercoat tomorrow after prepping.
I have not worked through the tie down yet. I do not like how the jack pads were installed with just washers and no backing plates, you can see the bow. Too much stress on camper.
Initially I was going to just rotate jack pads so the pad face sat inboard and tie down from there to stainless eyelets mounted on the flat bed but now I will buy more eyelets and stainless exterior and interior mounting plates. Stronger and less stress ( I think)

I was in UH-1B,C gunships in a time long ago in a Galaxy far, far away.
 

Attachments

  • IMG_2092.JPG
    IMG_2092.JPG
    117.7 KB · Views: 258
  • IMG_2091.JPG
    IMG_2091.JPG
    166.6 KB · Views: 252
we're both lucky to be here...huey's...I know the "whop-whop" well

to come out of it and end up in an Alaskan.....must have been doing something right
 
Very true - Welcome Home.

I pulled the cover plate off the goose neck receptacle because its dead weight that will sit there and bang. I am going to plug in the 6' of wire and male 7 pin conncetor that the previous owner gave me, run it out of the side of the goose neck box, thru existing openings in the frame then underneath and up through the flat bed outside of the camper mounting frame, splice in another 7 pin and use it to power the Alaskan.
My question is this. I need to install a battery separator. I still have to look up alternator charging amps.
Any suggestions on make and model of seperator?
I picked up an inexpensive wall mart group 27 battery in KY to get me home which I need to replace and am open to suggestions
 
Welcome home yourself

I have mine separated from the truck so I don't have an isolator...mines on a separate charging circuit which is activated when I plug into 120v.

Batteries....you have the weight capacity...why not mount a couple trojan golf cart batteries under the bed..2-6 volts....you'll really get some extended camping with them....I've got a group 31 sealed AGM marine deep cycle inside the camper...I get 10 days out and 24 hours to recharge with a stepped charger.

when mine comes out of the truck it comes out as a complete unit...no crosses connections to the truck.
 
hmm... Nice set up and I like what I read about Trojan but I am not convinced on the two 6V in series (Murphy's' law) I see a lot of folks do it but if one goes your dead in the water. Since mine will be semi permanent I will power camper from truck / shore power so I will need an isolator

I need to find a battery bracket, probably go for the same bracket (open frame on bottom) I had in my Tiara from West Marine and secure it in the side battery compartment of the Alaskan.

Because the couch is longer there is enough room to parallel 2 AGM 27 12V. Heat more than cold is going to be my issue (initially) so I want the bottom of the battery open to ambient camper temperature. If I end up in colder climates I can close it in and put on a blanket
 
Does the camper have AC?...I know they are offering it as an upgrade now but I don't know the draw.

2 Marine, deep cycle AGM's should do the trick...depending on the max draw of the unit...electrical draw varies so much with electronics available these days...calcing it on strictly 12v is always a question. I've got a few friends with TV's, computers and the whole enchilada...I'm pretty down and dirty simple...strictly fishing maam...unless wifee comes along.... ;) .

I run a couple small computer fans constantly to aid in the cooling of the refrigerator...even with those running 24/7.....I still get 10 days out.
 
No AC and both Comfort Air fans are intermittent. Lifetime warranty but of course they don't make them anymore. Bryan says they use MaxAir which I like because they have a rain guard that lets you operate the fan while its raining.

On one hand I want to put air, its wired for it but on the other I was thinking about a swamp cooler because its 12V but the water supply might be an issue and I am not too sure how effective they are. Coleman makes a pretty nice low profile but its pricey.

Definitely 2 AGM's, most likely 12v but definitely deep cycle. Not too sure about model and type. Marine is good but primarily it seems they are designed for good cranking amps. I just need to do some more research
 
Well the fabrication, painting and undercoating went well. They had to scrub the bed with wire brushes and treat the metal again but it was painted top and bottom then the bottom was sprayed with an undercoat. Sweet job too!

1st picture is of the goose neck box with a plug installed and wired in with stainless safety wire. If it can move it will and it will be a while before I am back there.

You can see the bead of leak stopper which sealed the bottom of the camper to prevent water intrusion. I still have to seal the sides which have 2 coats of deck sealer which gives it a very rough finish.

The camper sits 1/2" off the flat bed so air and water can move in and out. Very happy with it all.

2nd picture is the rear frame and steps, the handle on the Alaskan is positioned perfectly for going up or down.

3rd picture is with the Alaskan door open showing the deck left for the white picket fence or a bike rack to keep them high.

I need to rough up the steps and walking portion of the deck and apply some deck paint. While the diamond plate helps its slick.

4th picture is the camper secured by the same chain and shackles I used to bring her back from KY.

I need to finish working through the tie down set up. These shackles and turnbuckles are rated at 1,000 lbs each. The camper shipping weight is 2,200 lbs so for arguments sake I will round out to 3,000 wet.

The frame has 13 stainless 1.5" countersunk 3/8 bolts with lock nuts. The camper can shift up to 1/8" fore/aft/ & 1/2 side to side inside the frame.

I am really considering switching to 4 open jaw turn buckles fore and aft to stiffen up the tie-down then have a set of these shackles and turnbuckles mid ship. That gives me total tie-down rating of 6,000 lbs double the weight of the camper.

The key is going to be where I place the brackets on the camper. The tie down will be vertical which is the strongest. But on the other hand I have the 4 HappiJac Turnbuckles that came with purchase

Give myself a headache, just need to keep it simple. But first thing tomorrow, unload the jacks and dead weight from the truck then head to the scales to see how off my guesstimates are.

Headed up to ORL for Turkey with family be back next week to resume the work
 

Attachments

  • IMG_2109.jpg
    IMG_2109.jpg
    92.1 KB · Views: 209
  • IMG_2110.JPG
    IMG_2110.JPG
    173.3 KB · Views: 251
  • IMG_2117.jpg
    IMG_2117.jpg
    67.7 KB · Views: 276
  • IMG_2127.JPG
    IMG_2127.JPG
    112.1 KB · Views: 279
Too close for comfort. After unloading jacks from camper this morning I set them up in the backyard.

One fell over as soon as I opened up the tripod base up and the picture shows why.

These are the heavy duty 2000 lb jacks

I missed it in KY and here when we dismounted the camper for flatbed work.

Definitely a RCH moment from disaster.

As the saying goes " you are only as strong as your weakest link".

.
 

Attachments

  • IMG_2133.jpg
    IMG_2133.jpg
    84.6 KB · Views: 191
Scales came in at 11,480 lbs for truck full gas, flatbed and dry camper. 1520 lbs under. Little heavier than I expected and makes me question flat bed pre-conversion weight of 1250 lbs
 
The dealer stated the flat bed weighed 1250, the manufacturer said 950. Its a 9.4' commercial goose neck trailer so its heavy and heavier now
 
Back
Top Bottom