BluesideUp Alaskan Project

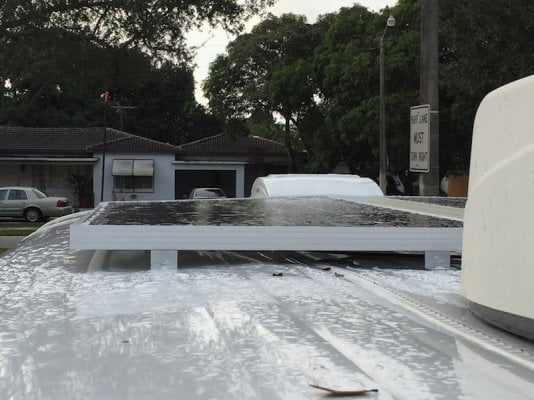
Shot of the twist in the panel, not concerned on panel performance but flexing of the wooden roof while the truck is in motion increasing the twist.
Will probably disconnect front outboard Z bracket from panel and allow it to return to normal then shim it so its level with the front inboard .

Response from Bryan Wheat @ Alaskan

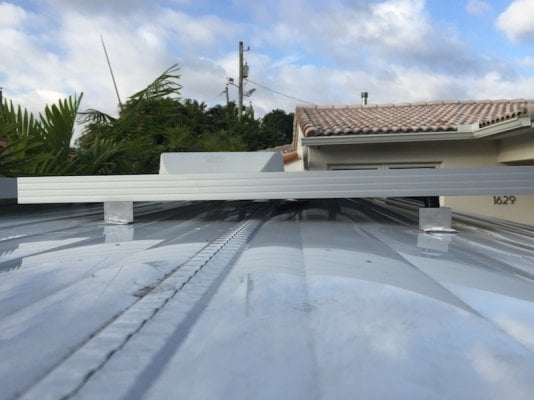
"Stephen, Looks good. The rear area can have a little sag to it on the longer campers with an A/C unit. Also the area around the A/C unit has an 1/8” luan piece that “turtle shells” the A/C area to help distribute the load on the 2X2’s. Thus the rear solar mounts are most likely resting on the 1/8” where the fronts are not. Also the center 2x2’s have 1/4” strips on them to make the vents the highest point for water run off."

Makes sense now so I will shim

.
 

Attachments

  • IMG_4287.JPG
    IMG_4287.JPG
    203 KB · Views: 180
Looks great, thanks for the write up, how are the 6awg getting to the lower section?
 
I drilled through the fan support frame to the 2 x 2" that supports the drivers side cabinets then up through the ceiling inside the cabinet.
The 6 AWB was fed from the drivers side exterior into the interior underneath the couch then fed up with the existing wire run to the top section then alongside the interior of the cabinets along with the AC power cable from the IOTA load control center.
There is an earlier post that should show that.
 
Shimmed drivers side panel outboard panel mount to level it up, passenger side was ok.
Camper now running house batteries and being charged by panels but there is a communication issue between the Bogart controller and the Bogart charger which will be solved when I change out the telephone cable from standard to cross/reverse pinned.

.
 

Attachments

  • IMG_4294.JPG
    IMG_4294.JPG
    138.3 KB · Views: 164
I followed up on PaulT's suggestion on a voltage jumper but found out that my IOTA Load Control Center ILC-3045 SN 116744 does not have the dual voltage jack which in turn made me reach out to IOTA.
They got back to me ASAP and I can install an IQ4 smart charger module ($23 on Amazon) directly to my existing ILC 3045 as shown in the attached diagram.

UPDATE.

The initial information provided by IOTA was incorrect. My ILC 3045 cannot be adapted with the IQ4 smart charger but if anyone has a standard charger with the voltage jack and wants to upgrade their existing charger send me your address I will mail you my IQ4 at no charge, just pay it forward.

.
 

Attachments

  • IQ4 Hookup.pdf
    93.5 KB · Views: 159
  • IMG_4359.jpg
    IMG_4359.jpg
    87.5 KB · Views: 143
As I get ready to head out for summer wandering one last issue needed to be resolved. Heating.
The Pex heating system installed during construction at the request of the buyer was a bust, as was my effort to convert the 4 gallon water heater filled with antifreeze into a radiator with a scroll fan for air distribution.
Removing the water heater would leave a 2 x 2 opening that would have to be plugged so I elected to replace the water heater with a new same model heater to install hot water in my Alaskan and cap off the anti freeze in the supply and return lines to the in floor Pex lines.
With the help of my plumber we ran hot and cold pex tubing around to the water pump for supply and distribution so I now have piping hot water for my sink and showers.
Prior to this I had gone to my gas company and had them install a regulator and 6' flex hose with a T to the existing low pressure line from my second bottle. This way no bottle shuffle is needed when I run out, just open the second valve. On a side note I will install a quick disconnect for BBQ install later
At the same time I had them install a T fitting with a inline shutoff on the hot water propane line in the head with a 4' flex hose connected to a Wave 3 Catalytic heater which when in use will sit on top of the open head door and store next to hotwater heater when not in use
So my upcoming trip will see if I made some lemonade from my Pex heating lemon
 

Attachments

  • IMG_5007.JPG
    IMG_5007.JPG
    40.5 KB · Views: 142
On the 10' get a pair of the up/down guides and install in the middle of the side. You will have to shorten down the part that goes on the top so it doesn't block the window when up. That will keep the sides about at the original separation.


I was getting ready to start replacing my Pirelli seals when I notice that there is a slight bow on each side of the camper top midships in the vicinity of the window

Its hard to tell from the picture but its there and results in both the upper and lower seals not making contact with the lower half.

I can can compensate for that when laying the new seal but was wondering if any other owners have experienced this and if there is a fix?

.
 
Deviations in the sides resulting in pirelli openings have always been there in mine as well. The guide installation seem like a good solution...although I've never had any problems with breezes... ;) . Their installation would make installing pirelli a little easier too. Good call. I'm going to take a look at my "new to me" 10' CO for their installation.

Steve....how did the summer go...really interesting details on both the heating and solar....part of the retro for my new CO is going to be 2 panels which have been sitting in my office for a couple years.
 
Back
Top Bottom