BluesideUp Alaskan Project

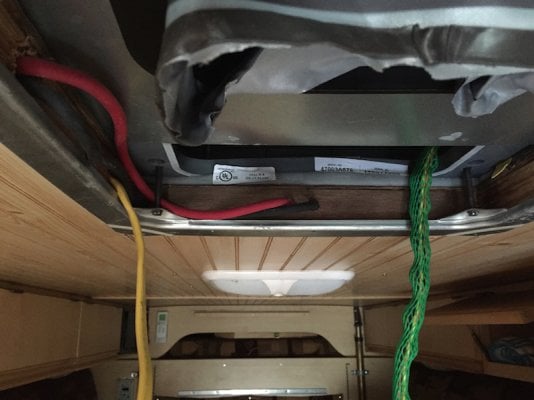
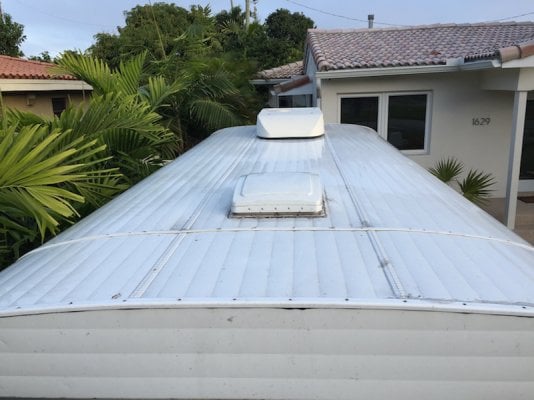
The IOTA converter's max DC output is 13.7 volts which is insufficient to fully charge the house battery bank so I have it on a Odyssey charger which has the correct charging profile for its AGM's.


.Bluesideup,
Take a look at http://www.iotaengineering.com/pplib/dlsmanl.pdf for a solution to your problem of insufficient charging voltage. If you have another charging controller, for your batteries, you can use the solution in Illustration 3 to get the voltage you need. You can use the DLS as a smart charger by buying the IQ4 unit to plug into the same socket. Without the voltage jumper, the DLS is configured as a power supply for 12 v appliances but the output voltage is about the same as a float charger so it does not charge batteries very well if at all.

With the IQ4, you will have an excellent smart charger.

Paul
 
Paul....I felt the breeze of that last post as it went right over my head....I can see I've got alot to learn about Solar before I take my installation on.
 
Thanks Paul I will look into that when I get back to Miami. Right now I am on a road trip in PA, unfortunately my attempt to convert the one of a kind pex system that came with my 11' is not meeting my heating demands as I head into Vermont and Maine. Time to rethink
 
I use the ctek DS250 dual with the smart charger. Connected directly to the truck batteries. It acts as an isolator and will adjust voltage to the house batteries based on charge level.

It will charge up to 80A when the batteries are low. It has a smart 5 stage charger built in. It will even charge your truck batteries if you have a solar input.

The only time I think of bringing generator is when I dry camp for extended periods. So far works great.
 
BluesideUp said:
Thanks Paul I will look into that when I get back to Miami. Right now I am on a road trip in PA, unfortunately my attempt to convert the one of a kind pex system that came with my 11' is not meeting my heating demands as I head into Vermont and Maine. Time to rethink
I'm in Massachusetts at the intersection of interstate 90 and 91. Enjoy the leaf peeping.
 
Back home after 3 week trip that took me to TX-PA-ME and home. My effort to make lemonade from a lemon PEX system was not that effective.
Finally got my Rickson's installed when I got back. Good Ride. I went from OEM Michelin 235/80R/17 Load Range E to Continental HDR 225/70R/19.5 load range G.
They are the standard OEM for F450-550
I deliberately downsized from 235 to 225 so as to provide more dually spacing. My front and rear axle weights are about 1000lbs below max.
The LR G's will provide a much better safety margin but I have them aired upto LRF at 95 psi cold.
.
 

Attachments

  • IMG_3788.jpg
    IMG_3788.jpg
    134.9 KB · Views: 97
  • IMG_3790.jpg
    IMG_3790.jpg
    122.4 KB · Views: 113
Purchased LYL WiFi OBD2 transmitter for $23 and downloaded Dash Command onto my iPhone primarily to track fuel consumption.
My Chevy 3500 has two tanks a 23.5 USG front and 40 USG rear and I have a problem topping off tanks unless I start fueling when the low fuel light comes on so the tracking should be useful
 
Installed my Warn 15K winch and re weighed truck.
I came in at 850 lbs under max weight with each axle being 400 +- under chevy's max axle weight and I computed my Center of Gravity to be on a vertical reference line on the front of the shore power or 54" in front of the rear axle. There is a neat formula on how to find your CG.
Go to how-to-build-hotrods.com under suspension " Find your car's Center of gravity". http://www.how-to-build-hotrods.com/center-of-gravity.html
As soon as I can mount the Solar Panels my build will be complete. yeah. Planing a run to Alaska next spring

.
 

Attachments

  • IMG_3825.JPG
    IMG_3825.JPG
    206.3 KB · Views: 103
I gave up trying to sleep in my cab over with the factory pad and a camping air mattress ending up on the sofa with my dog.

Any suggestions on a cab over mattress?
 
i just put a 5" wool futon (from thefutonshop.com) in my FWC Hawk cabover with dri-deck underneath.

i'd post a pic here but can't figure out how?- they're in my Gallery under Mods.
 
We use a 2" memory foam topper on top of our stock Alaskan pad/mattress. I believe the pad inside to be foam. If it is cold seeping from beneath issue, that should help. We roll the topper up and stow it to lower the top. We cut the topper to fit the mattress since it is a non-standard size.
If you have a bit of space available, there is thin rigid foam (Lowe's etc) with reflective coating that could maybe fit under mattress and the cabover sides/front still close?

Edit after re-reading you post: Being directly on top of an air mattress, unless you have a LOT of insulation on top of it, is a recipe for a cold sleep.
Evidently the air in the std type air mattress circulates bringing cool air under you constantly.
 
Thanks that's helpful. Since the sides and front panels need to fold that restricts thickness of the matress but I am thinking of a thick memory foam cut down to fit. The Alps pad is not a standard air mattress but a self inflating insulated pad for sleeping bags

Update.

I purchased a 4" memory foam pad and in conjunction with my 4" Alps Mountaineering insulated self inflating pad (50%) on top of the foam which was on top of the Alaskan pad was able to get a couple of good night sleep testing it inside my home..
In order for the Alaskan top to fully seat in the down position, the foam has to be folded in half and set in the center and the Alps pad stored in the camper.

.
 

Attachments

  • IMG_4367.JPG
    IMG_4367.JPG
    133.8 KB · Views: 128
  • IMG_4371.JPG
    IMG_4371.JPG
    176.4 KB · Views: 134
Does anyone have experience with mounting solar panels directly to the Alaskan's roof?
I have some great guidance from Bryan that the first row of 2 x 2 longitudinal spars outboard of the forward and aft fan openings are centered 15 1/2 " from the center line of the roof. The next row outboard are centered 16" from their respective inboard spars.
( Correction here. The spacing between the inboard spars is 151/2" and the 14 x14 " fan frame sits in-between)
I have two 2'x 5' solar panels that weigh 25 lbs each. They come with four Z brackets which I have mounted on each end with 16" spacing center hole to center hole. The Z bracket has a 1"x 1.5" footprint.
My thought is to measure and mark the roof centers of each spar with a chalk line from front to rear then line up each panel and mount them with 1.5" wood screws. I am going to put 3M VHB 4951 double sided tape on each foot then cover with DICOR to keep moisture out.
I have a junction box, test wired in pic that will be center line mounted in front of the AC unit. It will be secured with VHB and DICOR
Any suggestions or comments would be appreciated.

.IMG_4014.JPG
 
There is somewhere on one of these many various camper forums the showing the mounting of solar panels on an Alaskan without top roof penetration using Alaskan accessory/option roof racks that side/end mount to the "roof". There are pictures. 2x4s with holes for roof rack tubes and panels mounted to the 2x4s.
Look for it, it looked like thoughtful setup. I'd hunt it up for you, but you might find applicable ideas in you search you like better. :)
It is best to avoid roof penetration if possible. YMMV

Edit- it's here:
http://www.wanderthewest.com/forum/topic/8915-2010cabover-solar-install/
 
Thanks I saw it. The rack is a great idea
Alaskan went from penetration with fasteners to glue down then back to penetration after one came off. There is too much flex in the aluminum skin for a VHB tape or Silkafex for me
 
After drilling 1/2" two holes in the forward frame of the rear AC mount, two 1/2" holes were drilled in the roof and a cable puller was used to pull the + - 6 AWG welding cables through.
I used Dicor Sealant on two halves of a rubber vibration mount to insulate each power cable from the aluminum skin and fed them to a junction box directly above the holes and used 3M VHB tape to secure the box to the roof and later sealed the joint. Before setting the box the roof was cleaned with paint thinner then wiped down with alcohol.
Using the forward and aft left and right outboard fan screws I was able to line up the inboard solar panel Z mounts so they centered on the 2 x 2" ( 1 1/4 x 1 1/4") inboard longitudinal roof beam.
3M VHB tape was placed on the bottom of each Z mount after cleaning and 1 1/4" stainless steel exterior wood screws were used to secure each of the 155 amp panels. Since the Z mounts were set on 16" centers and bolted to the panels with lock nuts they lined up on on the next outboard 2 x 2" beam.
Each positive and negative cable from each panel was then fed to its respective bar in the junction box and the box was sealed. All screw heads were and cables sealed with Dicor.
While it has been a tough slog to figure it all I am very happy about feeding a 20' run of 6 AWG welding cable from the battery charger in the lower camper half to the junction box to offset any voltage drop.
I am also in better shape running each panel to a junction bar rather than paralleling to the same 10 gauge wire that came with the kit.
Tomorrow, after tidying everything up I will connect the charge controller with the charger and see how it powers up. .

.
 

Attachments

  • IMG_4273.JPG
    IMG_4273.JPG
    118.5 KB · Views: 141
  • IMG_4248.jpg
    IMG_4248.jpg
    108.5 KB · Views: 126
  • IMG_4261.jpg
    IMG_4261.jpg
    106.5 KB · Views: 122
  • IMG_4259.JPG
    IMG_4259.JPG
    112.7 KB · Views: 125
Before and After. I live less than a mile north of MIA so the pollution shows.
While the panels are square and have a slight tilt to the outboard sides which was expected, the tilt is more pronounced at the front outboard mounts so there is a slight twist of the panels
I am not sure what that is about and will reach out to Bryan on it

.
 

Attachments

  • IMG_4245.jpg
    IMG_4245.jpg
    204.8 KB · Views: 118
  • IMG_4270.jpg
    IMG_4270.jpg
    133.8 KB · Views: 131
BluesideUp said:
Thanks I saw it. The rack is a great idea
Alaskan went from penetration with fasteners to glue down then back to penetration after one came off. There is too much flex in the aluminum skin for a VHB tape or Silkafex for me
If you go to the Four Wheel Camper site, there is a current post. A number of the owners hare using flexible panels and adhering them to the roof. The key is using the right type of adhesive. 3-M has one and there are several others. There have been no reports of panels coming loose. JD
 
Thanks, there is no wind resistance with a flex panel since it adheres directly to the roof and it weighs 1/10th of a standard panel.
Was interested in flex panels but at the time I was shopping there were some negative comments about heat buildup. Plus the Alaskan roof is a corrugated aluminum skin and not a smooth surface.
Also they are too new so like anything new there usually are bugs especially if they are out of China.
Alaskan had moved to VHB sealant and had one come loose so I played it safe and fastened it down with 3M VHB two sided tape under each mount to prevent water intrusion, act as a vibration isolator as well as a secondary fastener to 1 1/4" stainless exterior wood screws. Murphy's law, if it can it will. .
 

Attachments

  • IMG_4277.jpg
    IMG_4277.jpg
    57.2 KB · Views: 81
Back
Top Bottom