Hawk on 2nd Gen Tundra

fireball

Senior Member
Joined
Apr 9, 2016
Messages
222
Location
central PA
Hello all,

Surely this is posted somewhere so maybe someone can be kind enough to point me in the right direction.

I have a 2008 Tundra and will be picking up a 2014 Hawk in a few weeks. I'm trying to find out what I will need to do with wiring and attachment points for the camper.

Thanks!
 
Welcome to WTW

Refer to the FWC website for attachment point locations. You will want forged bolts.
Wiring is a three prong twist lock on my 08 Hawk. My local RV shop installed a fused smart relay with an outlet in the sidewall of my 06 1st gen Tundra.

If you haven't addressed suspension and tires, you might start shopping for some E rated tires and consider airbags or beefed up leaf springs. With those mods, the Tundra is quite capable with the Hawk on board.
 
Andy - thanks for the quick reply!

The truck already has a new set of BFG KO2s, E-rated so we are all set in that department.

I had another poke around the FWC website and can't seem to find any details about the attachment locations or the needed wiring. I am buying the unit used from a private party and would like to make sure my truck is ready to go so that I can ship it out to them and then have a little adventure with the family taking the long way home.
 
Hey fireball, I just went thru this exact exercise two months ago. I had to sleuth out the measurements and get the anchors in before going across the country to pick up our Hawk. Let me get you some dimensions tomorrow. Regarding the wiring: The prev owner gave me the female connector for the wiring that had been on his truck. I cut a 2 1/8 hole in the bed wall and flushed it in like a fifth wheel setup. Not sure about your 2014 but my 2010 uses a seven pin connector with round pins. It looks/works like the common seven pin flat trailer connector but is not the same.

Maybe these will help - click to enlarge.

img_141220_0_2b11d0390391f04fef51fcf8997fe2a7.jpg


img_141220_2_cdaf724ae6ebbd0edd8e6fe6d92731f2.jpg


img_141220_4_6e8d1fc286321c8a4e5dbaa7987ad366.jpg


.
 
Bob, very helpful, thanks so much! I will take you up on the offer of exact measurements if you don't mind.

I found a spec sheet that looks to be a few years old that suggested the bolts would be located at 12" and 61" from the front of the bed. Were the bolts anything special from FWC or just something you got at the local hardware store?

Regarding the wiring, do I see your 7 pin connector at the right front of the bed area? So I would then assume that the camper itself has a male pigtail hanging out of it?

Thanks again!
 
12/61 sound familiar, I'll double check though. I went to Rural King and got the forged eye bolts, 1/2" I believe. I cut some 3" squares from 1/4" plate to use as backers under the truck bed. That was prob overkill and 1/2" fender washers would have been sufficient.

The plug was not installed in these pics. It's in the front drivers side, between my onboard air and the wheel well (white X). Yes, the camper has the male plug on about 3' of wire at the front drivers corner.

img_141226_0_753cafa084476ded04f87c42053a3be0.jpg


FWIW, I bought a 50' 10guage extension cord ($70) and cut what I needed to wire power/ground/parking lights from the truck bed plug to the battery. I put a new connector on the remaining cord and have a 35' heavy duty shore power cable now.

.
 
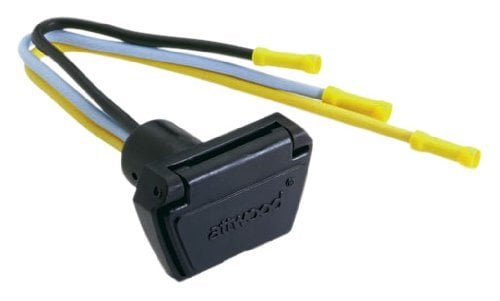
For a 2014 Hawk it could have a 3 wire Attwood plug molded onto the wire end. You can cut it off to out any type of connector you need such as a Marinco 3-wire trolling motor plug, but you might want to call ahead and get the specs for the plug. My 2013 came with the 3 wire Attwood trolling motor plug. I ordered this matching receptacle
Link
I use #8 bolts, washers, and nuts as screws do not seem to withstand the substantial pulling and tugging that these friction connectors endure. The 3 wires are marker lights, 12VDC and GND. My camper has LED marker lights that draw 0.5amps.
 

Attachments

  • Attwood Trolling Receptacle .jpg
    Attwood Trolling Receptacle .jpg
    15.5 KB · Views: 151
fireball, My anchors are at 12" and 60" from the front of the bed. They are 58.5" apart side to side. You have some leeway and I ended up making my decisions based on existing double wall areas under the bed.

Installed plug.

img_141354_0_d4c191f09763b1a376a8e89efaff2ad2.jpg
 
Fireball, Bob's information is excellent, but I respectfully disagree on the backing plate. I do not consider fender washers to be nearly sufficient backing; his three-inch square plates are much better. I don't think you could have plates that are too big; the more the load is spread the better. I also agree on the closed-eye forged bolts, and I suggest forged turnbuckles as well.
 
Camper Eye Bolt Locations for New Four Wheel Campers

(these are a general rule of thumb that we go by, but sometimes there are slight variables for certain trucks on the market)

These all should be correct measurements for new FWC's, but we cannot guarantee the accuracy with 100%, as there are some strange trucks out there we run into from time to time and we need to make adjustments on the fly.

IMPORTANT NOTE: Older four wheel campers WILL have DIFFERENT eye bolt measurements than what is posted here. The measurements above are pretty accurate for any new FWC manufactured in the past year or two.


Grandby Model:

Original Roll Over Couch Floor Plan = (front eye bolts 12” back from the front of the truck bed / rear eye bolts 76” back from the front of the truck bed).

Side Dinette Seating Floor Plan = (front eye bolts 12” back from the front of the truck bed / rear eye bolts 76” back from the front of the truck bed).

New Front Dinette Seating Floor Plan = (front eye bolts 11” back from the front of the truck bed / rear eye bolts 74” back from the front of the truck bed).


Hawk Model:

Original Roll Over Couch Floor Plan = (front eye bolts 12” back from the front of the truck bed / rear eye bolts 61” back from the front of the truck bed).

Side Dinette Seating Floor Plan = (front eye bolts 12” back from the front of the truck bed / rear eye bolts 61” back from the front of the truck bed).

The newer Front Dinette Seating Floor Plan = (front eye bolts 11” back from the front of the truck bed / rear eye bolts 58” back from the front of the truck bed).


Raven Model:

Roll Over Couch Floor Plan = (front eye bolts 12” back from the front of the truck bed / rear eye bolts 51” back from the front of the truck bed).


Fleet Model:

Original Roll Over Couch Floor Plan = (front eye bolts 12” back from the front of the truck bed / rear eye bolts 61” back from the front of the truck bed).

Side Dinette Seating Floor Plan = (front eye bolts 12” back from the front of the truck bed / rear eye bolts 61” back from the front of the truck bed).

The newer Front Dinette Seating Floor Plan = (front eye bolts 10” back from the front of the truck bed / rear eye bolts 57” back from the front of the truck bed).


Eagle Model:

Original Roll Over Couch Floor Plan = (front eye bolts 12” back from the front of the truck bed / rear eye bolts 61” back from the front of the truck bed).

Side Dinette Seating Floor Plan = (front eye bolts 12” back from the front of the truck bed / rear eye bolts 61” back from the front of the truck bed).


Swift / Finch Models:

Original Roll Over Couch Floor Plan = Most ALL Finch Model camper installations require the camper to either be “bolted down” to the truck bed, or you can sometimes use the “External Camper Tie” downs if Tork-Lift makes a kit for their truck ?

The only exception to this usually … If the customer has a 2005 – 2016 Toyota Tacoma Standard Cab, Access cab, or the CrewCab with the LONG 6.0’ truck bed. If the customer is putting the Finch Model on the 2005 – 2014 Toyota Tacoma truck that has the LONGER 6.0’ bed, they can use the custom made FWC black steel Tacoma Bed Bars we sell for tying the camper down on the truck. Please call your factory rep. or the FWC service department for more information & details on this. These installations are not that hard, but they are different.


If in doubt, PLEASE CALL our service department (800) 242-1442.

We can help clarify any questions or concerns you might have.

Thank you.

_________________________________________________________________________________________________________


fireball said:
Hello all,

Surely this is posted somewhere so maybe someone can be kind enough to point me in the right direction.

I have a 2008 Tundra and will be picking up a 2014 Hawk in a few weeks. I'm trying to find out what I will need to do with wiring and attachment points for the camper.
Thanks!
 
Thanks for the info everyone. I will be getting the truck ready beforehand and then driving to AR to pick it up. So I am hopeful I get everything right or it'll be a bit hectic trying to figure it out in the sellers driveway in the middle of Arkansas!


Sent from my iPhone using Wander The West
 
I had the wiring and Eye bolts installed at the local four wheel camper dealer out towards Philly and built the little platform this afternoon. 2 inches plus a few extra pieces of half-inch plywood just in case I need a little extra height.

Hopefully the swap will go smoothly!

ImageUploadedByWander The West1462310124.196131.jpg


Sent from my iPhone using Wander The West
 
We picked up the camper on Friday in Nashville and spent the last few days driving it home, spending 3 nights at various state parks and camp sites. Everything worked great!

FWIW, the 2" spacer was a good bit more than needed. I have plenty of clearance over the cab, and about an inch and a half on the bedsides. I sent a message to Stan @ FWC asking what the min. recommended clearance is. He confirmed that ~1/2" would be sufficient, so I'll be cutting the platform down so that everything fits nice and tight.

I checked the tie downs about 6 different times and everything stayed nice and tight. All pavement driving for this first trip home.
 
Just to give you an idea of how the fit of a Hawk made for a Tundra looks like I took a couple pictures of spacing on mine. Forgive the choice of a scale device but the cabover is less than the height of a soda can and about 3/4 inch above the bed rails

ImageUploadedByWander The West1462986930.420762.jpg

ImageUploadedByWander The West1462987031.689053.jpg


Sent from my iPhone using Wander The West
 
Mule, very helpful, thanks!

BTW, love the silver spur. I would've loved to found a used Hawk with the SS exterior to match my truck, but alas got an excellent deal on the unit I bought and will be happily content with the white exterior.
 
I got lucky, this one came up used at exactly the right time. Had to drive out to Jackson, WY the day after Thanksgiving but well worth it!
 
So.... I am also planning to mount the camper on a flat bed trailer from time to time. After seeing the clearance available over the truck I decided to mount some composite decking to the underside of the camper. The decking is 1"H and should give just about 3/8-1/2" clearance when mounted in the truck. I spaced the decking so that it would hit the "high spots" of the truck bed and everything will sit nice and level.

Also put some marks on the camper jacks to hopefully make the on and off process a bit easier and quicker in the future.
 
Can't seem to add pictures to the previous post so here they are:

Three pieces of composite decking, 1"H, screwed to the underside of the camper:
ImageUploadedByWander The West1463274996.783781.jpg

Two marks on the camper jacks, one reference/halfway point, and then the "all clear!" marks to pull the truck out from under the camper:
ImageUploadedByWander The West1463275010.909099.jpg


Sent from my iPhone using Wander The West
 

New posts - WTW

Back
Top Bottom