Thanks, that thread gave me a lot of other hints and ideas.Alley-Kat said:Shane,
Here's RicoV's solution about basically the same thing... a homebuilt exterior Reflectix wrap.
Several messages about it throughout the two pages of that thread (i.e., read the entire thread).
Took me awhile to find it, as the thread title is not that descriptive for the actual techniques applied, So, I doubt that it is easily found by searching. I just remember someone doing it, and even followed up enough on the idea to buy the Reflectix, yet I've not used the stuff at this time, so thanks for jogging my memory.
You are using an out of date browser. It may not display this or other websites correctly.
You should upgrade or use an alternative browser.
You should upgrade or use an alternative browser.
Low Cost Mods
- Thread starter Lighthawk
- Start date
Not a bad idea, but there are a lot of ways to attach that to the camper without drilling holes.GroovyDad said:Why won't this work?
I bought a roll of Reflectix, installed some grommets and bought some cheap little carabiners and may have found a solution. I did have to drill some holes in my Bobcat, which made me nervous, but they aren't in a critical place, so I gave it a shot.
I made sure that the holes on each side were in the same place so I can move it from side to side to "follow the sun." I just have to remember to try and park perpendicular to the path of the sun and it should work.
cwd
I like this idea and I already bought the reflectic for the interior for cold nights. So all set and I have those spring clamps. Thanks.
DavidGraves
Senior Member
- Joined
- Mar 24, 2016
- Messages
- 1,270
I am a little confused about Reflectix....used it in my van and motorhome....
I believe it is a barrier to radiant energy (heat) but not necessarly a very good insulation.
Hung inside as a thermal pak , it would trap an air space, (a very good insulation) but does the Reflectix product itself do much more than any other air impermiable fabric ?
I wish it would because it is readily availiable and easy to work with.
For desert life, an outer wrap would certainly reflect solar energy.
David Graves
overtheborder
Member
Escapepod, what brand is your solar setup?Escapepod said:
Escapepod
Advanced Member
Sorry, was in bad reception area for past week. The brand is Korr, from Australia.overtheborder said:Escapepod, what brand is your solar setup?

Escapepod
Advanced Member
On our most recent trip, we decided that using the top driver's side surface of the truck's rear bumper was too small a target, and way off center, especially when exiting for those midnight bathroom breaks. So for about $22 in materials, I bolted together two layers of redwood. The bottom layer fits the profile of the bumper "well", and keeps the step from moving to either side, and couple of bungees hold the step down. I'll probably paint it a flat black, and add some non-skid tape to complete the job.


PackRat
Senior Member
I fabricated a step unit as well....I used some scrap 3/4" x 3/4" angled steel...thin stuff about3/16" or so. I butt-welded a cross section of some similar thickness plate to better support it and give the bolt something to keep the step sturdy. I found a BIG bolt/washer/nut to secure it to the 2" ball adapter. I cut and painted a piece of plywood to sink into the angled frame and attached it with RH wood screws. I think glued a section of ridged matting to the wood insert.
it is attached to a 2" Ball mount like this:


it is attached to a 2" Ball mount like this:
PackRat
Senior Member
Here are a couple pics:


EDIT....in the last pic you can see I mounted it using an extension I got at U-Haul so I could use that step unit with the tail gate in the DOWN position.
You can also turn the 2" ball reciever upside down if that helps with the height you prefer.
EDIT....in the last pic you can see I mounted it using an extension I got at U-Haul so I could use that step unit with the tail gate in the DOWN position.
You can also turn the 2" ball reciever upside down if that helps with the height you prefer.
Escapepod
Advanced Member
Here are images of the finished product:Escapepod said:On our most recent trip, we decided that using the top driver's side surface of the truck's rear bumper was too small a target, and way off center, especially when exiting for those midnight bathroom breaks. So for about $22 in materials, I bolted together two layers of redwood. The bottom layer fits the profile of the bumper "well", and keeps the step from moving to either side, and couple of bungees hold the step down. I'll probably paint it a flat black, and add some non-skid tape to complete the job.
IMG_2916.JPG
IMG_2917.JPG
IMG_2920.JPG
IMG_2921.JPG

Escapepod
Advanced Member
Escapepod said:

Escapepod
Advanced Member

Escapepod
Advanced Member

Escapepod
Advanced Member
Escapepod said:

Tie downs added. Firm enough hold to keep in place during travel. Weighs about as much as a skate board, 36" in length.
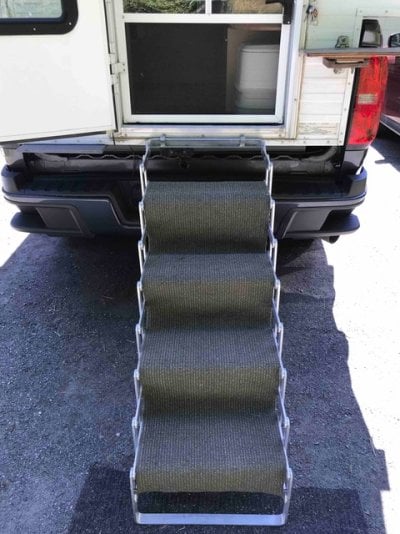
My new pup won't walk up the Brophy steps... they say they can't focus on the step w/o the riser. I did not want to start taking the dog ramp that we used with my old dog... so I grabbed some used carpet and cut a piece to fit... she ran up and down happy as a lark.
I had just converted the side couch to a side dinette and knew she would want to hop up on the bed and the table top would take the abuse with her nails so I used a scrap piece of under carpet liner...it is skid proof and now she can make it up and down in two hops.
I had just converted the side couch to a side dinette and knew she would want to hop up on the bed and the table top would take the abuse with her nails so I used a scrap piece of under carpet liner...it is skid proof and now she can make it up and down in two hops.
Attachments

la_morris
Advanced Member
I'm going to adopt your table top idea. Looks like you have a net pocket extending the length of the bed. Do you remember where you found it?
Indeed...it is a cheap pup tent net that goes front to back. All camping shoes have them. I used a grommet and a small screw to hold each end.... it is offset so it won't hit the counter. Very nice to have a place for reading glasses etc at night and there in the morning! .

Cool I'm headed out today for the week... I'm going to stop and pick some upbuckland said:I always carry a bunch of lightweight spring clamps ...great for tarps/awnings etc. I clamp one on the back top stair ... one can also put one on the back of each stair (3) ....i have found it stays put with the rubber backing.
") THANKS!!!!!
THANKS!!!!!Similar threads - WTW
- Shap
- Four Wheel Camper Discussions
- Replies: 4
- Views: 421