Mounting solar panel to FWC/Thule rack, how to?

munchmeister

Advanced Member
Joined
Jul 31, 2016
Messages
68
Location
Northern Colorado
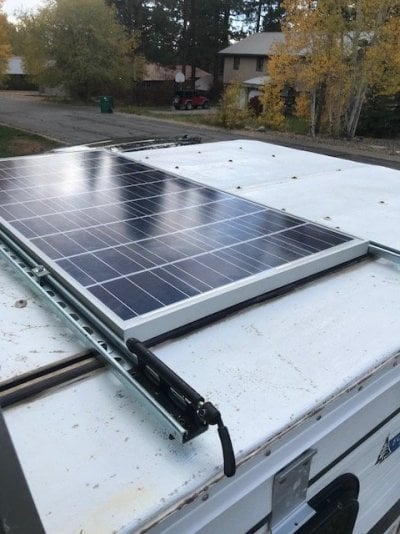
I've got a FWC Raven shell which had the Thule racks when I bought it. I'd like to mount a 100 watt or so panel and use the pre-wired SAE plug to charge a battery or two that I intend to mount into the interior side benches (its a shell, so there is no battery compartment, no cabinetry other than the narrow hinged lid.)

Can any of you steer me to what I'd need to install a panel close to roof (i.e. not using the rails and rack system) by just utilizing the Thule tracks that are the basis of the Thule system?

I'm thinking I'll get a couple of narrow batteries which can fit into the narrow space that is available under the hinged lid. The rear end of this space has the wiring stubbed in and labeled, Guess all I need is to hook up batteries to the correct feed from the roof top panel. I'd probably only be running a Fantastic Fan (also yet to be installed) to keep the interior of the shell cool when its hot and to run the LED lighting rather than pull power from the truck battery.

Thanks in advance.
 
I suggest a 160 or 180 watt panel which will span the width of your tracks (or any panel that is the same width or wider than your particular tracks). Much easier to mount compared to a panel that does not, price difference is insignificant and it will give you a little bit more leeway on daily amps especially in winter, spring and fall.
 
mm,

I have Yakima racks on my FWC. I mounted two 100 W panels to the tracks on my roof.

I think you could use an approach similar to mine for Thule racks

I bought four 1" x 2" rectangular Aluminum tubes cut to length I specified (two for each solar panel) to bridge between the tracks.

I bought two Yakima 8890028 hardware kits. Each kit contains 4 rectangular plates, 4 socket head screws and 4 washers. The plates slide into the track and are normally used to attach the Yakima landing pads to the tracks.

I drilled through the aluminum tubes with a small diameter drill to match the hole pattern in the Solar panel frame and to match the mount location of the Yakima racks.

I then drilled the side I needed to insert my socket (opposite to mounting side) with a larger drill (see pictures).

This results in the correct size hole at the mounting interface and an oversize hole to accommodate a socket on the opposite side.

One needs to be careful when drilling as the solar panel small holes are on one side of each tube (with the Yakima rack large diameter socket holes on that same side) and the Yakima rack small holes are on the other side of the tube (see pictures).

It helps to elongate the Yakima rack holes a little since the spacing may not be exact after drilling.
full

full


I screwed two tubes to each panel with 3 screws, lock washers and nuts going between each side (rail) of the Solar panel and each tube. I then lifted the tube and panel assembly onto the camper roof and attached them to the Yakima racks.

The Solar panel position can be changed (slide the panel where desired) or the panels can be easily removed if necessary. There is over 1" of air space under each solar panel and the top surface of each solar panel is slightly higher (maybe 3/4") than the top of the fantastic fan vent covers when the covers are closed.

The 4 tubes cut to length and the mounting hardware all totaled less than $100.

Edit to include image of Solar Panels on Camper roof:

full


I hope this is helpful,
Craig
 
To elaborate on my initial recommendation for a solar panel that spans your track width, here are some pictures of how I attached my 180watt panel. It spanned the track width perfectly so no need for angle stock to span the gap of the tracks like one needs for shorter panels.

I measured, marked and attached a 1/4" thick aluminum bar to both short edges of the panel. Then used some short sections of the same 1/4" bar stock as spacers to give clearance to the bolts heads of the bolts used to attach panel to bar stock. I drilled two holes in each doubled up section and ran m6 bolts, with lock washer, into the Yakima plates included in with the tracks. This gave me a total of 8 attachment points between the barstock and the track. It has not moved, nor any bolts loosened, all summer on and offroading plus it is no taller than the two roof vents so I can still fit in the parking garage at work (by 2 inches).

thumbnail_20170721_193916.jpgthumbnail_20170721_194002.jpgthumbnail_20170721_193933.jpgthumbnail_20170721_193835.jpg
 
Both mount systems look very sturdy. Can I ask where y'all got the nut inserts that fit in the Yakima racks.

Thanks Russ
 
I did something similar for my panel. The panel spanned my yakima racks. I bought a piece of aluminum angle and cut it into 4 2" or so pieces to make mounting brackets. I mounted a bracket on each side of the aluminum frame near the corners where iit intersected with the yakima track using with heavy pop rivets. I then drilled a hole in the other edge of the angle bracket to mount to the yakima track.

You can buy the anchor plates for the yakima rack from various places including yakima. The part number is 8810074. You also need a stainless steel bolt (preferably with a allen type head to thwart theft maybe) for each anchor plate that goes thru the bracket attached to the panel. but you can get that at any hardware store. I believe it's metric threads.


Here's a picture of how I mounted the panel to the track

IMG_4672.jpg

Here's a picture of the anchor plates that go in the track to which the bolt attaches.


index.jpg
 
oops, sorry I just re-read this thread and I got off on the wrong 'track' but maybe the info will help some else.
 
" Munch-M"

Welcome to the cult.

As others have suggested "bigger-is-better" at least when it comes to solar panels and batteries. You won't need much amps to run the fan and LED lights a few hours per day though as you get older your going to want to stop carrying 60 pound ice coolers and go to a 12 volt compressor fridge like a Engel or Truck fridge or equivalent that runs on battery. One battery and one 150 watt panel easily handles my Engel fridge, fan, LED lights, charge the i phone, plane batteries, transmitter, etc

Since you won't be able to tilt the panel at the sun you will need at least 150 watts to give you 5.1 amps on December 22nd (sun very low in the sky). June 22 a 150 watt panel puts out 9.1 amps per hour.

The solar controller prevents overcharging of the battery.
 
This is a great thread!
If my flexible panels ever quit (knock on wood) this will give me several great ideas for attaching fixed panels.
 
smlobx,

I am contemplating adding another 100 W panel.

Since I want to keep the roof load down (100 W rigid panels weight 20 - 30 pounds each) I will probably use a flexible panel and mount it to a thin aluminum panel then mount the whole thing the same way I mounted the rigid panels using the Aluminum rectangular crossbars mounted to the Yakima racks.

The crossbars will make the flexible panel assembly stiff and durable as well as facilitate air flow around and under it.

Regards,

Craig
 
If you are looking for a cheap way to do this, I purchased the mounting bolts that Zoie mentions and used them to bolt bars that electricians use to mount conduit, called strut channel. Then the solar bolted right on to that. It is low profile, has room for a bike rack and only cost bout $40 all said and done.
 

Attachments

  • IMG_2589(1).jpg
    IMG_2589(1).jpg
    76.9 KB · Views: 320
I like the way you have your 100W panels set up. Are they wired in parallel or in series?
ckent323 said:
mm,

I have Yakima racks on my FWC. I mounted two 100 W panels to the tracks on my roof.


Edit to include image of Solar Panels on Camper roof:


I hope this is helpful,
Craig
 
MHJackson,

I connected them in parallel. I used MC4 connectors and two into one "Y" adapters. These adapters will support either parallel or series connection. You need a pair for two panels.

Here is the write up on the install as well as lessons learned along the way.

http://www.wanderthewest.com/forum/topic/14892-adding-solar-to-a-2007-keystone/page-2?hl=ckent323

I have to add that after 11 months of use I am very satisfied with the Victron Solar Controller and the Victron Battery Monitor as well as the Victron application on my smart phone that I use to check on the Solar System performance and battery condition from the truck or whenever I am within about 30 feet of the camper when it is stored on its dolly on my driveway.

Regards,

Craig
 
Thanks! I have the Victron 701 and really like it. Thebluetooth dongle was also very handy.

ckent323 said:
MHJackson,

I connect them in parallel. I used MC4 connectors and two into one "Y" adapters. These adapters will support either parallel or series connection. You need a pair for two panels.

Here is the write up on the install as well as lessons learned along the way.

http://www.wanderthewest.com/forum/topic/14892-adding-solar-to-a-2007-keystone/page-2?hl=ckent323

I have to add that after 11 months of use I am very satisfied with the Victron Solar Controller and the Victron Battery Monitor as well as the Victron application on my smart phone that I use to check on the Solar System performance and battery condition from the truck or whenever I am within about 30 feet of the camper when it is stored on its dolly on my driveway.

Regards,

Craig
 

New posts - WTW

Back
Top Bottom