New Alaskan owner, finally

Oryguntroutbum

Senior Member
Joined
Dec 15, 2012
Messages
396
Location
Central Oregon
So I drove up to Mercer Island,Wa. to look at an 8' cabover that was listed on Craigslist as "very good" condition. Apparently my definition of "very good" and the owners is a bit different. After seeing the condition (which consisted of yellow jacket's nests, dry rot in nearly every corner, and a cabover that was drooping so bad on one corner I was nervous to put my weight on it) I finally declined and started my 4 hour drive home. I had been ready to pay the $2,700 being asked for the camper had it been in good shape.

I was a bit dejected as I had looked at several older Alaskans and a Four Wheel camper, all of which were more of a project than I was willing to take on. Since I was up in the Tacoma area I called on another Alaskan, this one an 8 ft. NCO. I met a nice guy named Chris who had a '64 in pretty dang good shape. We settled on $500 which I felt was very fair based on the lack of water damage. I found the only real damage was from road wash due to the Perelli seal having not been replaced for a long time, causing some pretty good gaps between the top and bottom halves.

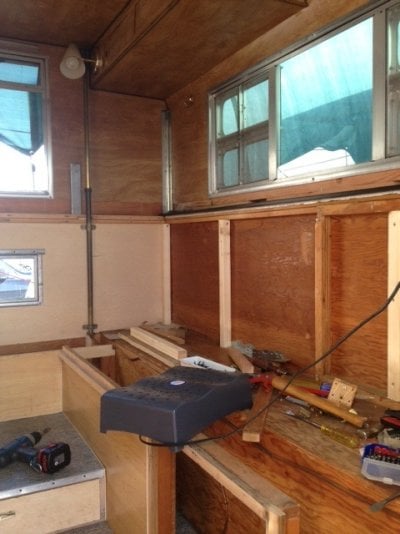
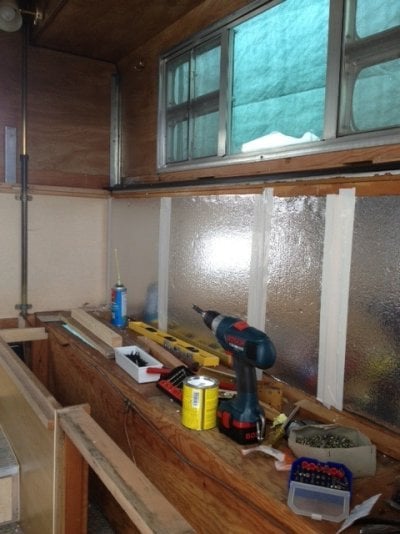
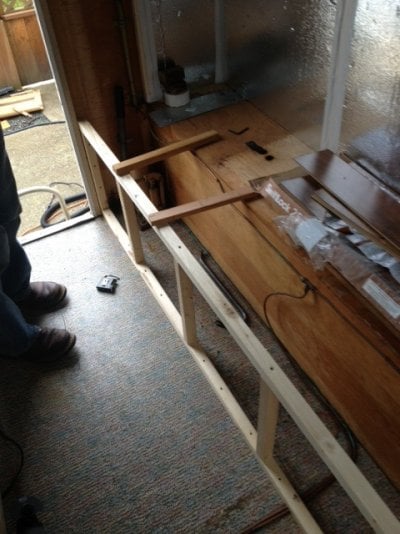
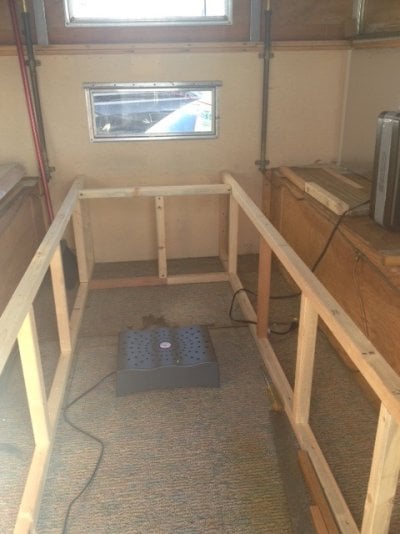
To sum it up I'm now an Alaskan owner and excited about fixing this one up. My goal is to make sure everything is sealed up tight on the outside and concentrate most of my attention in new cabinet doors, linoleum, counter tops and cushions.

Thanks to all of you on this site that provided lots of insight while I was lurking around here. I will try and post some pics when I can find myself at home when it's light out :)
 
It's always nice to hear that through sheer determination and an aligning of the stars, deals are found. Congratulations on the find....

When you get a little closer to doing the vinyl, I can give you a couple tips I learned from a flooring contractor....worked like a charm ;)

Best of luck and welcome to the crew....pictures


Thanks! I would definitely take any advice on the linoleum or any other aspect of improving or maintaining the Alaskan. Right now I need to figure out how to get it off my truck to work on it. It was a very stressful experience using the tripod jacks to get it on. I would like to get some corner jacks to use but I'm not sure the best way to mount a plate on the camper. It has no hardware for jacks right now.
 
Welcome. My belief is that the Reico Titian jacks work the best for the Alaskans.


Thanks Buckwheat, I think the Reico's are probably the best too. It's the mounting hardware that I'm concerned about. I'm not sure where the best place is to mount it on my camper. I have a call into Alaskan. Hopefully they can tell me if the current jack mounting brackets will work on my 64.
 
those jacks are scary(but i still use them). for a little more security, on my 64 10' nco,i use an old hydraulic stray camper jack placed under the left rear corner out of the way of the tailgate path.even with that, i managed to drop it 6 inches on to the back of the truck once. good thing alaskans are built tough.i find the bast advice is to have a helper, and take my time when using the 2 jack system. i'm looking forward to using corner jacks on the one i'm working on now(74 10'co), thanks to buckwheat. they arent as good as titans ,but they are way better than the older, old style.the only saving grace is that alaskans arent as top heavy on the jacks as an old camper i had once using the older stlye jacks .that seemed twice as scary.

wes
 
I agree. The Reico Titan jacks are great. No more bent eyebrow gutters.

Mike


Reico Titans....4 of them...one on each corner.....they have the brackets as well....they mount to the bottom half.....make sure you steel plate the opposite side and seal the bolt holes well when you install them. lagged to the plywood alone, without the plate, puts a tremendous flex on the attachments when jacking the camper up for removal.

"4 of them" avoids the wife on the single jack side ;)....I couldn't resist Mike
 
I pulled the trigger and ordered the jacks. At the recommendation of Brian at Alaskan I ordered the set with the "dually" brackets which is apparently what is used on the new ones. Might save me some dings in my truck. They cost me more than the camper :eek:
 
Also, for anyone who is interested, the part number for these Rieco Titan jacks is:

THD20004ZD

Decoded it's simply Titan, heavy duty, 2,000 lb, set of 4, dually

Chris
 
Ray77....the ones you ordered are the ones you want....had them for 20 years and they work great....

get the adapter for a drill...and carry a cordless with you....you'll find out why ;)

make sure you align the legs on the front so your wheel will just get by...you'll see when you put them on...don't run over the legs
 
Dang. How much for the four? Do they come with the dually brackets?


This is just a craigslist add that I found I know nothing about them. I do have an extra one it has a standard bracket on it. I have 2 extra standard brackets also because I also went with the extended brackets.
 
This is just a craigslist add that I found I know nothing about them. I do have an extra one it has a standard bracket on it. I have 2 extra standard brackets also because I also went with the extended brackets.


I getcha now. Thought maybe the add was yours and you were saying you now had a fourth. Thanks for the link. I think I'll bite the bullet and get the new 2k lb set. They seem to hold their value pretty good and I like the idea of the extra strength. :)
 
Here are a few pictures from the rebuild. These are a month or so old. Much farther now on the interior. Building the sink cabinet and adding backsplash up to the windows and new panel on the end wall.

Also bought new cushions and upholstered the sidewalls with forest green microfiber material. Looking pretty decent. Lots more work to do.

Chris
 

Attachments

  • photo 01.jpg
    photo 01.jpg
    103.5 KB · Views: 232
  • photo 02.jpg
    photo 02.jpg
    113.1 KB · Views: 212
  • photo 03.jpg
    photo 03.jpg
    121.8 KB · Views: 230
  • photo 04.jpg
    photo 04.jpg
    96.1 KB · Views: 214
Here is a pic of the upholstered interior sidewalls. These will cover the foam core insulation I installed.
 

Attachments

  • sidewalls.jpg
    sidewalls.jpg
    98.8 KB · Views: 172
Had some pitting on the aluminum window trim. Painted them using Rustoleum bed liner spray. Pic is a bit fuzzy but it turned out great.
 

Attachments

  • window trim.jpg
    window trim.jpg
    126.3 KB · Views: 123

New posts - WTW

Back
Top Bottom