Grandby Shell build, it takes a Village, a bit more install info, Zero Declination drop down shower

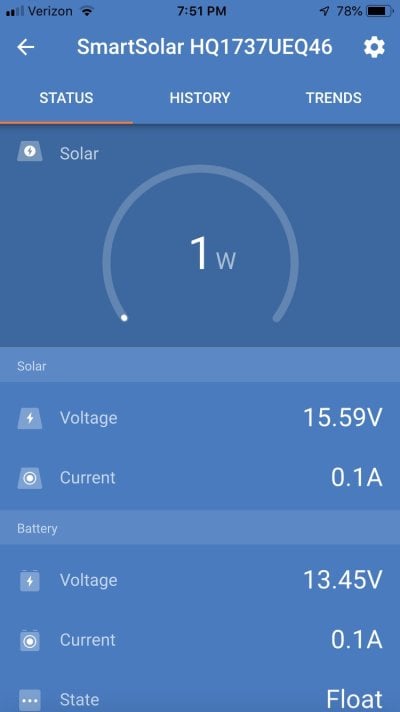
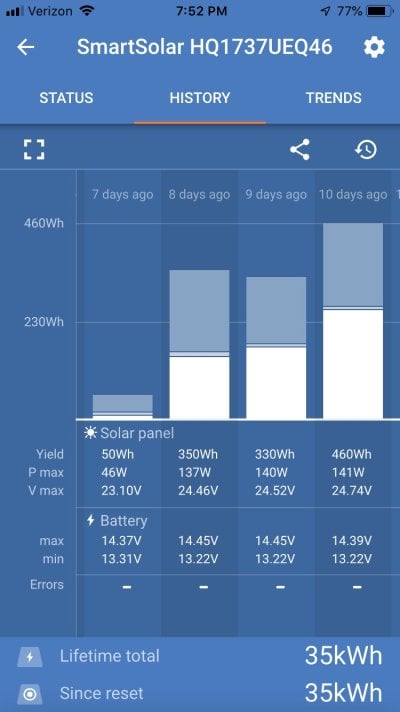
Here are screen shots from a Smart Bluetooth Victron solar controller. These were both taken late yesterday, Sun was low, all power to the Camper turned off. Everything at full capacity, 2 -120W panels not engaged.
#1 Device status shown in 3 parts ... Solar W output, Solar voltage & current, Battery voltage, current, state.
#2 - 30 day history of usage with solar input, W & V, min/max by daylight parameters, it registers active vs float
 

Attachments

  • D0093D7E-4850-4073-A469-4E5B67E4E396.jpeg
    D0093D7E-4850-4073-A469-4E5B67E4E396.jpeg
    87.4 KB · Views: 160
  • 7527B588-5F04-419B-9619-46BA01EEE81A.jpeg
    7527B588-5F04-419B-9619-46BA01EEE81A.jpeg
    134.5 KB · Views: 181
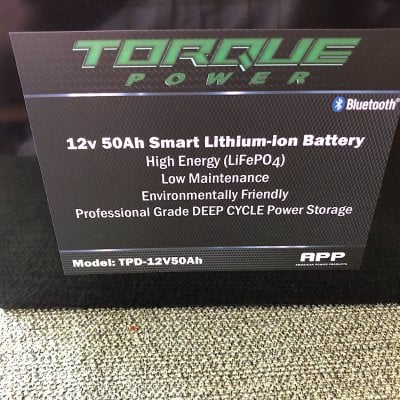
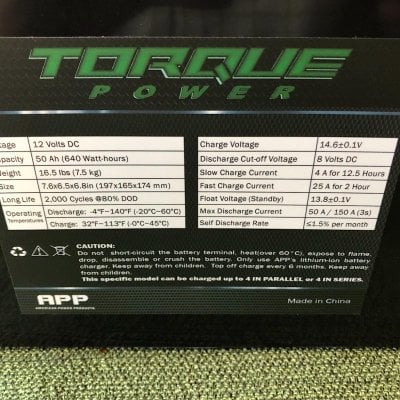
This is a new purchase, a LiFePo4 50 Ah Battery, that will be multi-tasked. My truck, Camper, canoe, & a bear box, in high bear population areas. I am going to make a Power Box which will enhance portability & multi use. This company, Torque Power, I think, is somehow related/off shoot to Stark Power. It uses the same internal Bluetooth module, the TP App is interchangeable with the SP App. Their pricing did influence my purchase.
 

Attachments

  • 32B28336-A034-4CE5-AB1F-A2B3747BD942.jpeg
    32B28336-A034-4CE5-AB1F-A2B3747BD942.jpeg
    494.3 KB · Views: 147
The same lead Tech, Max, also works there, same State, N.C. I want to make clear I am only reporting my experiences for the edification of WTW. I have no recommendations to give, I have no history with this, buyer beware. I have taken a full dive into LiFePo4. May it reward me with reliable off the grid energy storage, strictly 12V, with Solar. I inquired, & was told in a pinch, I could hook up this new battery purchase, in parallel, to my existing system. BUT, Max qualified, this Battery is a different generation. It should not be used in conjunction for long term storage. Reason is related to resting voltage & uneven drainage.
 

Attachments

  • 51759C89-5A4B-4267-A429-F67729DA4C9A.jpeg
    51759C89-5A4B-4267-A429-F67729DA4C9A.jpeg
    226.5 KB · Views: 141
Stokeme said:
StarkPower Bluetooth LiFePo4 App. I have 100Ah & 50Ah batteries, connected in parallel, in my FWC battery box. I purchased both about 1.5 yrs ago, same generation, parallel compatible.
I am not that handy. When I found out that internal Bluetooth existed in LiFePo4, I saw it as an opportunity. I did not have to buy a Victron battery monitor, mount it or wire it, add it to an already, for me, complicated wiring task. I am now a bit more confident. StarkPower has gone out of business, but, they were in business for some years, & I am happy with my purchase. I followed an earlier FWC post, the op a LiFePo4 pioneer, had owned SP for 2 years & was happy. There were Positive reviews about the company on the net. The owner was a former automotive industry innovator. Oh, also, they were priced ~$150 less than the competition, among several that did not offer Bluetooth. After buying the 1st Battery (100Ah), I had reasons to add more Ah(50) & to have separation. I asked for a discount & received a 15% off coupon code. It helped.
Two issues give me pause ... Will my SP App last “forever”?, 7 years is what I hope/expect. The 2nd issue occurred to me with this post, w/o the use of my phone for some reason, I will have no monitoring capability because I do not have an independent dedicated monitor.
Below are some screen shots taken off my iPhone SP App. #1. Both devices shown. #2 & 3. SOC, voltage, status, health, capacity. #4. Temperature & cycle life. My battery group has been through five cycles. #5. Real time individual cell activity. The tech is cool, it’s internal, it’s live. How long will
everything function at a high rate .....
I'm no LiFePo4 expert, having just purchased my own, and doing a rough install this week for a 5 day outing next weekend... but, the 5 cycles in 1.5 years means that ... yeah, they will last forever. More or less. These batteries are good for thousands of cycles!
 
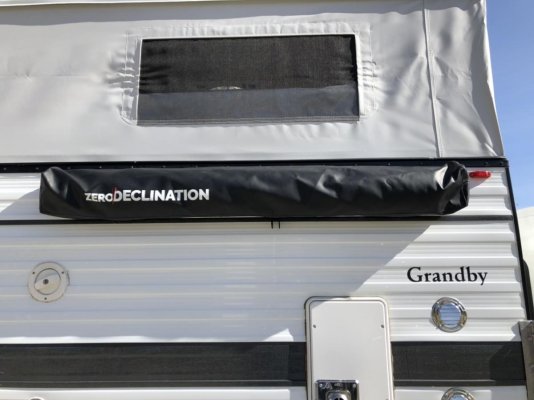
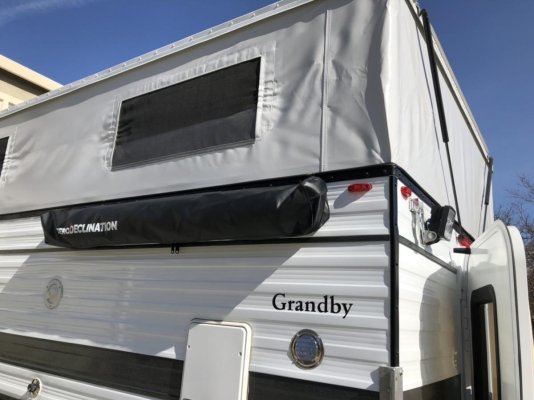
Here is one of my last remaining bucket list items, a drop down shower curtain. Outdoor bathing handy & ready. Quick out, quick up. This is about 1/2 the price of the Australian unit that has been out for a couple years. This seems solid, well made. I am happy so far. I will report more in a day or so. I have been following production since it was first thrown out, on FWC Facebook, as a business concept taking root. My wife “pointed” it out to me. I have a 4.5 gal solar shower tank that can be hitch mounted . I need to get them in sync for use.

https://www.zerodeclination.com/
 

Attachments

  • 15BAA1D7-8D91-4752-9580-BFD5941F3FA5.jpeg
    15BAA1D7-8D91-4752-9580-BFD5941F3FA5.jpeg
    92.2 KB · Views: 274
  • 28657B6B-6391-4680-A9B4-D5F81BD327FB.jpeg
    28657B6B-6391-4680-A9B4-D5F81BD327FB.jpeg
    99.3 KB · Views: 304
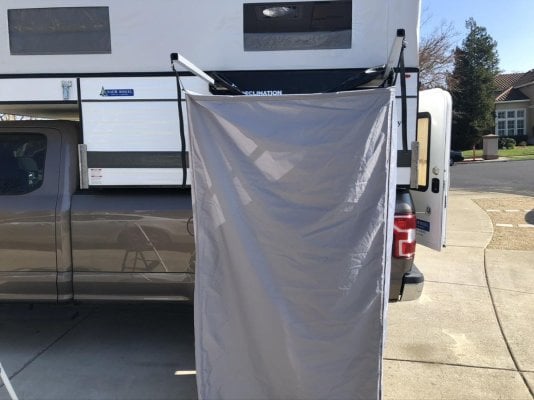
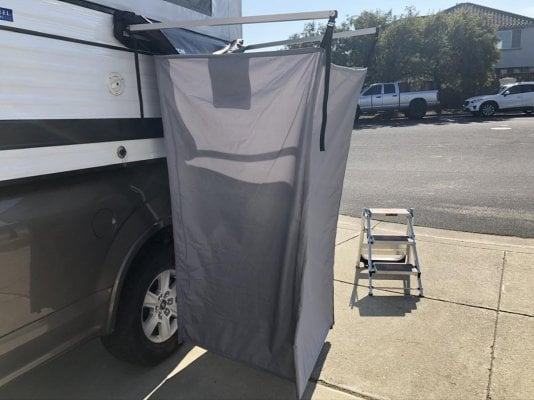
Shower tent extended. 4 straps offer adjustable length. Basic stakes & guy line included. Positive about the quality is my first impression. Very comparable to the Australian model I viewed at a FWC rally.
 

Attachments

  • BA4D1D4D-9754-4038-B791-1897DA835D85.jpeg
    BA4D1D4D-9754-4038-B791-1897DA835D85.jpeg
    110.2 KB · Views: 338
  • EF0DD7DD-AF42-48CC-8B10-28D7AD0B5025.jpeg
    EF0DD7DD-AF42-48CC-8B10-28D7AD0B5025.jpeg
    115.6 KB · Views: 286
Interior, bolt through, mounting view. Following the included instructions (be sure to use the butyl tape) I found the tent to be slightly too snug to the lowered roof after my initial mount attempt. Every roofline may be a snowflake, but I found mine, viewed closely after the fact, to have a slight downward pitch as it approached my front side clamp & also as it approached my rear back clamp. This makes some sense. So, the rear 1/3 length of my tent was right at the edge of my roofline, while the front 2/3 had very slight clearance. For my camper, a 2 5/8” drill spot would have been better than the listed 2.5”.
So, I carefully filed my holes a 1/4” lower, not wider, & after repositioning, it had a bit more breathing room between the top of the tent bag (and more importantly the inner aluminum tent frame) and the lower edge of my roof. I added extra butyl to compress at my drilled holes. A heads up, I had to remove the butyl tape from the rear mounting bar after my first attempt. So, I would recommend to do a dry run w/o the butyl tape. Position & check the bag with needed roof clearance before final positioning & addition of the butyl tape.
The tent foldout frame & infrastructure seems quality. The shower bag has a nice heavy rubberized coating. Overall, this is a great addition for our extended off road adventures.
 

Attachments

  • DA713811-F78C-4855-B251-C32A3BDDBA77.jpeg
    DA713811-F78C-4855-B251-C32A3BDDBA77.jpeg
    119.8 KB · Views: 267
  • A79A07E7-917D-4E35-BC8E-B08DEA259302.jpeg
    A79A07E7-917D-4E35-BC8E-B08DEA259302.jpeg
    91.6 KB · Views: 294
The shower enclosure looks cool. Looking at their website, they have a FWC mounting option (+$10) but don't specify what it is. Did you get this, and can you show how it works?
 
I learned the included install measurements are based on a roof style previous to my 2018 Grandby Shell. So, the lower roof flair may be different with different vintages. I would not recommend going lower than 2 5/8” unless you are intimate with your vintage framework. The top two holes go through my lower tube (of the two tubes) that is welded atop a fascia plate. The lower single hole goes through the fascia. Here is a pic of my Shell driver’s side frame.
The FWC kit has 3 bolts, 3 washers ... the value pieces are the 3 specialized Allen ”tube style” nuts that fit snugly & connect internally, from the inside, with the bolt in the drilled hole. Hardware I believe is stainless. This offers a flush, seamless install. The standard mount is a bracket(s) to attach to a roof rack on Jeep, Van etc. As always, buyer beware, these are my first impressions without length of use. I’m Stoked because this solves a marital issue for me.
 

Attachments

  • 8D679C6B-41C2-42AD-AA82-2F1A44DEE687.jpeg
    8D679C6B-41C2-42AD-AA82-2F1A44DEE687.jpeg
    153.5 KB · Views: 247
Further mounting info. The folding shower, frame & bag, is attached to a sizable, rear aluminum, mounting bar. The bar has 2 recessed slots that run the length of the bar. Slide a bolt into the slot & the bolt head is held by the slot. 2 in the upper slot, 1 in the lower. The bolts end up being held in place, for mounting, by the butyl tape. The bolts are inserted into three 5/16” holes drilled through the camper side wall. The tube nut & washer, placed through a hole from inside the camper, with the help of the butyl tape, compress the shower unit against the camper when tightened. Again, do that dry run with the shower. Be happy with the placement in relation to your lowered roof. Place some butyl tape around the bolts to hold them in place for the dry run or they will simply slide freely in the slot.
.
 
Thanks for the details on the mounting. I slightly prefer the versions that come in an aluminium hard case, but I am not sure I prefer them an extra $200.
 
Appreciate the extra installation instructions. My old, cheap pop-up tent has seen its final days and the new one from Zero declination arrived with the kit but without instructions yesterday, just sent them a message but haven't heard back as I'm hoping to get it mounted this weekend. I'll be using mine primarily for luggable loo privacy but may use a solar shower off the roof on some longer trips.

Edit: heard back from KP and he sent me instructions very shortly after I contacted him and started researching this. What an awesome company! Wish all companies were as dedicated to customer service!
 
This Shelter at Home has halted everything. Used it in DVNP & Alabama Hills in February for the first time. It was great to take a shower. Though, my solar shower did not heat up sufficiently during the daytime with such cold nights, Alabama Hills was a pretty crisp shower. Yes, also a good outdoor loo #2 facility. Glad my install notes helped if even a little. Follow fold out/in instructions or the tent has a tendency to retract over itself. Then to open you will need to swing tent back over itself.
Nice product & KP always replied within 24 hrs. Happy to support a small Camper business.

Here is the Zero Declination FB site ... more visual pic & video posts
https://m.facebook.com/Zero-Declination-561712754318309/posts
 
Our Zero Dec arrived Friday and I will be installing it on our 2018 Hawk side dinette today or tomorrow. Ours did not have the instructions with it either, but they are available on the website. I contacted the service department at FWC before ordering it and they seemed familiar with the product. I was hoping there would be documentation for safe install areas on various FWCs but there was not. My wife contacted the company and they quickly confirmed that we could safely drill where we are planning to put it (driver side, upper area of wall above the darker strip of siding). It looks like a well-made product.
 
Outside of the cost, one problem with stand alone shower/privacy tents is the wind. Anyone in Oregon right now with 30-60 MPH winds knows that most stand alone tents will blow over. The Zero Declination will not but is really expensive for a cover and two rods. It is easy to make your own attached shower curtain. Just attach two locking drawer pulls under the camper overhang and either use a bungie cord or wood or aluminum piece to connect the ends. Unlock the pulls and pull them out and attach your cheap dollar store shower curtain hooks and the shower head to the pulls. It works with the original FWC hose length. It it easier and faster than any other system for sale for a lot more money. I put the shower curtain into a dry bag and store it in front of the camper when traveling so it does not take up space inside the camper. I hike and have now used this system a lot for over 5 years- have used the shower a lot and it works great. I use the left over plastic leveling blocks, after parking and leveling for the shower floor. I have not used this as a toilet enclosure but it would work just as well the same way for that.
 
It is easy to make your own attached shower curtain. Just attach two locking drawer pulls under the camper overhang and either use a bungie cord or wood or aluminum piece to connect the ends. Unlock the pulls and pull them out and attach your cheap dollar store shower curtain hooks and the shower head to the pulls.

Any pictures? I might copy your construction.
 
We are pretty happy with our Zero Declination shower. It was a little harder to install than I anticipated. I know I measured where I would put it before I ordered, but the tent is a little wider than I thought. We have a 2018 Hawk side dinette with water heater and furnace, so the exterior driver side wall is pretty crowded. We also have LED lights, so there is an LED fixture towards the front of the upper area of the wall. The water heater vent is at the front of the driver side, and the furnace vent is just forward of the refrigerator vents (at the rear of the driver side). Between the two hot vents and the LED fixture, there was no where for me to mount the shower without having some part of the deployed tent being right in front of a hot vent.

I came up with a plan and did what I have learned to do with problem-solving like this: sleep on it. In this case, I thought about the problem for a few days and ended up going with my solution. The reason I hesitated is because it involved the rear end of the shower unit needing to be over a small part of the upper fridge vent in order to place the tent in a safe spot with respect to the hot vents. I ended up pulling the fridge vent cover off and carefully flattening the upper two louvers on the left side of the cover. While this will restrict the ventilation for the shower slightly, it should be fairly inconsequential as we have the computer fan in there and the two closed louvers are only about 1/12 of the total vent space when you include the lower vent. Two of the mounting screws for the vent cover interfered with the shower install, so I added some exterior silicon that I had to the flattened weatherstripping that was already on the cover. I installed the cover with all of the screws until the silicon dried, then removed the two problem screws. I knew that when the shower was completely installed, it would be holding that corner of the vent tight to the camper. After screwing down the shower, everything is very tight.

My Zero Dec installation tips:

After triple checking that your drilling locations will "land" appropriately on the interior of the wall, drill a pilot hole (1/8") in the safest of the three locations. You will be drilling through the metal siding and aluminum framing, so use a decent bit. Once your first pilot is drilled, go inside the camper and use it as a reference to check that all three holes will be in a good spot. Once you finalize the locations for the three holes, drill pilot holes in all of them.

Prevent chip out: Use the final bit size for the holes (5/16 I think, check instructions), and go to the inside of the camper and drill from inside out on the pilot holes just to get through the composite paneling on the inside. This will help preventing a big chip out on your interior when you punch through from the outside with the bigger bit.

Counter sink the pilot holes on the outside. After I drilled my three pilot holes, I tried finishing one of them with the 5/16 right off the bat. As the big bit cut through the siding, it got off center and began drilling through the aluminum framing in a slightly different location than my pilot hole. I knew going from 1/8 to 5/16 was not a good idea, but I tried it anyway. After that failed, I decided that countersinking through the siding would solve the problem. I have a high quality countersink made for hardened steel which I used, but a regular countersink shouldn't have any issue with the thin aluminum siding. The point of the counter sink indexes in the pilot hole in the framing, which allows the hole through the siding to be perfectly centered on the pilot hole. You want this because the larger bits will "walk" easily on the siding, as I found out. I recommend countersinking slightly into the framing as well.

Use an intermediate drill bit size. At this point I realized the 5/16 might not follow the pilot hole as nicely as I wanted, so I picked a bit just in the middle of 1/8 and 5/16. The countersinking made this intermediate step a breeze. Once the intermediate drilling was done, I had not trouble with the 5/16 and all of my holes ended up where they should be on the interior wall.

Butyl tape. Per the instructions, Butyl tape is required for the install. You are to apply it all along the top and bottom of the rear plate of the shower, and around the bolts. The back plate of the shower is a dual T-track, with two bolts in the top track and one in the bottom track. I marked the bolt locations with sharpie before applying the tape. After applying the tape along both edges of the plate, with breaks in the tape where the bolts were. I then made sure my bolts were lined up with my sharpie marks. I made a small "worm" of tape by rolling it up, then formed it into a donut around the base of each bolt. I then formed the donut into a conical shape so that when the shower was bolted up tight, I was sure that there was plenty of butyl tape sealing around the bolt and slightly into the hole in the siding. The same principal as the conical nylon washers that seal each joint on a p-trap under the sinks in your house.
 

New posts

Try RV LIFE Pro Free for 7 Days

  • New Ad-Free experience on this RV LIFE Community.
  • Plan the best RV Safe travel with RV LIFE Trip Wizard.
  • Navigate with our RV Safe GPS mobile app.
  • and much more...
Try RV Life Pro Today
Back
Top Bottom