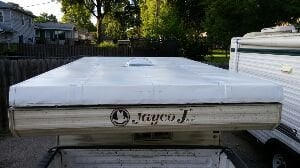
Jayco Sportster 8ft - Renovation

Did a little TLC on the truck and fitted four new shocks KYB Gas-a-just.
It improved the ride a lot. Truck has much better handling now!

Unfortunately i found the front right leaf spring broken (upper leaf)......
need to find an inexpensive solution to get two new springs in fall.

I am looking for a little upgrade because of the heavy diesel engine.

Some ideas ?
 
I just want to say the remodel looks amazing. I recently bought a 1983 8' Sportster. The first thing I had to tackle was the roof which looked alot like yours. Everything was a loss pretty much and I remade it on a budget. Still need to install some trim and some wheatherstripping for the roof when it closes. So far under $200 but the aluminum skin was on hand already. Its not pretty but it doesn't leak!
 

Attachments

  • IMG_20150721_4764.jpg
    IMG_20150721_4764.jpg
    13.8 KB · Views: 268
Hello Chris,

we considered to rebuild the entire roof but stopped this idea later. there was no budget remeining for this project. So we sealed every gap and every screw with butyl-tape and sprayed the roof two times with the tintable bedliner . If it leaks now.....
Lets have a shower... :D
 
:oops: We had a (little) shower at our TruckCamperMeeting in September 2015.

23292838rv.jpg


The "North-South" profile in the middle of the roof is screwed through the roof to the frame. Original there was a plastic profile in it.
(no seal). We had a few drops of rain in the rear and next to the cabover. Now we try to seal it with UV-protected sikaflex or similar, filling the gap in the profile, and then test it again in our driveway.
 
Hi,
work is nearly finished. Last issue was a leaking roof. We didn´t rebuild the entire roof. We removed the interior aluminium and the styrofoam wich was fully soaked with water. The water went into the roof (only the upper side leaked). But the water had no chance to get out of the roof, so it was the heaviest part of our camper :( . (2 1/4 lbs per sq.ft. )

The problem is that we had no chance to rebuild the roof in the correct shape. Originally it was a little arched ( i hope this is the correct word). We screwed the two halfs of the aluminium outside plus midlle profile to the wooden panel (north/south) using butyl tape between profile and aluminium and between the roof halfs.

Before:
20206715de.jpg


after:
20206710dg.jpg


As an insulation we added 1" closed styrofoam (doesn´t soak water) and covered it with 2mm cork sheets. We prepared these parts before installing. This was not the best idea, so we have to cover the entire roof with some decoration sometimes.
This will be our last work on the camper.

But the roof is not as good as we liked to have it. It is corrugated, but at the moment i am not willing to remove it and rebuild it.
It works well with our 200W Solar-System.
 
I recently acquired a similar camper. She's no beauty queen, but the immediate need is to fix the sagging roof and lift system.
I just want to thank you for providing detailed information and photos for the rest of us. Your efforts will undoubtedly inspire others as well as serve as a reference to those wanting to improve their campers.
Hats off to you! Sincerely, Brendan
 
Hi Brendan,

you´re welcome. If there is any question don´t hesitate to ask, also via "personal message".
There are some "european specific" solutions but we tried to finish the camper as original as possible.
Because of high shipping cost and customs taxes we found some special solutions, like the furnace.


Manfred
 
Update: The old Dometic compressor-fridge passed away last year :(

We replaced it with an ENGEL CK-85 (also sold as CK-100 somewhere ). Not the cheapest solution but we are very satisfied with it!
26125059ee.jpg

26125070dg.jpg


Low Amp-Drag , smooth run and only thin cables required. My wife loves it!

TCM-Calendar: (furnace thermostate + NASA-Clipper BM-1 battery-monitor)
26124986en.jpg
 
Manfred and Viola thank you for this detailed account of your Jayco Camper restoration. I am impressed. You are talented and creative. The winch roof raising is a real prize. Thank you to for the article in Truck Camper Magazine that has just aired. I am reading and re-reading the article because you have done so many clever modifications. The window between camper and truck is impressive to me. The dogs would really like one that is large. And the upholstery!!! I hope this has a lot of attention and prizes. You would be a big hit at the truck camping events here and the Overland Expos. Thank you again for publishing. It was great meeting you both this past October at Alaskan Camper. All the best. Hope to see you again.

Linda
 
Hi Linda,
thank you very much for your nice comment. We are also glad to know you in person at Alaskan-Campers!
Yes it was a hard piece of work and one year of planning and thinking about options and solutions to find the best way between restoring it for practical use with some modern improvements and leaving it as original as possible. I think we did well!

The upholstery is a great work of Viola. Very well thought out! They can be turned to the other side and all the colours are matching again... The front window to the truck is original and we replaced it exactly to the original place.

We got a lot of attention from the guys and ladies of our german www.wohnkabinenforum.de.
If we would like to sell it it´s only a question of minutes....but listening to Viola´s comment this will cause a divorce.....

The main problem was: after one year of repair we started to our first Truck-Camper-Rally at the "Holy Mountain of Andechs Monastery" to present the camper and one mile from our home the truck break down. We arrived at the Meeting by car, without truck and camper.....and we had to deliver and show our work later in 2015.

We stay in touch until our next USA-trip

Manfred
 
Manfred, great work! We are working on a 97 Sporster 8 like yours. Lots of great pics and it has been very helpful for me. One question, where did you mount your battery and how did you wire it up? Thanks!
 
Hi,
it was my intention to post the restauration not only for show but also to help others.

I mounted the battery ( 12 V 120 Ah AGM ) in the front seat of the camper to keep weight more in the front. No need for this on a longbed Truck like ours. If you need to keep the battery in a vented box i would recommend to install it in the rear seat to line the vent hose out through the back wall.

How to wire the battery :

Generally i will ask you to checkout other threads for this because some of my installations are specific european and to me...

My wiring is very special. Why ?
I removed the original 110V/12V converter charger and placed a 220V/ 16 Amp-Fi-Breaker in it´s place.

Breaker integrated in original cover of 1992 charger
19338850lf.jpg


Than i installed 3x 220V sockets ( 110V in your case ). I need these sockets only to plug in Violas Hoover when we are back home and the charger (Italian model works on 220V/ 12V from truck and up to 240 Watt Solar ) to charge the battery when the camper is stored in the garage.

Charger
19095681yo.jpg


I never needed shore power on our trips. The 120 Ah AGM + 2x 100 Watts of Eco-Worthy-Flat Solar-Panels on the roof keep us independent. The entire lighting is done as LED and the fridge is a Engel-CK85 Compressor-Fridge. Very quiet, low Amp-drag, good insulation and needs only thin cables ( 2,5 mm² which mean AWG 13) to get enough electric power to start.

Solar:
21432385ke.jpg


To watch the battery we installed a NASA Clipper BM-1 Battery monitor. At the shunt of the BM-1 all the ground cables come together.
If there are too much ground cables you should use a distributor for this.

Battery monitor:
19107416bf.jpg

Groundcable-distributor, barn-find ;-)
19107410vf.jpg


Between battery and all the electric components i installed a 12V fuse box with plug-infuses, like you can buy in the car department at Walmart or Home Depot. At the Fuse box all the +- cables come together and then are connected to the battery. I would also recommend a "Quick-Disconnect" at one of the battery poles or as a separate switch.

Fuse box:
19107409qw.jpg


I hope my english is good enough to describe what i mean.
 
Jawohl Manfred!

I recently owned this exact same camper ... albeit in much better condition than what you started with.

I am not nearly as industrious as you so I sold it and purchased a FWC.

Well done. I'm amazed.
 
Manfred65 said:
Hi biggb,
thank you! We love this product of our hands and brain. We had never owned a TruckCamper before and it was our first build!

It was our first step into TruckCampers !
Hi Manfred,

It’s been a while since we’ve heard from you. Hopefully you’ve had a good winter and are getting ready for a season of camping.

Regards,

Steve
 
Hi Steve,

i would love to have more time to go camping with our Jayco.

We will start the weekend after easter with the first meeting at the Andechs Monastery in Bavaria.
http://andechs.de/en/

There will be 40+ TruckCampers
32116172mk.jpg


32116176ah.jpg


32116179qw.jpg


We started a TruckCamper-Import Business last fall and hope to start selling right now. Therefor we have a small regional Car and Truck Exhibition next week, a local fair and the
http://adventuresouthside.com

in July.

A lot of work waiting as a "side job" until it will allow to do this business full-time.
 

New posts

Try RV LIFE Pro Free for 7 Days

  • New Ad-Free experience on this RV LIFE Community.
  • Plan the best RV Safe travel with RV LIFE Trip Wizard.
  • Navigate with our RV Safe GPS mobile app.
  • and much more...
Try RV LIFE Pro Today
Back
Top Bottom