BluesideUp Alaskan Project

After camping out this week in 40 degree temps its pretty obvious that some of the Pirelli seals need replacing.

I would appreciate any pointers
 
Alaskan Has them...another source was found but the thread has since disappeared into oblivion.....

pull the interior trim over the pirelli...install the pirelli tight to the top section with the camper pumped up.....trim off the excess from the interior and replace the trim

the back doors are a bit of a pain...but when you get the sides and the front done you'll see what to do....they'll last about 5-7 years...

the top section will have small (or used to) brass tacks to install against the upper section...from the bottom...there are brass strips covering the pirelli....staple the pirelli on....replace the brass strips...and trim off the excess...and caulk with polyurethane adhesive on the outside edges...that'll help stop the water surface tension from pulling under the pirelli

at the corners...after all is replaced.....coat the corners with polyurethane adhesive and leave a small drop hanging on the exact corner....it will serve to stop the surface tension of the water pulling back in toward the camper and form a drip point...this is where alot of rot starts

40 in Florida.....I thought you lived in toasty land ;)
 
Thanks. I have found a couple of sites that offer a 100' role cheaper than Alaskan but Bryan has spent a lot of

time answering my emails and supporting me with technical information so I will buy from him.

The sides , after 3 years do not even seal and a 1/4 of day light can be seen in numerous places top and bottom.

Yeah it was in the 30's in mid state with freeze warnings everywhere.

The cabin temperature started in the 60's but by 1 am was in the 50's then 40's with the Pex going full bore.

After I get the seals done I am going to look at replacing the pex supply & return tubing above floor with

copper, relocating the expansion cylinder to be adjacent to the heater box, insulating the laminate

around the heater then removing the foam insulation to permit the heat from the steel box exterior

to radiate then install a small fan and duct from a vented cover to pull ambient air through.

Sort of like a space heater.


.
 

Attachments

  • IMG_2294.JPG
    IMG_2294.JPG
    61.4 KB · Views: 107
Your heating should be able to keep your your camper a lot warmer then that at 30 degrees out bad pereli seal or not. Your water heater is 9,000 btus my wave 3 is 3,000 btus and can keep it in the 60s when it's below 30 out with a bad seal.
I would look more into your heat sysem. Do you have a storage tank on it? What is the flow rate of the water? What is the temp. rise across the heater? How are you regulating waterflow?
 
The heater is a SW4P made by Suburban manufacturing, tank capacity 4 USG, working press 150 psi,

9000 BTU, Recovery 7.5 USG/HR at 100F rise. Just a dedicated hot water heater and pump to push

heated anti-freeze around the pex.

The fluid flow starts at the perimeter of the floor and works its way to the center. The under dinette

floor and under the cabinets gets pretty warm but the center walkway does not. The first owner had

the same issue.

Its 65 OAT and I have turned the system on and will check temps in & out in 30 & 60 mins. The burner

is at 240 degrees
 

Attachments

  • IMG_2001.JPG
    IMG_2001.JPG
    108.8 KB · Views: 134
Here are the figures on a 90 minute run with an outside air at 68.

The water pump appears to just have a set output which is controlled by the thermostat. The burner is set on

high

0 min 30 min 60 min 90 min

Supply 68 115 144 134

Return 68 69 83 105

Floor 68 68 78 83

Thermostat 65 65 68 73

Also a pic of the pirelli seal.

.
 

Attachments

  • IMG_2363.jpg
    IMG_2363.jpg
    60 KB · Views: 186
Those temps look real good giving 30 degrees on a hydronic system is good. So next question is where is the heat going.
I asume that the underside is insulated correct? You are only at a 15 degree rise from ambient OSA to the floor temp weird.
I get why they ran the tubing from the outside to the middle but maybe you should move some of the coils toward the middle that might help the heat from getting traped under the cabinets.
 
That's why I am at a loss. The picture is of the bottom of the camper upside down.Bryan stated that once the pex was installed they placed a couple of layers of foil bubble wrap, I assume to prevent heat loss then installed the bottom wood layer of the camper.

The coils are permanently sealed and not accessible. Before mounting the camper on the truck I put 2 heavy coats of a deck sealer on the exposed wood and the camper bottom is 1/2 inch above the steel deck.

My first though was to reverse the flow by swapping the supply and return lines so the center is heated first.

The side perimeter of the bottom shell floor is mounted inside a 2"x 2" 1/4 steel angle frame inside of the saddle boxes and the objective here is how best to heat the camper interior not the perimeter and inside the camper cabinets.

My second thought was to relocate the expansion tank to the same level as the heater then remove the shelf and side and top insulation of the heater. I could reinstall a stainless ventilated wire shelf

With the cabinet top open and a small 12v fan the radiant heat from the tank could be circulated. The efficiency of the water heater would go down but I think that would be off set.

Short of that a wave heater but I really want to exhaust all else first
 
The Pirelli is not in the best of shape so I will start with the sides because I have daylight through both seals where they fail to have contact. Not good in mosquito season.

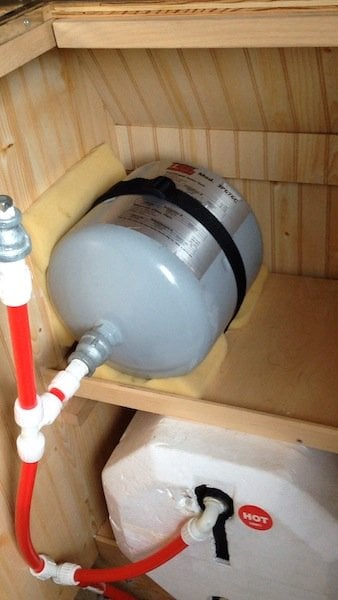
I sent Bryan a copy of the burn figures and was surprised by a very thoughtful email from Don which is below. Quite helpful and its apparent that the heater is not putting out the temps he is use to seeing. I will check with suburban

"Stephen,

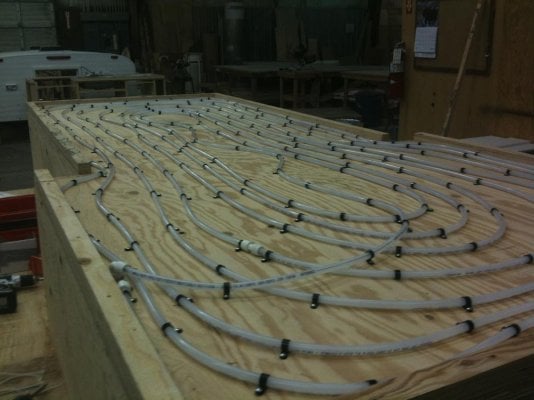
I am not totally familiar with the system Bryan installed, but I did install a similar system in an Alaskan which I used and which is now in Iceland working well and once I got the boiler/hotwater heater set to full max temperature output it worked well even at -40º camping in Montana. My system had a finned copper tube heat exchanger going around the perimeter of the bottom half at its top edge. This might be something you could accommodate into your current system. I also had an expansion tube at the high end of the system which was a “T” off of the main delivery line. This system does take space and require good air circulation up over and out other finned element.

Your low limit setting for the exiting water should be about 150º, the high limit setting should be about 190º, so it would appear your water temperature settings are too low.

The second thing I would suggest is to set the Alaskan on 3” of solid urethane foam board with a foil surface side facing up. This should trap most of the heat and reflect it up.

I had a very low amp draw circulating pump, I believe it was a March pump.

Don"
 
It's really nice to have the Wheat's participating on issues and conversations...

My sincerest thanks to both of them for their contributions!
 
It really is and I woke up to a followup from Don

"One other thought is a quick disconnect which would connect your truck engine cooling to the camper. This would provide continuous hot coolant which would circulate thru the camper system while the engine was running. It would also be a way to preheat the engine on cold days if the camper heat was running."

Rusty, I just reread your comment about molding on the edge of the Pirelli. That is not molding but the gap between the edge and the camper, the seal has just shrunk so it no longer makes contact all the time
 
Taking Don's advice on the low supply temperature I took a close look at the flue box with the burner installed, that inspection warranted the removal of the burner.

The unit is 4 years old and from the look of the exterior of the anode its original.

The picture explains the problem

Any suggestions?

.
 

Attachments

  • IMG_2385.jpg
    IMG_2385.jpg
    155.2 KB · Views: 164
I see the gap between the camper and the Pirelli...it's the small white 1/2" strip I was looking at...?

If you can separate the flue entirely from the unit...that's a good candidate for plating or high temp paint...condensation residue
 
Ok, I see said the blind man. That is actually the inside part of the bag awning rail frame.

I just got off the phone with Bryan ordering the Pirelli and got some background. The pex tubing was installed at the customers request without the heater.

The only other pex was his fathers camper but it was different and had a copper fin lined around the top perimeter of the bottom half

The customer on my camper was a Colorado builder who installed the heater. Bryan chuckled and said I guess it works better in concrete than wood and it was good to have clean hands on this one. He actually had just responded to my original inquiry and recommended putting a standard heater in.

In reality I think that despite the foil I am loosing heat out of the bottom

The flue is integral with the tank so I think at this point I am going to wire brush it clean and figure out how to treat it and see what that does, along with the Pirelli change out to my temps.
 
Some progress, wire brushed the flue and cleaned of the burner nozzle which had some residue. Re-assembled and lit it off, the supply temp climbed quickly to 140 in about 15 minutes.

But the unit shuts itself off when it reaches a pre-set temp/pressure, whatever that is. The thermostat only controls the circulation pump.

Suburban recommends that this model be de-rated 4% for every 1000 ft above MSL. The owner lived in Colorado so I have an email into him and will ask Suburban for some technical support
 
Installed matching Odessy AGM aux battery with VSR Isolator and ran aux ground to main battery ground on LH of engine block. All wire is # 2

Main has 150 amp Blue sea fuse at battery, aux does not but will when accessories are mounted.

I am looking for a good OBD2 plug to be able to scan fuel and electrical diagnostics on an iPhone. Any recomendations?

.
 

Attachments

  • IMG_2398.jpg
    IMG_2398.jpg
    89.5 KB · Views: 143
I was getting ready to start replacing my Pirelli seals when I notice that there is a slight bow on each side of the camper top midships in the vicinity of the window

Its hard to tell from the picture but its there and results in both the upper and lower seals not making contact with the lower half.

I can can compensate for that when laying the new seal but was wondering if any other owners have experienced this and if there is a fix?

.
 

Attachments

  • IMG_2437.jpg
    IMG_2437.jpg
    48.8 KB · Views: 159
no fix,

compensate for it with the pirelli...that's why this particular material is so great...it conforms to the body of the lower and retains it's elasticity for a few years.

It's not perfect and there will be small openings....the smaller the better...it's just to cut down the draft and dust....

especially all that cold air in Florida
 
I'm telling you, its gonna be in the 60's for the next couple of days.

Installed ViAir 480 compressor with 5 gallon tank on a 40 amp fuse on the aux battery for air tools, bags etc.

While its on a pressure switch I installed separate interruptor switch. Felt the bed was a dryer and easier place to access rather than under the flatbed or truck.

.
 

Attachments

  • IMG_2441.jpg
    IMG_2441.jpg
    81.4 KB · Views: 123
Back
Top Bottom