Ultimate Solar Thread

Alright, got the self tappers! #10 x 3/4". Now, what's the best way to get some sealant in with them? A small pilot hole? I will cover the screw heads and the area under the bracket as well. If a pilot hole, which size would be best for #10's? Thanks for patience and help.
 
On "blind" installations (like when trying to find an unmarked beam under a top surface), I'm always a little leary of using self tapping screws, so I do a small pilot hole, maybe 1/16" in diameter. I usually go pretty slow thru the first top surface. You might feel a small "release" (the small air gap between the two surfaces... top and beam) when you completely penetrate the top surface, right before your encounter the surface of the beam. If you are in the right place you will feel the drill bit bite into the beam, right after that "release". If you are in the wrong place, and don't feel the drill bit bite into the beam, all you have is a very tiny hole to fill with sealant or solder it closed (if that will work). And, the pilot hole will help guide the self tapping screw into the right place. Without that pilot hole, I seem to have several of the self tapping screws on a big job... wander away from the desired location.

Part way thru the installation of the self tapping screw put some sealant all the way around the screw threads and then drive it all the way home. You should have a nice round "push-out" of sealant around the head of the self tapping screw. Don't touch the sealant, you don't want to break the "push-out" bead of sealant.
 
Mines mounted just above the camper battery (which is next to the water tank). I never drill a pilot hole with self tappers. Haven't felt the need, yet.
 
Well, I finally got around to getting solar setup on my camper. Went with one of the closeout Unisolar 68-watt stick on types and a Morningstar Sunsaver 10 solar charge controller.
View attachment 14601
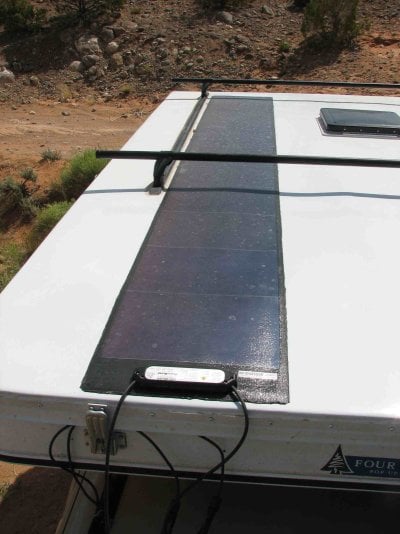
Decided to put the solar panel leads at the front in order to shorten the length of cable to my house battery, which is under the hood on the passenger side. Don't have a great mounting of the solar cable coming off of it and down the edge of the front windshield, but hopefully I can get some advice on a good alignment? Right now I'm just thinking a couple clips on the underside and front of the cabover and maybe getting the windshield replacement guys to use some of their great adhesive to mount the cable a little better alongside the front windshield when I get it replaced in the next few weeks.

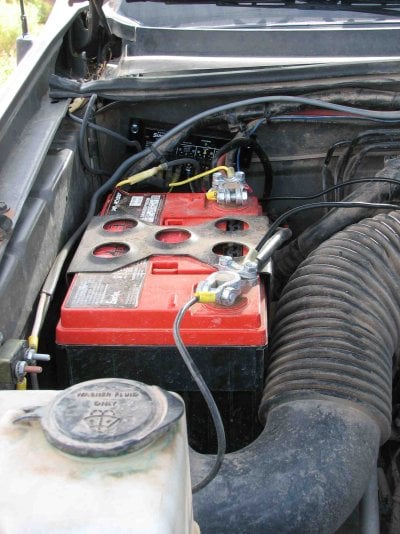
Charge controller is mounted behind the 68 amp hour house battery on the firewall of the engine compartment. ARB fridge wiring loom is connected to the "load" terminals on the charge controller. Not the best wiring job with crimp connectors, but I got fuses in-line from the panel and to the battery. Will look into borrowing a soldering iron sometime soon and making the connections better.
View attachment 14603
I'm really impressed with the performance thus far. I have been making a point to park in the sun in the driveway, but I'm definitely seeing a full battery in the early afternoon everyday. That's with my ARB 50L fridge constantly set at 39 degrees and running in 90-95 degree heat (ambient outside) in my truck cab. I do see about 50% battery in the early mornings before the sun. Placement of the panel does mean that I get shading from my canoe with it on the Yakima bars on top, unless I mount the canoe on the extreme driver side with straps barely on the load bars. I'm not expecting great performance (or even adequate voltage for running the fridge and/or charging the battery) with the canoe mounted center or with my Yakima Megawarrior cargo basket, but those aren't on very much.

I was thinking before of getting one of the AM solar 100 watt panels, but that would have increased my initial investment by about $140 dollars and would have meant months more waiting to get a solar setup installed (money and time for more involved install on roof). I may go with one of these panels in the future (even this winter), with an under cabover slide-out tray and removable option for angling with the lower sun angles when I'm depleting my house battery with the furnace. I figure I'll just unplug the 68-watt and plug in the new panel if I do go in that direction (the morningstar 10 PWM controller will still suffice).

Overall, with the great deal on the Unisolar stick on panel ($100 on simpleray.com, though without warranty with the manufacturer out of business), the PWM charge controller, solar cables and assorted other electrical components (crimp butt connectors, 10 gauge wire, fuse holders, fuses, etc.), I think I made out with an investment under $220. Upgrade of the panel will only require a new panel, itself. I think this will work for me for the near future - and give me peace of mind that my homebrew keg will stay cold in my fridge for those longer backpacks away from the truck!

-joe D.
 

Attachments

  • Unisolar Solar Panel.jpg
    Unisolar Solar Panel.jpg
    228.5 KB · Views: 222
  • Charge Controller location.jpg
    Charge Controller location.jpg
    250.3 KB · Views: 190
Just spent 7 days camping. Five days in one spot (had the jeep along for exploring) and was very happy with my 100w panel keeping everything up. Used the freezer set at 20 degrees and in general didn't try to conserve at all. Ran the lights, microwave, heater etc, and never had any trouble keeping the camper battery up. Considering the last three days were cloudy (and rainy and windy) and only got spotty sun I was pretty happy.

I had four ice chests along, rotated supplies (aka beer) as they got used up into finally one chest. I gave away ice and still had ice in the last chest when I got home.

I'm liking solar more and more all the time :cool:


How big (watts) of a microwave are you using? What size and type of inverter are you using?

Thanks in advance
 
I was just about to say 1500 watts, then I looked at my old install thread. http://www.wanderthewest.com/forum/index.php?/topic/2126/page__pid__23523__st__0&#entry23523
Its a cheapie 600 watt microwave.
 
Marshfly said:
So. All of the links in the first post are broken. What's up?
Thanks for catching and pointing this out. I'll ask an Administrator to look into this.
 
What kind of switch do I need to install if I wanted to be able to cut the power from my solar panels between the panels and the charge controller, that is, upstream of the controller. (as I threatened to do here)?
Yes, I'm ignorant :unsure: ...but seems like this one (for example) would work:

Single-pole 20-amp toggle switch
eab1e650-68ea-42e2-87eb-e99dcb892f27_400.jpg


Yes?
And this goes in the positive leg and the negative leg isn't switched -- correct?
Or is there some reason particular to solar panels that require both + and - be switched?
 
No, one leg should be fine. My suspicion is we don't need to do it. After all thats why they sell so many battery "maintainers". Besides, one use of the microwave and I draw mine down just fine :)
 
ETAV8R said:
thanks for the link. I thought I had a pretty good understanding about solar set ups, but his suggestions make a whole lot of sense to me. This is a treasure trove of info on how to fully utilize your solar equipment and avoid gettin sold more panels by salesmen. I was ready to buy one more panel to increase my power and will instead use that money to buy a different charge controller, a monitor and more efficient wire.

A must read in my opinion
 
Charging question

We have the Eagle shell so we DON'T have the IOTA converter
.
We plan to install a 100 watt panel on the roof. Do we need to manually switch off the roof panel driving down
the road because the truck alternator is running camper charger.
 
RC Pilot Jim said:
Charging question

We have the Eagle shell so we DON'T have the IOTA controler.
We plan to install a 100 watt panel on the roof. Do we need to manually switch off the roof panel driving down
the road because the truck alternator is running camper charger.
I don't know if this applies to your situation -- the part about "DON'T have the IOTA controller"... but here was a previous discussion about truck and solar both charging the battery.

I think most people who have both sources of charging (truck and solar) keep both connected all the time without problem -- I know I do.

Actually, on my most recent trip I disabled the truck-charging of the battery while I was driving because I wanted to confirm that I could run indefinitely with solar-only charging -- which I did. :)
 
Thanks Mark,
The fact that battery can receive charge from both sources at the same time sets my mind at ease. (I will read the post too)
Further thought ...solar goes through a morningstar controller that reduces the amount of current flowing to the battery as it reaches full...so probably if one drives say 6 hours - 90% of current is coming from the truck alternator, rest is coming from solar whether refer is on or not. :oops:
 

New posts - WTW

Back
Top Bottom